# SmileLine Docs Every written guide and API concept page, in full. Endpoint reference lives in the OpenAPI document at https://docs-stage.smileline.io/openapi.json. --- # Automations Source: https://docs-stage.smileline.io/guides/automations Nurture sequences and appointment reminders that message patients for you. Automations send the messages your team would otherwise have to remember: nurture for new enquiries, reminders around appointments, follow-ups after a missed visit. Everything lives in **Settings → Automations**, split into two tabs: * **Sequences** — multi-step nurture tied to a lead's journey. A sequence starts when a journey enters a stage (or is created, won or lost) and works through its steps: messages, waits, tasks, notes and stage moves. * **Reminders** — fixed cards anchored to appointments: booking confirmation, pre-visit reminders, post-visit follow-up, missed-appointment recovery and cancellation messages. New practices start with a ready-made library: default sequences for the main treatment groups and a standard set of reminder cards, all editable. ## How automations behave * **Messages thread into the inbox.** Every automated send lands in the patient's conversation like a human-sent message; replies arrive in the shared inbox as usual. * **Humans win.** When a patient replies, or a team member messages the patient manually, the running sequence stops — automation never talks over a live conversation. If a shared family contact replies and SmileLine cannot safely identify one patient, reply-sensitive sequences stop for every patient that contact represents. * **Quiet hours.** Automated SMS and WhatsApp messages only send inside the practice's send window (default Monday–Saturday, 08:00–20:00, changeable under **SEO → Reputation → Setup**). Email is exempt. * **Consent is checked at send time.** Channel opt-outs always block that channel. Under the *explicit consent* GDPR mode, an automated message holds until marketing consent is recorded for its channel. * **Edits apply immediately.** Changing a live sequence affects leads currently mid-sequence: removed steps are skipped, new steps apply to anyone who hasn't passed them, and pausing a sequence freezes everyone in place without ejecting them. A message already prepared when the pause wins is marked as cancelled in the Inbox and cannot be manually retried. After you re-enable the sequence, its next scheduled check resumes that exact step and message instead of creating a duplicate. Automated activity is always visible: sequence starts, stops and sends appear on the patient timeline, and each lead's journey shows a chip with the running sequence and a **Stop** button. --- # Appointment reminders Source: https://docs-stage.smileline.io/guides/automations/reminders Confirmations, move notices, pre-visit reminders, post-visit follow-ups and no-show recovery — anchored to the appointment. Reminders are fixed cards under **Settings → Automations → Reminders**. Each card is one message anchored to the appointment itself, so a reschedule recalculates any delivery that is still pending and a cancellation stops pending delivery. | Card | When it sends | | -------------------------------- | ------------------------------------------------------------------------------------------------------------------------- | | **Booking confirmation** | As soon as an appointment is booked. | | **Appointment moved** | When an appointment is moved to a new time. | | **Pre-visit reminder** | A set time before the appointment starts — the defaults are 48 hours (email) and 24 hours (SMS), and you can run several. | | **Post-visit follow-up** | A set time after the appointment ends. | | **Missed appointment follow-up** | When an appointment is marked as a no-show. | | **Cancellation message** | When an appointment is cancelled. | Each reminder reads as a sentence — "Send **SMS** **24** **hours** before the appointment" — followed by the template it sends. Click the template name to edit it. Automated SMS and WhatsApp reminders respect the practice send window; a reminder that comes due overnight goes out when the window opens. A WhatsApp reminder outside the 24-hour window is sent as the template's approved Meta template, with each placeholder filled from the body's merge tags in order; if a tag has no value for that patient, the reminder is skipped (Meta rejects an empty placeholder) and the skip is recorded rather than sent as a failing message. Reminders that talk about an appointment still to come — the pre-visit reminder, the booking confirmation and the appointment-moved card — are not sent once that appointment has started. A confirmation arriving after the visit tells the patient something untrue, so a reminder delayed past the appointment is marked as not sent rather than delivered late. The post-visit follow-up is unaffected by the clock: it describes something that has already happened. The missed-appointment follow-up and the cancellation message now also require the appointment to still be in the state they describe — if a no-show is corrected to attended, or a cancellation is undone, before the message goes out, it is not sent. An appointment-moved message also requires the appointment to remain both upcoming and non-terminal. ## Add and remove reminders **Add** on a card creates another reminder of that kind, and the bin icon on a row deletes one. Pre-visit and post-visit cards can hold several reminders — two pre-visit reminders (48 hours by email, 24 hours by SMS) is the usual setup. The event-driven cards hold one each, because a second would mean two messages for the same event. One practice can keep at most 100 reminder rules switched on at once. The page shows the active count. At the limit, switch off an existing rule or save the new rule switched off; archived and switched-off rules do not consume the active allowance. The channel picker on each row shows the connection the reminder will send from — *SMS · +44 7700 900123*, *Email · Dental By Design* — read from **Settings → Channels**. Email always uses the practice's built-in sender; SMS and WhatsApp use the number assigned to the appointment's location when there is one, otherwise the **All locations** number, otherwise the oldest active one. A channel with nothing connected reads **Not connected** with a link to Settings → Channels, and the reminder is skipped until a connection exists. See [Sequences](/guides/automations/sequences#which-sender-a-message-step-uses) for the full rule. Timing takes **minutes**, **hours** or **days**, and shows whichever unit represents the stored value exactly — a reminder set to 90 minutes reads as 90 minutes, not as an hour and a half rounded off. Timings save when you leave the box. The event-driven cards — appointment moved, missed appointment, cancellation — send as soon as the event happens. Use **Add a delay** on the row if you would rather wait first, for example to give a no-show an hour before you chase them. Setting the delay back to 0 returns them to sending immediately. Card edits apply when new reminder records are created. A reminder already scheduled keeps the rule timing, channel and template content captured at the time it was scheduled. Switching a card off cancels deliveries that have not started. Deleting a reminder archives the rule and cancels only deliveries that have not started. Existing send-history and idempotency records are retained, so an old delivery remains auditable and cannot be recreated by deleting its rule. There is no undo for a deleted reminder — you would need to add it again, and the new one starts with its own delivery history. SmileLine does not retry a technically broken reminder forever. After ten consecutive processing failures, that reminder delivery is skipped and the patient timeline records that it needs staff review. Other reminders keep their own independent delivery state. There is a matching limit on rescheduling. An appointment whose time keeps changing — usually one being edited repeatedly in a connected practice management system — re-arms its reminders up to twenty times. After that the reminder stops following the appointment, and the patient timeline records that it needs staff review. ## Reschedules and cancellations Reminders follow the appointment record: * **Rescheduled** — reminders recompute against the new time. This includes a reminder whose send time had already passed: booking an appointment for tomorrow does not permanently lose its 48-hour reminder, and moving that appointment further out arms it again. A reminder that genuinely reached the patient stays in the history and is not sent again; one that never made it out to a provider is re-armed for the new time. The **Appointment moved** card, if enabled, tells the patient the new time — every time the appointment moves, not just the first. * **Moved into the past** — a reminder recomputed against a time that has already passed is not sent. Recompute follows the live appointment, so the check is made against the new time rather than the one the reminder was written for. * **Cancelled** — pending reminders are cancelled and the cancellation message (if enabled) goes out. * **No-show** — remaining reminders are cancelled and the missed-appointment follow-up goes out. * **PMS correction waiting** — if the PMS contradicts a backwards or terminal appointment fact, a reminder that comes due stops at the final provider boundary and is marked as not sent until an appointment editor resolves the correction. Keeping SmileLine's fact re-arms every interrupted reminder that is still relevant. Accepting the PMS fact recomputes time-anchored reminders, but does not create a retrospective booking, move, cancellation or no-show announcement. A live PMS update that resolves the contradiction follows the same relevance rules. A historical backfill is different: importing history never sends a patient message. It records the interrupted occurrence as **Not sent — historical PMS reconciliation**, while leaving the reminder eligible for a later live reschedule. That old message cannot be retried from the Inbox; a future live change creates a fresh occurrence with current appointment content. ## Practice management systems If your PMS (for example Dentally) is connected, it probably already sends appointment reminders. To avoid double-messaging patients, SmileLine switches every reminder card **off** when a PMS connection activates. Turn a card back on only after switching the equivalent reminder off in the PMS — disconnecting the PMS does not switch them back on automatically. Appointments that arrive from the PMS get the same reminders as ones booked in SmileLine — the cards make no distinction once they're enabled. See [PMS integrations](/guides/settings/integrations#review-appointment-corrections) for the correction review workflow. A reminder stopped by that review remains recoverable. If it is still relevant, resolving the correction re-arms it with a new delivery generation. If it has become irrelevant while staff review the correction, the failed ledger remains eligible for a later appointment reschedule instead of being made permanently terminal. --- # Sequences Source: https://docs-stage.smileline.io/guides/automations/sequences Multi-step nurture that starts when a lead enters a stage and stops the moment a human takes over. A sequence is an ordered list of steps that runs for each journey it matches. You'll usually have one per treatment group per stage — "Implant enquiry nurture" on the **New** stage, for example. ## How a sequence is chosen When a journey enters a stage (or is created, won or lost), SmileLine looks for one enabled sequence with that trigger: 1. A sequence **bound to the journey's treatment** wins. 2. Otherwise the **default sequence** (one with no treatments selected) runs. 3. No match — nothing sends. One enabled sequence per trigger, stage and treatment: the editor blocks overlaps and tells you which sequence already covers the combination. ## The sequence list **Settings → Automations → Sequences** lists each sequence once, with the treatments it covers shown as chips on its row and the number of leads currently mid-sequence beside them. The **Active | Archived** switch above the list decides which set you're looking at. Archiving a sequence stops it matching new leads and stops every lead currently mid-sequence, so you're asked to confirm — the confirmation tells you how many leads that affects. ## Create a sequence Go to **Settings → Automations** and click **New sequence** (or click the ⚡ icon on a stage column of the journeys board). Name it, pick when it **starts** — *a lead enters* a stage, *a new enquiry arrives*, *a lead is won* or *is lost* — and which **treatments** it covers. Leave treatments empty to make it the default. Add steps with **Add step**. Each step is one of four kinds (below) and has its own time. ## Reading the steps The steps are a schedule. Every step has one time, **counted from the moment the sequence starts** — *Day 0*, *Day 2*, *4 hours*, *Day 1 · 4 hours* — and the list keeps itself sorted by that time. Two steps at the same time go out together: an email and an SMS both at *Day 0* is exactly how you send on two channels at once. Open a step to change when it runs: a number, a unit (minutes, hours or days) *after the sequence starts*, and **Only during opening hours**. Change the time and the step moves to its place in the list. A step marked **opening hours** can only ever land later than its time, never earlier — a *Day 2* step whose second day is a Sunday goes out on Monday morning. Set it on a *Day 0* step to send the first message during opening hours only. A step you haven't finished — a message with no template, a stage move with no stage — isn't saved, and nothing else on the list saves either until you finish or remove it. The step is marked **Not saved yet** and a banner at the top of the list says what's holding it up. ## Step kinds | Step | What it does | | ------------------ | ------------------------------------------------------------------------------------------------------------------------------------------------------------------------------- | | **Send a message** | Sends a template by email, SMS or WhatsApp. WhatsApp steps need a template with an approved Meta (HSM) reference. | | **Create a task** | Creates a task (assigned to the journey owner or a chosen team member), with an optional note for whoever picks it up. | | **Move to stage** | Moves the journey to another stage — if that stage has its own sequence, the lead continues there. This is how sequences chain. A sequence can't move leads into its own stage. | | **Add a note** | Appends an internal note to the patient timeline. | Each step has its own pause switch — a paused step is marked **Skipped** and passed over without stopping the sequence. ### Which sender a message step uses The **Channel** picker shows each channel with the connection it will actually send from — *Email · Dental By Design*, *SMS · +44 7700 900123* — read from **Settings → Channels**. A step stores the channel, not the connection, so a sequence built before a number is connected starts sending the moment one is. * **Email** always sends from the practice's built-in sender, on your verified sending domain when you have one. A connected Gmail or Outlook mailbox is for the inbox only and is never used by a sequence. * **SMS and WhatsApp** use the connection assigned to the patient's location when there is one, otherwise the connection set to **All locations**, otherwise the oldest active number. A practice with one number never has to think about this. A channel with nothing connected reads **SMS · Not connected** in the picker, the step shows a **SMS not connected** badge on its row and on the sequence in the list, and the step is skipped for every lead until a connection exists. The sequence keeps running its other steps. The picker links straight to **Settings → Channels** to fix it. Sequence messages are marketing messages. Before every send, SmileLine checks the patient's current preference for that channel against the practice's outbound-marketing policy. Missing or withdrawn evidence holds the step for a later recheck; it is never inferred from the enquiry itself. Marketing SMS includes the practice identity and STOP instruction, and marketing email includes an unsubscribe link and one-click unsubscribe headers. Appointment reminders remain transactional and use their separate reminder rules. ## When a sequence stops A lead drops out of a sequence when: * the **patient replies** on any channel (if *Stops early when the patient replies* is on — the default); * a **team member messages** the patient manually — the human owns the conversation now; * the **journey leaves the stage** the sequence is scoped to (and, if *Stops early when the lead moves to another stage* is on, on any stage change); * the journey is **won or lost**, the patient **opts out**, or someone presses **Stop** on the lead's enrollment chip. A lead never runs the same sequence twice at once, but can re-enter it after a past run ended — a lead that regresses and comes back through the stage gets nurtured again. Sequences send from your connected channels (**Settings → Channels**). A step whose channel has no active connection — or whose patient has no email or mobile number — is skipped and logged on the timeline, and the sequence continues. If SmileLine repeatedly cannot process a sequence step because of a technical error, it does not retry forever. After ten consecutive failed attempts, the sequence stops and the patient timeline shows **Sequence stopped for review** so a team member can investigate and follow up manually. A later matching journey trigger can create a fresh sequence run; the failed run itself stays stopped for audit history. ## Editing templates Message steps use templates from **Settings → Templates**, edited through the same dialog as the library — click **Edit template** on the step. Email templates open in a visual editor: plain paragraphs read like a personal email, and typing `/` inserts layout blocks (headings, lists, buttons, dividers, sections, columns) when you want a designed one. **Image** below the editor adds a picture from your practice's image library. Press `Escape` once to close the `/` menu, and again to close the dialog. The canvas is 600px wide — the email standard — and shrinks to fit a narrow screen. Prefer to write the markup yourself? Switch **Visual** to **HTML** above the editor and paste your own HTML, with a preview tab beside it. See [Message templates](/guides/inbox/templates) for how the two modes differ. Merge tags like `{{patient.firstName}}` and `{{location.phone}}` are literal text in the template; they resolve when each message sends. Insert them from the chip row under the editor, in either mode. --- # Browser extension Source: https://docs-stage.smileline.io/guides/browser-extension The SmileLine Chrome extension puts a free on-page SEO report, link analysis and Google result positions one click away — and, signed in, your practice dialer. The SmileLine extension for Chrome is a free SEO toolbar. Open it on any page — your own site, a competitor's, a directory listing — and it reads what search engines see. None of the toolbar features needs a SmileLine account, and while you are signed out the extension sends nothing about your browsing to SmileLine. Signed in with the SEO & Ads add-on, one feature does talk to SmileLine: the domain-metrics overlay on Google results sends the visible result hostnames to your account to look up their authority scores (see [Domain metrics](#domain-metrics-seo--ads-add-on)). Nothing else about your browsing is sent. Practices on SmileLine Voice can also sign the extension into their account and take calls straight from the toolbar — see [the dialer](#the-dialer) below. ## Install Open the SmileLine listing on the Chrome Web Store and click **Add to Chrome**. Click the puzzle-piece icon in the Chrome toolbar and pin **SmileLine** so it stays visible. ## The on-page report Open any page and click the SmileLine icon. The popup analyses the page in place: * **Findings** — the same checks SmileLine's site audit runs: missing or badly sized titles and meta descriptions, missing or duplicate H1s, missing canonical, pages blocked from indexing, missing local business schema. * **On-page facts** — title and meta description lengths, word count, heading structure, canonical URL, meta robots, robots.txt verdict for this page, structured-data types, and hreflang entries. * **Heading outline** — every H1–H6 in order, indented by level. The report reads the page as rendered in your tab. It cannot see the server's HTTP status or response headers, so those checks are left out rather than guessed. ## Link analysis The **Links** section counts internal, external, nofollow, sponsored and UGC links, and can highlight each kind directly on the page — click a category to outline every matching link, click again to turn it off. **Check internal links** probes the page's same-origin links (up to 100) and lists any that return an error, feeding the broken-link finding in the report. External links can't be checked from inside the browser. ## Google result positions On google.com and google.co.uk searches, the extension numbers each organic result so you can read positions at a glance — useful when you're checking where your practice ranks for "dentist in ⟨your town⟩" without counting rows by hand. ### Domain metrics (SEO & Ads add-on) Signed in to a practice with the **SEO & Ads** add-on, each numbered result also shows the domain's authority metrics — domain rank (0–1000), backlinks, and referring domains — under its title. Lookups come out of your practice's monthly SEO allowance; results are cached for two weeks, so repeat searches are free. Without the add-on (or signed out) the numbering still works and nothing else is shown. ## The dialer With **SmileLine Voice** enabled for your practice, the extension is also a softphone that stays registered while Chrome is open. Right-click the SmileLine icon and choose **Options** (or click **Sign in** in the popup). Pick your practice region and click **Sign in to SmileLine** — a SmileLine window asks you to approve the connection for your practice. Anyone whose role can use the dialer may connect. Click **Enable calling (microphone)** and allow the microphone when Chrome asks. This is needed once per browser. Once connected, the popup shows the dialer above the SEO report: * **Incoming calls** ring with a Chrome notification — with the patient's name when SmileLine recognises the number — and can be answered or declined from the notification or the popup. * **Outbound calls** start from the popup's dial pad, or by selecting a phone number on any web page, right-clicking it and choosing **Call with SmileLine**. * **In a call** you can mute, hold, hang up and send key tones. Closing the popup does not end the call. * **DND** pauses ringing on this browser without signing out; calls continue to ring your other SmileLine devices. Signing out disconnects this browser's calling endpoint entirely — calls stop ringing here until you sign in again. While you are on a call the popup offers **Transfer**: it lists every colleague who has calling set up, with their do-not-disturb state, and hands the caller to that colleague's most recently used device straight away. A ringing or live call in the popup also shows **Open in Smileline**, which opens the matched patient's record — or the desk with the live call — in a new tab. When a call that was ringing you is answered by a colleague, the popup says **Taken by** and their name for a moment instead. --- # Diary Source: https://docs-stage.smileline.io/guides/calendar/diary The clinical workspace's day — a column per practitioner or room on an hour rail shaded by the rota, a date picker that shows how busy each day is, booking by click or drag, editing in the card, a 3-day view, and a short-notice gap filler. Open **Day** in the clinical workspace. The whole page is the diary: one line of controls above the grid, no heading. The page's address carries the date and the view, so a day can be bookmarked or shared. ## The controls From left to right: **previous** and **next** (a day, or three weekdays in the 3-day view), **Today**, the date, and the jumps **+1W**, **+3M** and **+6M** (a week, three and six months on — the usual recalls); then **Day / 3 days / List**, the site (only with more than one), and icons for **Practitioners / Rooms** (only when the site has rooms), **Columns shown** (the eye), the colour mode, **Short notice** and print. Hover an icon for its name. In the grid you book from the slots themselves; the **List** view, which has none, keeps a **+ Book** button. Each column header shows its booking count. On the keyboard, **←** and **→** move a day (three weekdays in the 3-day view) and **t** returns to today. The eye hides and shows columns and stays in the same place in every view: it lists practitioners, or the rooms in the room view. Its badge counts what is hidden. ## Finding a free day Click the date. Three months open at once; the arrows page a month at a time and **Today** returns to today. * Every day is tinted by how much of its bookable time is taken — green under 40 %, yellow under 70 %, orange under 90 %, red when it is full — and a small bar under the number shows the same thing without colour. * Bookable time is each practitioner's rota inside the site's opening hours, less approved time off; someone with no rota counts the site's hours. Cancelled and no-show appointments do not count as booked. * A grey day is a closed day or one where nobody is working. * Hover a day for the figures: **6h 40m free of 8h · 3 booked**. * The tint counts the practitioners you are showing. Hide the others with the eye to see one person's free days. Click a day to open it. The arrow keys move between days. ## Reading the grid * Each column is a practitioner (or a room; in the 3-day view, a practitioner under each day), headed by their avatar — their initials on their diary colour, the same one the eye menu lists them by. A former practitioner who still holds a booking keeps a column; a booking with no practitioner sits under **Unassigned**. * Grey time is outside the practitioner's rota or the site's opening hours; hatched time is a closed day or an approved absence. A day a practitioner's rota does not cover — a Saturday for someone who works Monday to Friday — is grey from top to bottom. A practitioner without a rota at all is not shaded. * A card shows the start time, the patient, the appointment type and the note. The whole card is coloured: by status out of the box (pending yellow, booked salmon, confirmed green, arrived blue, in the chair indigo, completed grey, no-show red). Small glyphs mark a first visit, lab work still out, a mobile number on file, an appointment managed by an external practice management system, and an online booking. Hover a card for the full summary. * The colour mode switches the cards to the practitioner's, the room's or the appointment type's colour from Settings; a resource without a colour keeps the status colour, and the status's initial sits at the right of the card's first line. * One red line marks the current time across today's columns. ## Booking from the grid Click an empty slot to book it, or drag down (or up) over empty time to set the length as well. The slot stays outlined on the grid and the booking form opens beside it — where an appointment's card opens — with the date, the time (to five minutes), the length you dragged, and the practitioner or room of that column already chosen. The outline shows the times and the length — and the patient's name once you have chosen one — and is still the booking: drag it to another time or column, or drag its bottom edge for more or fewer minutes, and the form follows — and changing the date, time, minutes, practitioner or room in the form moves the outline. Click anywhere else, or **Cancel**, to drop it. On a touch screen, tap; a drag scrolls the diary. **Location** starts as the site the diary is on — change it in the form and the rooms on offer follow. A practitioner is always required; a site that requires a room asks for one. A pick list with eight or more entries has a search box at the top. The same form opens in a dialog from the **List** view's **+ Book** and from **Short notice**, and sits on the patient record. The outline turns red when it runs into something: another booking of that practitioner (or of that room), or grey or hatched time — outside the rota or the site's hours, a closed day, an absence. **Book** then asks first. Over a booking, owners and managers give a reason the record keeps, as when a card is dragged onto a taken slot; nobody else can book there. Over grey or hatched time, **Book** becomes **Outside working hours — use anyway** and a second press books; moving the outline asks again. Beside the search, **New patient** adds someone who is not on file yet and puts them straight into the booking; whatever you had typed in the search — a name, an email or a number — is already filled in. The form also takes: * **Status** — **Booked**, or **Confirmed** when the patient has already said yes. * **Lab work** — **None required**, one of the patient's lab cases still on its way (this visit becomes its fit appointment), or **New lab case…**, which opens the lab case form once the appointment is booked. * **Short notice list** — **Yes** also puts the patient on the [waiting list](/guides/patients/letters-and-waitlist) as a short-notice request for anything sooner than this visit. Taking an earlier gap from **Short notice** books a new appointment; it does not move this one. Cancel the later visit once the earlier one is booked. **Lab work** and **Short notice list** appear only for members who can read lab cases and the waiting list. Consultations booked from the Today queue land here too: the booked step of the [outcome wizard](/guides/today/outcomes-and-undo#book-the-slot-without-leaving-today) opens this grid in a dialog, and the slot the caller picks becomes an appointment with the journey's treatment on the card. ## Moving, resizing and chairside statuses * Drag a card to another time or column. A dashed outline shows where it will land, snapped to five minutes, and carries the patient's name, the new times and the length. If that slot is already taken the card returns and the diary says so; owners and managers are offered an overbook with a reason the record keeps. A change made elsewhere in the meantime refreshes the diary instead. * Drag the bottom edge of a card to change its length. * Click a card to edit it where it is: the date and time, the appointment type, the length, the practitioner, the room, lab work, the short notice list and the note, then **Save**. **Status** offers the next chairside step (**Confirmed**, **Arrived**, **In chair**, **Fulfilled**, **No-show**) and applies as soon as you choose it, without **Save**. **Cancel appointment** asks for a reason; the icon beside the name opens the patient. * Click anywhere outside the card to close it; that click never starts a booking. * A booking an external practice management system manages cannot be moved or edited here: its card shows the details and offers only **Confirmed**; the provider owns its time and outcome. Fulfilled, cancelled and no-show bookings stay in place. * A visit shared by several practitioners appears in each of their columns and moves in time only. ## 3-day view The chosen day and the next two diary days, each split into a narrow column per practitioner (initials in the header, the full name on hover). Hide practitioners with the eye to widen the rest. A Saturday or Sunday appears only when it holds a booking or a rota window, so a Thursday shows Thursday, Friday and Monday. The rail runs 07:30–20:30 and stretches to anything earlier or later. Whenever today is on screen, the diary opens scrolled to the current time. ## Short notice **Short notice** lists the free time of the days on screen that fits patients on the [waiting list](/guides/patients/letters-and-waitlist): short-notice requests first, matched to the requested practitioner, the appointment type's length and buffers, and the patient's earliest and latest dates. **Book** opens the booking dialog on that gap; once booked, the waiting-list request is marked booked. If that last step fails, the booking stands and the diary offers **Retry** rather than booking twice. The gap finder reads this site's diary. A clinician booked at another site at that time can still be offered until the availability engine is shared with the diary. ## Printing Print the page for the day sheet: the sidebar and the controls are left out and the grid prints landscape. --- # Calendar Source: https://docs-stage.smileline.io/guides/calendar/overview A month at a glance — results on past days, workload on future days, and a drill-down behind every date. The Calendar shows your practice month as a grid you can read in seconds: what each past day produced, and what each future day holds. Use it to spot busy days ahead and to review how a day, a week or the whole month went. Open **Calendar** from the sidebar. ![The month grid with results on past days and workload on future days](/screenshots/calendar/month-grid.png) ## Reading the grid Each cell is one practice day (weeks start on Monday, times in your practice's timezone). What a cell shows depends on where it sits relative to today: * **Past days show results:** revenue won that day, journeys won and lost, new leads, and how many leads were contacted. * **Future days show workload:** appointments taking place and tasks due. * **Today** (outlined) shows both. Days with nothing recorded stay blank apart from the date, so the busy days stand out. Metric meanings: | Metric | Counts | | ----------- | ------------------------------------------------------------ | | Revenue won | Deal value of journeys won that day | | won / lost | Journeys closed as won or lost that day | | leads | New patients created that day | | contacted | Distinct patients reached by an outbound touch that day | | appts | Appointments taking place that day (cancelled ones excluded) | | tasks | Open tasks due that day | The header sums the visible month — the same numbers with the same icons, so it doubles as a legend. ## Moving around Use the arrow buttons next to the month name to step between months. When you're viewing a different month, a **Today** button appears to jump back to the current one. The grid stays live: as leads arrive, tasks complete and journeys close, the numbers refresh on their own. ## Open a day's detail Click any day to see everything behind its numbers. ![The day detail dialog listing leads, contacts, appointments and tasks](/screenshots/calendar/day-detail.png) The dialog is a fixed size whichever tab you are on, so switching between them never resizes the panel. It opens on a row of tabs — **Overview**, **Schedule**, **Bookings**, **Leads & contacts**, **Journeys** and **Tasks**. The list tabs show their row count, and a tab only appears when it has something in it, so the strip doubles as a summary of what the day contains. ### The four cards **Overview** opens with four cards. Two of them pair figures that only mean something next to each other: * **Appointments** — how many took place. * **Booked time** — the chair time the day held, with the average appointment length beside it. * **New leads** — how many arrived, with how many were contacted beside it. * **Revenue won** — the value of journeys closed as won. ### How the day compares Most cards carry a small green or red badge showing how the day compares with the rest of the month you're looking at. The comparison uses two different baselines, because the two kinds of number behave differently: * **New leads and revenue won** are compared against the month's days **so far** — future days haven't happened yet, and counting them as zeroes would make every past day look like a record. * **Appointments** are compared against **every** day of the month, since they are booked ahead. **Booked time** is the chair time the day held — cancelled appointments released their slot and are left out, a no-show held its slot and is counted, which is the same rule the **Appointments** card uses. Hover a badge to see which baseline it used. Ranges of several days show totals with no badge — a multi-day total isn't comparable to a daily average. ### Breakdowns Under the cards, up to four breakdowns of the same day appear two to a row — each only when there's something to show. Every one reads the same way: a row per category with its share of the day, the count on the right and its percentage beside it. * **Appointment status** — the mix of booked, confirmed, fulfilled, cancelled and no-show, each status keeping its own colour. This panel counts cancelled appointments, so its total can be higher than the **Appointments** card, which matches the grid cell and leaves them out. * **Contacts by channel** — calls, SMS, email, WhatsApp and recorded outcomes. * **New leads by source** — where the day's leads came from. * **Won by treatment** — the day's won value split by treatment. ### Schedule The **Schedule** tab draws the day as an hour-by-hour rail with each appointment as a block sized by its real length, coloured by status. A cancelled appointment gave its slot back, so it's drawn hollow with a dashed outline; a no-show held its slot and stays solid. Two blocks side by side means two appointments at the same time. Click a block to open that patient's record. The rail spans from the first booking to the last. The tab is absent on a day with no bookings, and on a multi-day range — a merged range has no single day's clock to draw. ### The row tabs The remaining tabs list the rows behind the numbers: * **Bookings** — every appointment with a status badge (**Booked**, **Confirmed**, **Fulfilled**, **Cancelled**, **No-show**, and so on) and its time. * **Leads & contacts** — each new patient with their lead source and arrival time, then every outbound touch with its channel. * **Journeys** — journeys closed as won or lost that day, with their value. * **Tasks** — open tasks due that day. Every row with a patient links straight to their record — click through to act on what you see. Opening the calendar from a booking notification lands you on **Bookings** with that appointment highlighted. ## Look at a range of days To review more than one day at once, drag across the grid with the mouse, or click a day and then `Shift`-click another. The same dialog opens with the stats summed over the range and the lists merged in date order, each row labelled with its day. The **Schedule** tab is absent — a merged range has no single day's clock to draw. A range can span up to 45 days, and each section in the dialog lists up to 200 rows — a note appears if anything was cut off, and in that case the schedule and breakdowns cover the rows shown rather than the whole range. On a phone, the month renders as a tappable day list instead of a grid; tap a day to open its detail, where the schedule, breakdowns and lists stack in one column. --- # AI assistant Source: https://docs-stage.smileline.io/guides/chat-widget/ai-assistant Let the widget answer dental and practice questions, qualify leads, and connect booking-ready visitors to your online funnel. By the end of this page your widget will answer visitors' questions — prices, opening hours, what an implant consultation involves — grounded in your own website and documents, and hand the conversation to your team whenever a human should take over. ## What you need AI answers are part of the **AI assistant** add-on: **£99/month** for GBP practices or **$129/month** for USD practices. The EUR catalogue has not been approved yet, so EUR practices cannot enable the add-on until SmileLine support confirms pricing. The add-on also unlocks reply suggestions and thread summaries in the Inbox. Enable it under **Settings → Billing**, then flip **AI answers** on in **Settings → Chat widget**. ## How it answers When a visitor types a free-text question, the assistant: * retrieves the most relevant passages from your **knowledge base** and answers from them — it never invents prices or availability. If your knowledge doesn't cover the question, it says the team will confirm and asks for contact details instead; * answers general dentistry questions at patient-education level and recommends a consultation for anything personal — it never diagnoses; * collects the visitor's name and number naturally during the conversation and saves the lead exactly like the guided qualifier does; * adds a **Book an appointment** button to its reply when the visitor asks to book and [online booking](/guides/online-booking/setup) is live with at least one bookable appointment type. The button opens the full booking funnel in a new tab; it does not preselect a visit type or collect booking details in chat; * hands off to your team when the visitor asks for a person, mentions pain, or cannot use online booking — the thread flips to human mode and stays with your team. Pain and human requests always take priority over a booking button. Everything it says is in the Inbox thread, marked as assistant messages. The visitor sees a typing indicator from the moment their message lands until the reply arrives; a reply can take some seconds when the assistant reads your knowledge base and checks online booking first. The booking button is offered only in the reply to an explicit booking request; it is not a permanent shortcut in the widget. If online booking is paused, has no bookable appointment types, or becomes unavailable before the reply arrives, the assistant falls back to your team instead. ## Build the knowledge base The **Knowledge base** card on **Settings → Chat widget** feeds the assistant. Three source types: * **Website crawl** — enter your practice site's address; SmileLine reads up to 150 pages on that site's apex/`www` host pair and refreshes them weekly. Re-crawl on demand after big site updates. Links that leave that pair or fail the public-destination safety policy are skipped. * **Documents** — upload PDFs, text, Markdown or HTML files (price lists, patient information leaflets), 10 MB each. * **Snippets** — quick free-text facts: opening hours, parking, finance options. Snippets are the fastest way to teach it something. Each source shows its ingestion status and how many passages it contributed. Removing a source takes its knowledge out of the assistant immediately. For document sources, the uploaded file is also queued for permanent deletion from storage. Scanned PDFs with no selectable text can't be read — paste the content as a snippet instead. ## Test before you switch it on Click **Test the assistant** to chat against your current knowledge base without anything reaching your website or Inbox. Ask what a visitor would — "How much is whitening?", "Are you open Saturdays?" — and check the answers cite the sources you expect. The assistant is suppressed the moment a team member replies in a thread — once a human joins, the AI stays out of that conversation. --- # Guided qualifier Source: https://docs-stage.smileline.io/guides/chat-widget/scripted-flow Configure the treatment picker, qualifying questions and contact capture the widget walks visitors through. By the end of this page your widget will qualify enquiries the way your front desk would: which treatment, how urgent, and how to reach them — and file the result as a journey on your board. ## How the flow works The qualifier is a short, scripted conversation: 1. The greeting offers your configured treatments as tappable chips (plus "Something else"). 2. Picking a treatment asks up to three qualifying questions you define. 3. The widget collects the visitor's **name**, **phone number** (validated) and **email** (skippable), then asks for marketing consent. 4. The lead is created: patient matched or created, a journey opened for the mapped treatment, the whole Q\&A saved as a note, and an attribution touch recorded with intake method **chat**. If the visitor abandons midway, the conversation still sits in your Inbox with everything they said so far — nothing is lost. ## Configure treatments and questions On **Settings → Chat widget**, the **Guided qualifier** card lists the flow's treatments: Click **Add treatment** and give the chip a **Button label** — this is patient-facing wording ("Straighter teeth"), not your internal catalog name. Pick which catalog treatment it **opens a journey for**. Choose **Enquiry only** to capture the lead without opening a journey. Add up to three questions. Fill **Answer chips** with comma-separated options for one-tap answers, or leave it blank for a free-text reply. Good qualifying questions are the ones your treatment coordinators ask first — "How many teeth are you missing?", "When would you like to start?". The answers arrive as a note on the patient's timeline, so whoever picks up the lead has the context. No treatments configured? The widget skips the picker and goes straight to contact capture — it still works as a lead-capture form. ## Consent and the capture step The consent line shown before the final step and the thank-you message are part of the flow configuration. Visitors answer with the two chips, or by typing **yes** or **no** (any capitalisation); anything else re-asks. Consent is recorded on the patient's marketing-consent flag — under explicit-consent GDPR mode, automated messages hold until it's granted. If a message fails to send — a dropped connection, a busy moment — the bubble stays in the thread with a **Didn't send — tap to retry** link. Retrying resumes the same step; it never creates a duplicate answer or a duplicate lead. While a reply is on its way the widget shows **Sending…**, and **Still working…** if it takes longer than usual. If SmileLine itself is briefly unavailable mid-conversation, the visitor's answers and messages are stored the moment they arrive and delivered once service returns, whether or not the visitor taps retry. An answer that only lands after the visitor has already moved on is placed in the thread as an ordinary message rather than applied to a question the flow has passed, so nothing is filed against the wrong step. ## What happens after the flow Once the details are captured: * Without the AI assistant, the thread flips to **human** mode — further visitor messages simply wait in your Inbox. * With the AI assistant enabled, the visitor can keep asking questions and the assistant answers — see [AI assistant](/guides/chat-widget/ai-assistant). --- # Set up the chat widget Source: https://docs-stage.smileline.io/guides/chat-widget/setup Add the SmileLine messenger to your practice website with one line of code. By the end of this page the SmileLine chat widget will be live on your practice website, branded to match, and every conversation it captures will land in your shared [Inbox](/guides/inbox/conversations). ## What the widget does The chat widget is a messenger that sits in the corner of your practice website. Out of the box it runs a guided qualifier: visitors pick a treatment, answer a couple of questions, and leave their contact details — the lead lands on your journeys board like any other enquiry, with full [attribution](/guides/lead-capture/attribution). With the AI assistant add-on it also answers free-text questions from your own knowledge base (see [AI assistant](/guides/chat-widget/ai-assistant)). Every message — the visitor's answers, the bot's prompts, your team's replies — is one conversation in the Inbox on the **Live chat** channel. Replies you send from the Inbox appear in the visitor's widget instantly. ## Install it Go to **Settings → Chat widget** and click **Set up the chat widget**. SmileLine creates the widget, its Live chat channel, and a hidden capture hook for its leads. Copy the snippet from the **Install** card and paste it before the closing `` tag on every page of your website (or into your site builder's "custom scripts" slot): ```html ``` The EU hostname above is illustrative. Copy the generated snippet exactly: US organizations use `widget-us.smileline.io`. Flip **Widget live** on. The launcher appears on your site within a few minutes. On each page it mounts once the page's own content is ready and the browser has an idle moment — at most 1.5 seconds after that — and loads its configuration in the background, so it never slows your site down. The key in the snippet identifies your practice — no login or API key is needed on your website. Switching **Widget live** off makes the snippet render nothing without touching your site. ## Brand it The **Appearance** card controls how the messenger looks: * **Display name** — shown in the panel header, usually your practice name. * **Greeting** — the first message visitors see. * **Brand colour** — drives the launcher, visitor bubbles and the send button. * **Reply-time copy** — the expectation line under your name, e.g. "Typically replies in a few minutes". * **Position** — bottom right or bottom left. Changes reach embedded widgets within about a minute. ## Preview it live A working copy of your messenger sits in the corner of the **Settings → Chat widget** page. Click its launcher to open it, exactly as a visitor would. The launcher stays in the corner while the messenger is open — it turns into a chevron, and clicking it again closes the panel. The preview follows the form as you type, before you save: rename the practice, change the brand colour or move the widget to the left and it updates immediately. You can also click straight through the guided qualifier to check the treatments and questions read well. Nothing in the preview is real. It creates no conversation in your Inbox and captures no lead, so anything you type into it is discarded. AI answers and the online-booking button are not part of it — use **Test the assistant** on the same page for those. ## Proactive messages Proactive messages open the conversation for you on specific pages — a visitor reading your implants page gets a tailored line after a few seconds. Add them on the **Proactive messages** card: * **Page matches** — a fragment of the page URL, with `*` as a wildcard: `/treatments/implants*`. * **Message** — the teaser bubble text. * **Delay** — seconds after the widget has loaded before the teaser appears. Visitors can dismiss a teaser; it won't reappear during that browsing session. ## Replying from the Inbox Widget conversations behave like any other channel: they appear in the Inbox as **Live chat** threads, unread counts tick up as visitors write, and anything your team types is pushed to the visitor's browser in real time with the sender's first name — the "a human has joined" moment. The contact panel shows which page the visitor is chatting from. Templates can't be sent to the widget — they're built for email, SMS and WhatsApp. Attachments can. ## Sending files Visitors can send you photos and documents from the messenger — the thing people most often want to do first ("here's the tooth"). Three ways, all of them working the same: * **The paperclip** next to the message box opens their file picker. * **Paste** — a screenshot copied to the clipboard drops straight into the message box. * **Drag and drop** anywhere onto the open messenger. Files appear as thumbnails above the message box before sending, each with an × to remove it. A message can carry files with or without any text, and up to 16 MiB per file. Your team can reply with a file the same way, from the Inbox's own paperclip. Images show inline in both directions; everything else appears as a named download. While the guided qualifier is still running, a file is delivered to your Inbox straight away but doesn't count as an answer — the widget carries on asking the question it was on. That way a photo sent before someone has given their phone number still reaches you. --- # Request and track deposits Source: https://docs-stage.smileline.io/guides/deposits/requests Send a deposit payment link mid-call, record cash payments, and handle refunds and no-shows. A deposit is requested **before the consultation is booked** — it secures the booking without blocking it. If the patient prefers to pay at the practice, record that instead; the booking never waits on the link. Patients who book themselves through [online booking](/guides/online-booking/setup) pay their deposit inside the booking flow — those deposits appear here automatically with the same refund and no-show lifecycle. If an online-booking hold expires before payment, SmileLine cancels the hold, releases the diary slot and cancels the pending payment request together. If the practice has already recorded an in-person payment, or an attempted refund has failed, the slot is still released but the money record is kept and a **Booking payment review** task is created for staff. A paid or in-progress refund is left with its automatic booking or refund process instead of being silently cancelled. The same review task is created if the practice management system rejects a slot after money has been collected. A booking-payment review is durable and separate from the editable task text. Cancelling or editing its task never causes the cancelled paid appointment to reappear. Staff must explicitly arrange a replacement booking or refund the Stripe payment; a practice-collected payment is refunded outside Stripe. ## Send a deposit request From the **Today** queue or a patient's record, open the **Booking deposit** block and click **Request deposit**. On Today the block also sits on the outcome wizard's booked step, under the value, so the link goes out while the consultation is being booked. Check the amount. It's prefilled from the treatment's override (or the practice default) and can be adjusted for this patient. The amount is locked once sent and must be between 1.00 and 5,000.00 in the practice's accounting currency. Pick the channels. Your last selection is remembered, and channels the patient can't receive (no mobile number, no email, opted out) are disabled with the reason shown. Click **Send payment link**. The patient receives a short link that opens a Stripe payment page; the messages also appear in the inbox thread. Each journey, appointment, or patient-only request can have at most one live deposit request. Cancel the current request before changing its amount. If the browser loses the response while sending or re-sending, retrying the same action does not create another message. SmileLine keeps one send attempt per selected channel and finishes any interrupted handoff automatically. If the request is paid, cancelled or expires before a queued message reaches the channel provider, SmileLine does not deliver that stale payment reminder and does not offer to retry it from the Inbox. ## While it's pending The deposit block shows the request's state live — it flips to **Paid** the moment Stripe confirms, so you can complete the booking mid-call. * **Copy link** — paste the payment link into any other channel. * **Paid at practice** — the patient paid by cash or card in person; the link is voided. Refunds for these are settled in person too. * **Cancel** — voids the link. If a patient somehow pays seconds after a cancel, the payment is refunded automatically. Links expire after the configured number of days and the request is marked **Expired**. A payment that lands moments after expiry still counts — the money is real, so the request flips to Paid. If the practice enters Closing or Purging, every still-pending deposit link becomes inactive immediately. A deposit confirmed before closure remains recorded and is not refunded merely because the practice closes. If Stripe first confirms payment after closure has begun, SmileLine records a durable automatic-refund obligation; a refund that ultimately fails is left visible for staff review. Opening the link concurrently or retrying after a network error reuses the same Stripe payment-page generation. If Stripe ever reports a second successful payment for the same request, SmileLine preserves the original payment and tracks the additional payment as its own automatic refund. A failed additional refund flags the deposit for staff review rather than hiding or resending it. SmileLine also rechecks stale payment pages on the connected Stripe account, so a captured payment still converges if its webhook delivery was permanently missed; the same amount, currency and payment-identity checks apply. ## After the consultation * **Attended** — the deposit is refunded in full automatically. This works whether attendance is recorded in SmileLine or arrives from your practice management system sync. * **Did not attend** — depending on the practice policy the deposit is either kept automatically or flagged **No-show review**, where a manager chooses **Refund** or **Forfeit** from the patient's record. * **Refund failed** — rare (for example the patient's card was cancelled); the deposit is flagged and a manager can retry the refund. The money stays in the practice's Stripe balance until a retry succeeds or it's settled out-of-band. * **Refund needs review** — Stripe reported conflicting, truncated or differently-owned refund history, so SmileLine cannot safely choose an attempt automatically. Automatic recovery stops instead of creating another refund. Review the payment in Stripe and contact SmileLine support with the deposit request ID before taking another money action. Support can investigate the evidence, but SmileLine does not currently provide an in-product override for conflicting refund history. The review remains visible even if new deposits or connected-account charges are later disabled. When Stripe has accepted a refund but still reports it as pending, SmileLine checks that exact refund directly instead of publishing another refund job. Those checks are bounded to the provider's 35-day settlement window. If the outcome is still unclear at the attempt or deadline limit, the deposit changes to **Review required** and shows **Recheck Stripe**. A recheck never creates a second refund; it reads the same Stripe refund ID. Rechecks have a 15-minute cooldown and stop after three attempts, after which you must review the payment in Stripe. A known partial external refund can offer **Refund remainder** for only the verified unpaid amount. Queue publication exhaustion remains review-only: SmileLine cannot prove that a delivery was not already accepted, so it never creates a second refund generation from a missing queue acknowledgement. Conflicting, truncated, differently-owned, or exhausted recheck evidence is also review-only and shows no money action until the Stripe outcome has been resolved. If Stripe evidence ever totals more than the original deposit, SmileLine shows **Review required**, disables every refund action and keeps the displayed refunded amount capped at the original deposit. Do not issue another refund. Review the charge in Stripe and contact SmileLine support with the deposit request ID. Stripe can finish an asynchronous refund after it previously reported that attempt as failed or cancelled. SmileLine accepts that late success only when the exact refund ID, payment and attempt still match; an older callback can never overwrite a newer refund decision. Who can do what: front desk and telesales send, re-send, cancel and record practice-collected deposits; refunding or forfeiting a paid deposit needs a manager or owner. --- # Set up booking deposits Source: https://docs-stage.smileline.io/guides/deposits/setup Connect the practice's Stripe account and configure deposit amounts, link expiry and the no-show policy. Booking deposits let the practice take a refundable payment before a consultation is booked. Patients pay through a short link sent by SMS, email or WhatsApp; when the consultation is marked as attended, the deposit is refunded automatically. Payments go **directly into the practice's own Stripe account** — the practice is the merchant of record, receives the payouts and pays Stripe's processing fees. SmileLine adds no fee on top. ## Connect Stripe Only owners and managers can connect Stripe. Stripe authorization is tied to the immutable practice country chosen during sign-up. United States practices use USD; the United Kingdom uses GBP; every other currently supported country uses EUR. Every deposit uses that same country and currency. Open **Settings → Payments & deposits**. Click **Connect Stripe**. You'll be taken to Stripe to sign in, choose the practice's existing Standard account or register one, and authorize SmileLine. When Stripe sends you back, SmileLine verifies the account once and shows its payment and payout status. If Stripe still needs information, use **Authorize Stripe** after resolving the requirements in Stripe. Stripe can approve access before the browser returns to SmileLine. SmileLine records that grant independently and attaches it only after the single-use callback proves the practice and connection generation. If the callback is abandoned, rejected or superseded, the unused grant is deauthorised automatically within a bounded one-hour cleanup window rather than remaining attached indefinitely. Payments are enabled as soon as Stripe verifies the essentials; payouts to the practice's bank can take a little longer to switch on. Both are shown as status pills on the page. ### Change the connected account Choose **Change Stripe account** to authorize a different Standard account. SmileLine does not move payment traffic immediately. The page shows the candidate as **awaiting confirmation**, while the current account continues to receive new deposits. Confirm only after checking that you selected the intended practice account. You can also cancel the switch; cancellation deauthorizes only the candidate and leaves the current account unchanged. Confirming a switch changes the account used for new deposit payment pages. Every payment page, captured payment and refund already in progress remains pinned to the Stripe account that created it. SmileLine never attempts to refund an old charge through the newly selected account. ## Configure deposits Once connected, turn on **Deposit requests** and set: * **Default amount** — what a deposit request asks for when nothing more specific applies (for example €50, £50 or $50, according to the practice's financial region). Deposit amounts must be between €1/£1/$1 and €5,000/£5,000/$5,000. * **Per-treatment amounts** — override the default for specific treatments (for example €100, £100 or $100 for implants). Leave a treatment empty to use the default. * **Link expiry** — how many days a payment link stays live (1–30, default 7). Expired links tell the patient to contact the practice. * **If the patient doesn't attend** — what happens to a paid deposit on a missed appointment: * **Hold for review** (default): the deposit is flagged and staff decide whether to refund or keep it. * **Keep automatically**: the deposit is forfeited as soon as the appointment is marked as not attended. * **WhatsApp template** — WhatsApp only allows business-initiated messages outside a 24-hour reply window when they use an approved template. Pick the approved deposit template here; without one, WhatsApp sends only work within 24 hours of the patient's last message. SMS and email have no such restriction. An appointment type that requires a deposit is unavailable in online booking whenever the connected account cannot take charges or SmileLine cannot reach its configured Stripe environment. The requirement is never silently changed to a free booking. Staff can still take cash or card outside Stripe and use **Paid at practice** on a deposit request; this is an explicit staff action, not an automatic fallback. ## Refunds * Attending the consultation refunds the deposit in full, automatically — whether attendance is recorded in SmileLine or synced in from your practice management system. * Staff with the manager role or above can refund or forfeit a deposit manually at any time from the patient's record. * Stripe's processing fee from the original payment is **not** returned to the practice on refunds — that's how Stripe works, not a SmileLine charge. Refunds are paid out of the practice's Stripe balance. If the balance can't cover a refund, Stripe debits the practice's bank account; a refund that ultimately fails is flagged in SmileLine for staff to retry. --- # Analogue adapter (ATA) Source: https://docs-stage.smileline.io/guides/desk-phones/ata Keep an existing analogue phone by registering a Grandstream HT801 or HT802 adapter on your desk phone line. An analogue telephone adapter (ATA) puts an ordinary corded or cordless analogue phone onto the line — plug the phone into the adapter, the adapter into your network. You need the line's SIP credentials from **Settings → Call routing** — see [Desk phones](/guides/desk-phones) for how to reveal them. Connect the adapter's network port to your router and plug the analogue phone into the **Phone 1** port. Power it on. On the analogue phone, dial `***` then `02` — the adapter reads out its IP address. In a browser on the same network, open `http://` and sign in (factory password `admin` — change it while you're there). On the **FXS PORT1** tab, fill in: * **Account Active**: Yes * **Primary SIP Server**: `sip.telnyx.com` * **SIP User ID** and **Authenticate ID**: the line's username * **Authenticate Password**: the line's password * **SIP Transport**: **TLS** (port `5061`) * **Register Expiration**: `3` minutes Leave the vocoder order at its PCMU/PCMA defaults. Click **Apply**, then **Reboot**. The **Status** tab shows FXS Port 1 as **Registered**, and the phone gets a dial tone. Call the number from a mobile — the analogue phone rings. If the line is two-way, dial out to confirm outbound. Analogue phones plugged into an ATA stop working during a power cut, unlike an old exchange line. If the practice relies on this phone for emergencies, keep it on a UPS or keep a charged mobile as the fallback. Grandstream's HT8xx manuals live at [grandstream.com/support](https://www.grandstream.com/support). --- # Cisco Source: https://docs-stage.smileline.io/guides/desk-phones/cisco Register a Cisco 68xx or 88xx multiplatform (MPP) phone on your desk phone line. You need the line's SIP credentials from **Settings → Call routing** — see [Desk phones](/guides/desk-phones) for how to reveal them. These steps apply to **multiplatform (MPP)** firmware — the open-SIP variant. A phone running Cisco's Enterprise firmware must be converted to MPP before it can register with a third-party SIP service. Connect the phone to your network and power. Press **Applications → Status → Network status** to read its IP address. In a browser on the same network, open `https://` and switch to **Admin Login → advanced**. On the **Voice → Ext 1** tab, fill in: * **Line Enable**: Yes * **Proxy** (under Proxy and Registration): `sip.telnyx.com` * **Register Expires**: `180` * **Display Name**: your practice name * **User ID** and **Auth ID**: the line's username * **Password**: the line's password * **SIP Transport** (under SIP Settings): **TLS**, port `5061` Under **Voice → Ext 1 → Audio Configuration**, keep **G711u**, **G711a** and **G722** as preferred codecs. Click **Submit All Changes**. The phone reboots and the line label stops flashing once registered. Call the number from a mobile — the handset rings. If the line is two-way, dial out to confirm outbound. Cisco's MPP documentation lives at [cisco.com](https://www.cisco.com/c/en/us/support/collaboration-endpoints/index.html), and the carrier's guide is [Cisco: 68xx/88xx setup](https://support.telnyx.com/en/articles/5820309-cisco-68xx-88xx-setup). --- # Cordless (DECT) Source: https://docs-stage.smileline.io/guides/desk-phones/dect Register a Yealink W-series DECT base station so cordless handsets ring on your desk phone line. A DECT base station registers with the line once; cordless handsets then pair with the base — useful for surgeries where the phone moves around. You need the line's SIP credentials from **Settings → Call routing** — see [Desk phones](/guides/desk-phones) for how to reveal them. Connect the base station (for example a Yealink W70B or W73P bundle) to your network and power. Pair a handset with the base (**OK → Settings → Registration**, then press the base's pairing button). On the paired handset, press **OK → Status** to read the base's IP address. In a browser on the same network, open `https://` and sign in (factory login `admin` / `admin` — change it while you're there). Go to **Account → Register**, pick Account 1, and fill in: * **Line Active**: Enabled * **Label** and **Display Name**: your practice name * **Register Name** and **User Name**: the line's username * **Password**: the line's password * **Server Host**: `sip.telnyx.com`, port `5061`, transport **TLS** * **Server Expires**: `180` Under **Account → Number Assignment**, assign the account to every handset that should ring. Click **Confirm**, then call the number from a mobile — the cordless handsets ring. If the line is two-way, dial out to confirm outbound. One base station supports multiple handsets, and they all ring together — you rarely need a second registration. Yealink's DECT manuals live at [support.yealink.com](https://support.yealink.com). --- # Fanvil Source: https://docs-stage.smileline.io/guides/desk-phones/fanvil Register a Fanvil X-series IP phone on your desk phone line. You need the line's SIP credentials from **Settings → Call routing** — see [Desk phones](/guides/desk-phones) for how to reveal them. Connect the phone to your network and power. Press **Menu → Status** to read its IP address. In a browser on the same network, open `http://` and sign in (factory login `admin` / `admin` — change it while you're there). Go to **Line → SIP** and, for SIP Line 1, fill in: * **Line Active**: ticked * **Display Name**: your practice name * **Username** and **Authentication User**: the line's username * **Authentication Password**: the line's password * **Server Address**: `sip.telnyx.com`, **Server Port**: `5061` * Under **Global Settings** (or the line's advanced settings), set the transport protocol to **TLS** and the registration expiry to `180` seconds. Under **Line → Audio** (or the line's codec settings), keep **PCMU**, **PCMA** and **G722** enabled. Click **Apply**. The line shows **Registered** on the status page. Call the number from a mobile — the handset rings. If the line is two-way, dial out to confirm outbound. Fanvil's documentation lives at [fanvil.com/support](https://www.fanvil.com/support), and the carrier's guide is [Fanvil X-series: IP phone](https://support.telnyx.com/en/articles/6209971-fanvil-x-series-ip-phone). --- # Grandstream Source: https://docs-stage.smileline.io/guides/desk-phones/grandstream Register a Grandstream GRP26xx series IP phone on your desk phone line. You need the line's SIP credentials from **Settings → Call routing** — see [Desk phones](/guides/desk-phones) for how to reveal them. Connect the phone to your network and power. Press the **round menu button → Status → Network** to read its IP address. In a browser on the same network, open `https://` and sign in (factory login `admin` / `admin`, or the random password on the sticker under newer units). Change it while you're there. Go to **Accounts → Account 1 → General Settings** and fill in: * **Account Active**: Yes * **Account Name**: your practice name * **SIP Server**: `sip.telnyx.com` * **SIP User ID** and **Authenticate ID**: the line's username * **Authenticate Password**: the line's password Under **Accounts → Account 1 → SIP Settings**, set **SIP Transport** to **TLS** (port `5061`) and **Register Expiration** to `3` minutes. Under **Accounts → Account 1 → Audio Settings**, keep **PCMU**, **PCMA** and **G722** as the preferred vocoders. Click **Save and Apply**. **Status → Account Status** shows the account as **Registered**. Call the number from a mobile — the handset rings. If the line is two-way, dial out to confirm outbound. Grandstream's manuals live at [grandstream.com/support](https://www.grandstream.com/support), and the carrier's guide is [Grandstream GRP2612: SIP trunk configuration](https://support.telnyx.com/en/collections/1513008-grandstream-devices-telnyx-setup). --- # Desk phones Source: https://docs-stage.smileline.io/guides/desk-phones Ring a physical SIP handset directly on one of your numbers — even when SmileLine is unreachable — and understand exactly what that number gives up in return. A **desk phone line** moves one of your numbers off SmileLine's call handling and onto a physical SIP handset. Calls go straight from the carrier to the phone on your desk, with SmileLine completely out of the path — so the phone keeps ringing even if SmileLine, or your internet-connected computers, are down. That independence has a hard trade: SmileLine can no longer see the number's calls at all. | On a desk phone line | On SmileLine | | ------------------------------------------ | --------------------------------------- | | Rings your handset directly, always | Rings your team's devices via SmileLine | | Works during a SmileLine outage | Depends on SmileLine being reachable | | No ring groups, menus or opening hours | Full call routing | | No voicemail, recording or AI receptionist | All included | | Calls do not appear in call history | Every call on the timeline | | No screen pop or patient matching | Both built in | Moving a number to a desk phone is the practice owner's decision and takes effect for every caller. Most practices are better served keeping numbers on SmileLine and adding a [backup number](/guides/settings/call-routing) — the caller is then forwarded only when SmileLine can't take the call. ## Turn a number into a desk phone line You need the **owner** role, and the number can't be your outbound caller ID (pick a different caller ID first on **Settings → Phone numbers**). Open **Settings → Call routing** and find the number's card. Click **Move to a desk phone…** and confirm. The card switches to the desk-phone panel and shows **Setting up** for a minute or so. When the panel shows the line is live, click **Reveal SIP credentials**. You'll see the three values every handset needs: server, username and password. Each reveal is recorded in the activity log. Enter those values on your handset — pick your brand below for step-by-step instructions. ## The settings every phone needs Whatever the brand, the registration values are the same: | Setting | Value | | ---------------------- | -------------------------------------------------- | | SIP server / registrar | `sip.telnyx.com` | | Username / auth ID | from **Reveal SIP credentials** | | Password | from **Reveal SIP credentials** | | Port | `5061` with TLS (preferred) or `5060` with UDP/TCP | | Registration expiry | `180` seconds | | Codecs | G.711 A-law, G.711 µ-law, G.722 | | STUN / ICE | off | You can register more than one handset with the same credentials — they all ring together. The line carries up to **two concurrent calls**. The desk-phone card checks with the carrier each time it opens whether a handset is actually registered on the line: **Handset registered** means it will ring; **No handset is registered** or **last registration failed** usually means a mistyped password or server — calls fall to the backup number until the phone registers. **Unknown** means the carrier has not confirmed a state yet. Calls on the line count towards the practice's fair-use calling like every other Voice call: SmileLine reads the line's call records from the carrier once a day to count them. ## Receiving and making calls The line starts **inbound-only**: the handset receives calls immediately, but can't dial out. UK and US law require emergency numbers (999/112/911) to work from any line that can place calls, so outbound activates only after you register the handset's physical address — click **Register emergency address…** on the number's card. Once the carrier confirms it, the panel shows **Two-way** and the handset can dial out (domestic numbers only). If the practice moves, register the new address before relying on the handset for emergency calls — responders are dispatched to the registered address. Numbers that stay on SmileLine (the softphone, desktop app and extension) register per location instead — see [Emergency calling](/guides/settings/emergency-calling). ## If the handset goes offline Set a **Backup number** on the same card. If your handsets are unplugged or lose registration, the carrier forwards callers there instead — the same safety net SmileLine-handled numbers get. ## Set up your phone ## Moving back to SmileLine Click **Move back to SmileLine** on the number's card. The handset stops ringing, the line's credentials stop working, and SmileLine answers the number again — its routing starts unconfigured, like a newly bought number, so set it up on the same page. The move is carried out at the carrier in the background. If it keeps failing there, SmileLine stops retrying after a bounded run of attempts and parks the move in [**Review queue**](/guides/lead-capture/review-queue#phone-system-items) rather than failing silently — the row names the error. Click **Move back to SmileLine** again to retry it. --- # Poly Source: https://docs-stage.smileline.io/guides/desk-phones/poly Register a Poly VVX x50 or Edge E series IP phone on your desk phone line. You need the line's SIP credentials from **Settings → Call routing** — see [Desk phones](/guides/desk-phones) for how to reveal them. Connect the phone to your network and power, let it boot to the home screen, then read its IP address under **Menu → Settings → Status → Network → TCP/IP Parameters**. In a browser on the same network, open `https://` and sign in as **Admin** (factory password `456` — change it while you're there). Go to **Simple Setup** (or **Settings → Lines → Line 1**) and fill in: * **SIP Server Address**: `sip.telnyx.com`, port `5061`, transport **TLS** * **SIP Outbound Proxy**: leave empty * **Phone Display Name**: your practice name * **Address**, **Auth User ID**: the line's username * **Auth Password**: the line's password Under the line's **Registration** settings, set the expiry to `180` seconds if the field is exposed; the default re-registration also works. Click **Save**. The line key on the handset turns solid once registered. Call the number from a mobile — the handset rings. If the line is two-way, dial out to confirm outbound. Poly's documentation lives at [docs.poly.com](https://docs.poly.com), and the carrier's guide is [Polycom: setup with Telnyx](https://support.telnyx.com/en/articles/5619617-polycom-setup-with-telnyx). --- # Yealink Source: https://docs-stage.smileline.io/guides/desk-phones/yealink Register a Yealink T3x, T4x or T5x series IP phone on your desk phone line. You need the line's SIP credentials from **Settings → Call routing** — see [Desk phones](/guides/desk-phones) for how to reveal them. Connect the phone to your network and power. When it boots, press **OK** (or **Menu → Status**) to read its IP address off the screen. In a browser on the same network, open `https://` and sign in. The factory login is `admin` / `admin` — change it while you're there. Go to **Account → Register** and fill in, for Account 1: * **Line Active**: Enabled * **Label** and **Display Name**: your practice name * **Register Name** and **User Name**: the line's username * **Password**: the line's password * **Server Host**: `sip.telnyx.com`, port `5061` * **Transport**: TLS (use `5060` and UDP only if TLS is unavailable) * **Server Expires**: `180` Under **Account → Codec**, keep **G722**, **PCMU** and **PCMA** in the enabled list. Click **Confirm**. The account status shows **Registered** within a few seconds, and the line icon on the handset turns solid. Call the number from a mobile — the handset rings. If the line is two-way, dial out to confirm outbound. More than one Yealink can register with the same credentials; they ring together. Repeat these steps on each handset. If registration fails, check the password was copied exactly (reveal it again if unsure), and that your router isn't blocking outbound port `5061`. Yealink's own manuals live at [support.yealink.com](https://support.yealink.com), and the carrier's guide is [Yealink: Setup with Telnyx](https://support.telnyx.com/en/articles/3074710-yealink-setup-with-telnyx). --- # The call log Source: https://docs-stage.smileline.io/guides/desktop-app/call-log Every call in and out of the practice, with recordings, AI transcripts and summaries, without leaving the desk. The desk keeps one screen open all day. The rail down the left switches between them, and your phone line stays registered the whole time — changing screens never drops a call. ## All calls Click **Calls** in the rail. Every call the practice has made or taken appears newest first, with who it was with, when, how long it lasted and how it ended. * **All / inbound / outbound** narrows by direction. * **Recorded** shows only calls with a stored recording. * The search box matches a phone number or a patient's name. Numbers match however they were typed — `07700 900 077` finds the same call as `+447700900077`. Click any call to open it. If a recording is stored it plays inline, and the transcript appears underneath. Every opened call carries an **Outcome** and a **Note** — the wrap-up after you hang up. Click the value to edit it: an outcome is any short label your practice uses ("Booked", "Callback", "Wrong number"); the note takes as much as you need. Enter saves the outcome, Ctrl or ⌘ + Enter saves the note, and Escape cancels. Both stay on the call for everyone who opens it. Listening to recordings and reading transcripts needs the calling media permission. Without it you still see that a call happened, who it was with and how it ended — you just cannot open what was said. Ask an owner to change this on **Settings → Team**. ## AI calls Click **AI calls** in the rail for the same list narrowed to calls your AI voice agent handled. Each one shows the agent's outcome for the call, and opening it adds the agent's written summary above the transcript. The summary is only there once the agent has finished writing it, which happens a short time after the call ends. Until then the transcript alone is shown. If the summary or transcript looks wrong or inappropriate, click **Report AI content** under the transcript and say what was wrong. Your note goes to the Smileline team as a support message together with the call reference — the transcript itself is not sent. The same option is on the desk's **Account** screen for anything else the AI produced. ## What each call tells you | Column | Meaning | | ----------------- | ------------------------------------------------------------------------------------------ | | Name or number | The patient's name when the call is linked to a record, otherwise the other party's number | | Time and duration | When the call started, and how long it was connected | | Badge | The outcome — for AI calls the agent's own disposition, otherwise the call status | | Voicemail | The caller left a message rather than reaching a person | | Dot | A recording is stored for this call | Recordings and transcripts are removed when the practice's retention window passes, so an older call may show no recording even though one was made. ## Call quality A small dot beside a call shows how the audio held up on the devices that carried it: green for a clean call, amber for noticeable jitter or loss, red when it was poor. Hover it for the measured numbers. Each device reports its own leg once, at the end of the call; nothing is sent while you are talking. --- # Calls on the desk Source: https://docs-stage.smileline.io/guides/desktop-app/calls Incoming screen pops, click-to-call for Smileline Voice practices, and dialing sessions for everyone else. ## With Smileline Voice Click **Enable calling on this device** the first time you open the desk, and allow microphone access when your computer asks. The desk is now a registered device — it rings alongside any browser tab you also have open, and whoever answers first takes the call. When a call comes in, the incoming-call card shows who it is. A known patient opens straight into the work panel; several possible matches offer a picker; an unknown caller shows the number. Click **Answer** or **Decline** on the card. In-call controls — mute, hold, hang up — work exactly as in the browser. {/* screenshot owed: /screenshots/desktop-app/screen-pop.png — the incoming-call card with a matched patient */} ### Marketing-line calls Calls to your tracking numbers — the ones your adverts and website show — ring the desk with a **Marketing line** badge. The desk never assumes the caller is here about their patient record on these calls: nothing opens by itself. If the number matches a patient, their name is shown — click it to open them; if the number is unknown, the card offers **Not a known patient — create a lead** so the enquiry is captured while you talk. {/* screenshot owed: /screenshots/desktop-app/marketing-line-pop.png — the incoming-call card with the Marketing line badge and the create-a-lead button */} ### Calling out Every lead in the queue with a phone number has a call button in the work panel. Click it: your desk rings once and answers itself, then the patient's phone rings, and you are connected. ### Calling any number **Keypad** in the left rail dials anything — a lab, a referring practice, a number read off a note. Type it or tap it out, in whatever form you would read it aloud, and click **Call**; the desk sorts out the country code. Calling works the same way as calling a lead: your desk rings once and answers itself, then the number you dialled rings. {/* screenshot owed: /screenshots/desktop-app/keypad.png — the Keypad view with a number entered */} ### While you are on a call The call sits in one place — a panel at the bottom of the desk — and stays there whichever screen you move to, so switching to the inbox or the calendar never drops it. **Keypad** on the panel sends tones down the live call, for phone menus and extensions. The arrow at its right collapses it to a small bar; click that to bring it back. **Pop out** lifts the call into its own small window that floats above your other apps. Use it when you need the rest of the screen: leave the desk, look something up in your browser, and the call stays in view with mute, hold and hang up on it. **Open desk** brings Smileline back to the front and puts the little window away. It disappears by itself when the call ends. {/* screenshot owed: /screenshots/desktop-app/call-panel.png — the call panel during a call, with the popped-out window beside it */} **Transfer** hands the caller to a colleague — the list shows everyone with calling set up and whether they are on do-not-disturb — or to a number you type. **Announce first** rings the colleague while the caller hears hold music, connects you to them when they answer, and waits for **Complete** (hand the caller over) or **Cancel** (take the caller back); **Blind** moves the caller to the colleague's most recently used device at once and leaves yours. An inbound caller can also be sent to voicemail from here. The popped-out call window can answer or decline a ringing call and send keypad tones; its **Transfer** button brings the Desk forward to pick the colleague. A call that was ringing you and was answered elsewhere closes with **Taken by** and the colleague's name. While you are on a call your other devices are left out of the ring for new calls. On the **Keypad** screen, a practice with more than one number chooses which one the person you call sees under **Show as**. Left on **Automatic**, the call presents the number routed to your device's location, or the practice's default caller ID when that location has none. ## Without Smileline Voice The desk shows the same **Start dialing** button as the browser's Today page. * **Native sessions** run the call audio in the desk itself — headset on, work the queue, and each lead you settle on is dialed. * **Assisted sessions** hand each call to your practice's own phone app, which opens by itself. Mark **Done**, **No answer**, or **Skip** on the call panel as you go — outcomes are recorded in Smileline either way. A dialing session shows in the same call panel as everything else, so it follows you between screens and pops out into the floating window too. {/* screenshot owed: /screenshots/desktop-app/dialer-bar.png — the call panel during a dialing session */} ## If calls don't ring * Check the tray menu says **Available**, not **Do not disturb** — see [Tray and availability](/guides/desktop-app/tray-and-availability). * Check your computer's microphone permission for Smileline Desk (System Settings on Mac, Settings → Privacy on Windows). --- # Desktop app Source: https://docs-stage.smileline.io/guides/desktop-app Smileline Desk keeps the Today queue, inbox, calendar, patients, the clinical day list and optional practice calling together in a dedicated desktop app. Smileline Desk puts the Today queue on your desk as its own app. It lives in your system tray (menu bar on Mac), stays signed in, and is built around one job: working calls. {/* screenshot owed: /screenshots/desktop-app/call-desk.png — the call desk showing the queue, work panel and an incoming-call card */} ## What it does * **The Today queue, call-first.** The same leads, day tabs, filters, keyboard shortcuts and work panel as the **Today** page in your browser — without the rest of the app around it. * **A rail for the rest of the day.** Switch between Today, the keypad, the [call log](/guides/desktop-app/call-log), voicemail, AI calls, your inbox, the calendar, patients and **Account** without leaving the app. When your role opens both [workspaces](/guides/getting-started/workspaces), a **CRM** / **Clinical** control at the top of the rail swaps it: the clinical rail holds the **Day list** — the day's appointments, each opening the patient record — and the inbox. Your phone line stays registered across every screen, so changing view never drops a call. * **A phone that follows you.** A live call sits in one panel you can reach from any screen, and pops out into a small window that floats above your other apps when you need to leave Smileline mid-call. * **Back and forward, the way your browser does it.** Your mouse's two side buttons step back and forward through the screens you have opened, including in and out of a patient record. On a Mac, Cmd+\[ and Cmd+] do the same, as does a two-finger swipe on the trackpad. It only ever moves between the app's own screens, so a call in progress carries on. * **With Smileline Voice, it is the phone on the desk.** Once you enable calling, the app stays registered all day. Incoming calls ring here even when the window is hidden to the tray, with a desktop notification and a screen pop showing who is calling. * **Without Voice, it is still your dialing desk.** Practices using the Power Dialer — including assisted dialing through their own phone system — get the same call-optimised queue. ## How it fits with the browser The desk and the browser app work on the same queue at the same time. If both are signed in, an incoming call rings both, and whoever answers first takes it — the other stops ringing. Opening the same lead in two places shows the usual takeover prompt, exactly as it does between two browser tabs. Anything that isn't call work — settings, reports, marketing — opens in your normal browser with one click. The desk itself never navigates away from the queue. Open **Account** at the bottom of the rail to delete your account, read the Terms and Privacy Policy, or sign out. Profile, password and two-factor settings open in your normal browser so the live desk stays available. If you belong to more than one practice, **Account** also lists them under **Switch practice**: pick one and the desk reloads on that practice's queue and phone line. Finish any call first, because the reload ends it. ## Next steps --- # Install and sign in Source: https://docs-stage.smileline.io/guides/desktop-app/install Download Smileline Desk for macOS or Windows, sign in once, and stay signed in. ## Requirements * **macOS** 13 (Ventura) or later. * **Windows** 10 or 11. ## Install Download the installer for your computer using the `dl.smileline.io` link Smileline gives you — a `.dmg` on Mac, a setup `.exe` on Windows. Open it and follow the prompts. On Mac, drag **Smileline Desk** into **Applications**. Launch the app. It appears in your system tray (menu bar on Mac) and opens its window. On Windows, a call or voicemail notification cannot open the app on its own: the notification tells you to open Smileline Desk from the tray, and the taskbar icon flashes while a call is ringing. On Mac, clicking the app in the Dock brings the window back. {/* screenshot owed: /screenshots/desktop-app/sign-in.png — the sign-in screen inside the desk window */} ## Sign in Sign in with the same email and password you use in the browser. Your region is handled automatically — the app finds the right Smileline service for your practice on its own. Smileline Desk is for existing practice accounts. Create an account or organisation, and manage subscription billing, in the web app. Prefer **Continue with Google** or **Continue with Apple**? Choose your practice's service region if prompted. * In the Mac App Store version, **Continue with Apple** opens Apple's native sign-in sheet inside Smileline. Directly downloaded Mac versions use the system web authentication session for Apple sign-in. * On macOS, **Continue with Google** uses the system's secure web authentication session. macOS may ask whether Smileline can use its sign-in website, then open your default browser or Safari. Complete the prompts to return to Smileline automatically. * On Windows, social sign-in opens your normal browser and returns you to Smileline when you finish. Keep Smileline open during sign-in. If you cancel, you can select a provider again. If sign-in cannot start, select **Try again** or **Sign in with email**. On macOS, a failed authentication session returns you to the sign-in screen. The desktop flow accepts existing accounts throughout; it does not register a new account through a social provider. You stay signed in across restarts: quit the app, launch it again, and the queue is back without another sign-in. The Mac App Store and Microsoft Store deliver updates for store installs. A directly downloaded build prompts when its own update is ready. --- # Tray and availability Source: https://docs-stage.smileline.io/guides/desktop-app/tray-and-availability Hide the desk to the tray and keep ringing, or switch to Do not disturb when you step away. ## Hide to tray, keep ringing Closing the desk window doesn't quit the app — it hides to the system tray (menu bar on Mac) and stays registered. An incoming call still rings: you get a desktop notification with the caller, and the app asks for your attention in the Dock or taskbar. Click the tray icon (or the Dock icon on Mac) to bring the window back. To quit completely, use **Quit** in the tray menu. {/* screenshot owed: /screenshots/desktop-app/tray-menu.png — the tray menu showing Available, Open Smileline Desk and Quit */} ## Do not disturb The tray menu has one switch: **Available**. Untick it and this desk is skipped when calls ring the practice — they go to your colleagues' devices, or to voicemail if nobody else is available. Tick it again to rejoin the ring. Do not disturb applies to this desk only. Your browser tab, if it is also enabled for calling, keeps its own setting. --- # Run a dialing session Source: https://docs-stage.smileline.io/guides/dialer Start a dialing session from Today and let SmileLine call each lead for you as you work down the queue. The Power Dialer turns the [Today queue](/guides/today/overview) into a calling session: your audio connects once, and every lead you open is dialed for you — no copying numbers, no dead air. This is a **single-line** power dialer: it places one call at a time, only when you open a lead, and you hear the real ringing tone. It cannot make silent or abandoned calls — the behaviour Ofcom penalises in the UK. ## Before you start **Start dialing** appears in the Today header only when all three are true: * A calling add-on is enabled — **SmileLine Voice** or the standalone **Power Dialer** (see [Set up dialing](/guides/dialer/setup)). * Something can actually place the call: either SmileLine Voice is provisioned with an active default caller ID, or the practice's own phone system is connected in [Phone providers](/guides/settings/phone-providers). * Your role can run dialing sessions — owners, managers, front desk and telesales can; analysts can't. You'll also need a working microphone. Use headphones if you can — they stop the caller's audio leaking back into your mic. On an external phone system the session runs in **assisted** mode: your provider's own app places each call and holds the audio, so no microphone is needed here and the bar offers **Done**, **No answer** and **Skip** instead of mute and hang-up. See [Assisted dialing](/guides/dialer/setup#assisted-dialing). ## Start a session On **Today**, click **Start dialing** in the header. Allow microphone access when the browser asks. Your audio connects once and stays connected for the whole session — there's no per-call setup. Once the bar under the header reads **Ready**, SmileLine opens the first workable lead in your queue and dials it. If you already had a lead open, it dials that one instead. ## The auto-dial loop While the session is live, opening any lead with a mobile number dials it automatically — click a row, press Enter, or let the queue advance for you. You hear real ringback while the patient's phone rings, so there's never silence on either end. Two rules keep the loop safe: * **A live call is never interrupted.** Opening another row mid-call just shows that lead in the work panel; the dialer only calls when the line is free. * **Leads without a phone number are simply worked without a call.** Record their outcome as usual and move on. If you open a lead without dialing (for example after ending a call early), the bar shows a **Call** button — click it to dial the open lead whenever you're ready. ## The dialer bar A slim bar sits under the header for the whole session. It shows: * **The call state** — *Connecting your audio…*, *Ready*, *Dialing*, *Ringing*, then *On call with* the patient's name and a live timer. * **Calls placed** — a running count for the session. * **Call** — dials the open lead (shown when the line is free). * **Mute / Unmute** — mutes your microphone during a call. * **Hang up** — ends the current call. * **End session** — disconnects your audio and closes the session. ## After each call When a call ends, the bar reads **Call ended — record the outcome, then open the next lead**. Record what happened with the normal [outcome wizard](/guides/today/outcomes-and-undo) — reached, no answer, booked, and so on. As soon as the outcome is saved, the queue auto-advances to the next actionable lead and dials it. Every call is also logged automatically on the patient's timeline — who called, when, how long, and whether it was answered — whatever outcome you record. If [call recording](/guides/dialer/recording) is on, answered calls get a **Play recording** control there too. ## Ending a session A session ends when any of these happens: * You click **End session** in the bar. * You leave or close the Today page. * Fifteen minutes pass without a call — the session ends automatically and a notice tells you why. Just start a new session whenever you're ready to keep going. ## If the connection drops Your audio rides a live connection to SmileLine, and the app keeps that connection up for you: * **On the web**, a temporary problem starting the calling control — the practice's audio provider being slow, a brief network blip, a server hiccup — is retried automatically for as long as the page is open, with no pill to click. Only a permanent refusal (your session has ended, or your role no longer allows calling) shows **Calling unavailable on this device** with a **Reload** button: reload, and sign in again if asked. * **On the mobile app**, a dropped dialer connection shows a notice at the top of the dialer — *Connection lost — reconnecting…* while it reconnects on its own, *Your sign-in has expired — sign in again to keep dialing.* when the session is over, *SmileLine refused the live connection — retrying automatically.* while SmileLine is briefly unavailable, or *No connection — check your network and reconnect.* when the phone is offline. Tap **Reconnect** to try again straight away. **Dial next**, **Hang up** and the outcome buttons stay disabled until the connection is back, so nothing you tap is lost. ## What calls cost Calls aren't metered. With SmileLine Voice, calling is unlimited fair-use and the Power Dialer is included; the standalone Power Dialer is a flat monthly add-on. Each number the practice holds is billed monthly until it's released. See [Billing](/guides/settings/billing) for the full pricing picture. ## Next steps --- # Call recording Source: https://docs-stage.smileline.io/guides/dialer/recording Record dialer calls for training and dispute resolution with consent, central retention controls and a full audit trail. Call recording captures answered dialer calls so you can review how enquiries are handled, coach the team, and settle "who said what" disputes. It's off by default; this page covers turning it on compliantly, how long recordings are kept, and where to play them back. ## Turn recording on Recording is configured at **Settings → Voice & calling** (owner or manager role): In the **Call recording** card, switch **Record calls** on. Click **Manage retention**, or open **Settings → Practice details → Data retention**. Enter 7–3,650 days under **Call recordings**, or leave it blank for **Forever**, then click **Save**. The default is 90 days. From then on, every answered dialer call is recorded. Calls that are never answered produce no recording. SmileLine imports recordings up to 32 MiB. If a provider produces a larger recording, the call remains in the timeline but no playback control is added. ## Callers are told they're being recorded Recording a call comes with obligations: **callers must be told the call is being recorded**, and in some places they must actively agree to it. SmileLine now plays a short announcement — *"Please note, this call is recorded."* — at the start of every recorded call, before the conversation begins. It can't be switched off, and it's on the recording itself, so you have evidence the notice was given. Where the AI voice agent takes the call, the same words open its greeting. If the carrier ever refuses to play the announcement while the recorder is running, the call's history entry is marked so nobody relies on a notice the caller never heard. Recordings are stereo with one party per channel, which is what lets a transcript tell the caller's words from the practice's. You don't need a script for this any more. Two things are still worth knowing: * **In some US states every party must consent, not just be told.** California, Washington, Illinois, Pennsylvania, Florida and several others work this way, and California's rule carries a private right of action. The announcement is a notice; if the caller objects, stop the recording or end the call rather than continuing. * **The announcement is in English.** SmileLine Voice serves the UK and the US today. If that changes, this page will too. This is practical guidance, not legal advice. Recorded calls with patients can contain health information, so review your obligations under UK GDPR and your practice's privacy policy — and if in doubt, speak to your data protection advisor before enabling recording. ## Pause the recording while you take a payment Card details must never end up on a recording. While a recorded call is up, every calling surface — the browser call bar, SmileLine Desk and the Chrome extension — has a **Taking payment** control: Press **Taking payment** before you ask for the card. The recorder pauses on the caller's line and the bar shows **Recording paused**. Press **Resume recording** once the payment is done. Recording carries on in the same file. The pause is a fenced command on the call, like hold: pressing it twice sends nothing twice, and it is refused on a call that isn't being recorded. Every pause window is kept with the call — the times the recorder was off — so you can show the audio around a payment was never captured. If you forget to resume, the pause simply runs to the end of the call. ## Retention: recordings delete themselves Recordings are kept only for the retention window you set, then deleted automatically. There's no manual purge to remember — a shorter window is the simplest way to minimise the data you hold. New calls follow a saved window immediately. A shorter window is applied progressively to existing recordings in bounded daily batches. Extending the window or changing it to **Forever** does not restore deleted audio or postpone a recording already scheduled to expire sooner. When a recording expires, its **Play recording** control is removed. The call-history entry remains, including who called, when, how long and the line outcome. ## Play a recording back Answered, recorded calls show a **Play recording** control wherever the call appears: * On the **patient timeline** — every dialer call is logged there with who called, when, how long and the outcome of the line. * In **Today's recent activity** for the lead you're working. Click **Play recording** and the audio streams inline. Playback is limited to owners and managers: front desk and telesales place calls but cannot replay them, and analysts have no calling access at all. Voicemail messages are the exception — every calling role can play those in the [voicemail inbox](/guides/settings/voicemail), while the transcript beside them stays with owners and managers. Under the player, the same roles can expand the call's **transcript**. SmileLine transcribes recorded calls and voicemails automatically once the audio is stored, so a long call can be read instead of listened to. Transcripts are deleted with the recording when its retention window passes. ## When a recording fails Occasionally the carrier reports that it could not record a call. The call keeps its history entry — who called, when, how long and the outcome — but no **Play recording** control ever appears for it, and nothing is retried in the background: the audio does not exist. When the failed recording was a voicemail, the practice still gets the missed-call alert, which says the message could not be recorded, so the caller is never silently lost. ## Every listen leaves a trail Recordings are sensitive, so access is audited: **every playback is written to the practice activity log**, along with who listened and which call it was. Turning recording on or off and changing the central retention settings are logged too. Owners and managers can review the trail at **Settings → Activity log**. --- # Set up dialing Source: https://docs-stage.smileline.io/guides/dialer/setup Get the practice ready to dial — SmileLine Voice for the full phone system, or assisted dialing through the phone system you already have. The Power Dialer turns the Today queue into a calling session. What it needs first depends on which phone system the practice uses. * **SmileLine Voice** — the phone system inside the CRM. Dialing, ringing and audio all happen in the browser, and the Power Dialer is included at no extra charge. Set it up in [Voice and calling](/guides/settings/voice) and [Phone numbers](/guides/settings/voice-numbers). * **Your existing phone system** — keep VoiceStack and dial in **assisted** mode: SmileLine opens each call in your provider's own app and you tell it how the call went. Set it up in [Phone providers](/guides/settings/phone-providers). * **The standalone Power Dialer add-on** — the calling workflow on its own, for a practice on an external phone system that does not integrate. **Start dialing** appears on Today as soon as one of those can actually place a call. If none can, the button offers to finish setting one up instead. ## Pricing at a glance * **SmileLine Voice** is **£199/month** for GBP practices or **$249/month** for USD practices, including three concurrent lines, one number per line, and unlimited fair-use calls to domestic destinations. Extra lines are £49 or $69 each; extra numbers are £5 or $7 each. The Power Dialer is included. * **The standalone Power Dialer** is **£49/month** or **$69/month**. Everything lands on the practice's normal SmileLine invoice — there is no separate account to fund and no provider bill to reconcile. An EUR catalogue has not been approved yet. EUR practices see pricing as unavailable and cannot enable a paid add-on until SmileLine support confirms the EUR catalogue. ## Assisted dialing If the practice keeps its own phone system, the queue still works — the call is placed by your provider's app rather than by the browser. Connect the provider in [Phone providers](/guides/settings/phone-providers). On **Today**, click **Start dialing** and open a lead. SmileLine writes the call, then opens your provider's app on the number. When the call finishes, click **Done**, **No answer** or **Skip** in the dialing bar. The queue advances on whichever comes first: your click, or your provider's own record of the finished call arriving in SmileLine. Assisted dialing never advances on a timer. Your provider gives SmileLine no live ringing or answered events, so if a call has been open a while with no record yet, SmileLine nudges you for an outcome — it never guesses one. How quickly the record arrives is your provider's pacing, not SmileLine's. Mute and hang-up are absent in assisted mode: the audio lives in your provider's app, and only that app can control it. ## Enable the add-on Only the practice owner can change billing. Open **Settings → Billing** and find **SmileLine Voice** — or **Power Dialer**, if the practice wants the workflow on its own — in the **Add-ons** card. Click **Enable**. The change applies immediately and is prorated on the next invoice. Until an add-on is on, **Settings → Voice & calling** shows its settings read-only under an **Add-on required** card. ## Connect the calling account Calling configuration lives at **Settings → Voice & calling** and needs the owner or manager role. Calls are carried on a calling platform SmileLine owns and operates — there is no provider account to open and no API key to paste. A practice that has never provisioned reads **Pending**. Click **Verify & provision**: SmileLine checks the calling platform is reachable and marks the practice's calling ready, and the status badge then reads **Active**. Nothing is created at the carrier, so it is safe to repeat and never creates anything twice. If the badge reads **Error**, the message names what failed; click the button again, and get in touch if it keeps failing. Numbers cannot be ordered or ported until the badge reads **Active**, so do this before the next step. Verifying again later is a connection check, not a repeat of setup. ## Get a number to dial from Outbound calls need one **Active** number: it is the caller ID patients see. UK numbers also need approved Ofcom verification first, and both live on their own page — see [Phone numbers](/guides/settings/voice-numbers) for verification, ordering, the default caller ID and releasing. Neither step is instant. Verification is a review by the calling provider (allow several working days) and a new UK number is then validated by the carrier (allow up to 72 hours). Start both well before the day you want to be on the phone. Assisted dialing needs none of this: the number and the caller ID belong to your own phone system. ## Next step --- # Create your practice Source: https://docs-stage.smileline.io/guides/getting-started/create-organization Set up your practice organisation in SmileLine and invite your team with the right roles. By the end of this page your practice will exist in SmileLine, its country, service region and accounting currency will be locked, and your colleagues can be invited with the right roles. GBP and USD practices can also start the free trial; EUR subscription onboarding remains unavailable until its catalogue is approved. ## Choose the practice country Choose **Practice country** before entering your account details. SmileLine uses the country where the practice operates to select its service region and accounting currency: * Practices in the United States use the US service region and **USD**. * Practices in the United Kingdom use the EU service region and **GBP**. * Practices in every other country currently offered in the selector use the EU service region and **EUR**. You can click **Change country** before creating the account. The country cannot be changed after the practice organisation is created. Check the practice country carefully. It cannot be changed later because it controls where the practice is served, the currency used for existing values, reports and deposits, and the legal country used by provider accounts. ## Create the organisation Right after you create your account, SmileLine walks the owner through three setup steps. Enter the **Practice name** and optional website. The **Financial region** shows the country and accounting currency selected during sign-up. When you continue, SmileLine creates the practice with its default pipeline, treatments, lead sources, message templates, nurture sequences and appointment reminders, and shows each setup stage as it runs. If you entered a website, SmileLine also reads it at the same time. This takes a few seconds. Enter the first location's contact details, opening hours and IANA timezone. If you entered a website, the phone, email, address, nation or state and opening hours it publishes are already filled in — check them and correct anything that is wrong before continuing. Anything the site does not state is left blank, and a value you have already typed is never replaced. The timezone starts from your practice country's default; US practices choose theirs explicitly here before continuing. Accept any pending practice agreement. If your practice uses GBP or USD, start the 14-day trial through Stripe; when Stripe confirms it, you land on **Today**. EUR practices must contact SmileLine support and cannot start a trial yet. You become the practice's **Owner** automatically. The accounting currency is used throughout the CRM, connected Stripe account and SmileLine subscription. The GBP and USD subscription catalogues are approved; EUR subscription Checkout remains unavailable until SmileLine confirms EUR pricing. Setup progress is saved after each step. If you close the tab, cancel Checkout, or return to the SmileLine home page, onboarding resumes at the first incomplete step instead of restarting the practice details. An unfinished Checkout can be resumed from **Start free trial** at any time until Stripe expires the session (24 hours); after that, the next click opens a fresh Checkout. After Stripe Checkout, SmileLine verifies the existing Stripe customer and subscription before offering another Checkout. A delayed or missed webhook is reconciled from Stripe directly; **Check again** repeats that safe verification and does not create another subscription. If Stripe reports an ambiguous state, setup stops for staff review instead of guessing or charging again. ## Add another practice Open the menu at the bottom of the sidebar and choose **New organization** to set up an additional practice on the same account. It walks the same three steps, and the new practice becomes the one you are working in as soon as step 1 completes — the footer links back to the practice you came from if you want to stop partway. Two things differ from your first practice: * **The 14-day free trial runs once per account.** An additional practice is charged when you complete Checkout, and the wizard says so before you pay. * **Each practice keeps its own subscription, add-ons and invoices.** Nothing is shared between them except your login. An additional practice must be in a country served by the region you are signed in to. If it belongs to the other region, sign in there and create it from that side. There is also a limit on how many practices one account can hold; if you reach it, contact SmileLine. ## Accept the Data Processing Agreement Before an eligible practice starts its free trial, you'll be asked to tick **I accept the Data Processing Agreement on behalf of your practice**. This is the contract that authorises SmileLine to store and process your patients' data on the practice's behalf. * The link in the checkbox opens the full document so you can read it first. * Only the practice **Owner** can accept it — it binds the practice, not just your account. * Who accepted, when, and which version are recorded. You can review the record any time in **Settings**, then **Agreements**. If we later publish a new version of an agreement, the owner is asked to accept it on their next visit. The rest of the team keeps working uninterrupted — they just see a small dismissible notice. A practice set up for you by a Smileline partner skips the trial step: it starts on the [free plan](/guides/settings/billing#free-plan-for-partner-created-practices), and the first owner to sign in is asked to accept the agreements before making changes. ## Invite your team Go to **Settings**, then **Team members**. Click **Invite member**. Enter their **Email** and pick a **Role** (see below). Click **Send invitation**. They'll get an email with a link to join the practice. The link opens a **Join *your practice*** page that already knows who was invited: someone without an account gets the sign-up form, someone with one gets the sign-in form, and either way the **Email** field is fixed to the invited address. Once they've signed up or signed in there, they're in the practice — no second step. A person who was already signed in with the invited email is asked to click **Accept invitation** instead. ![The invite-a-team-member dialog with email and role cards](/screenshots/getting-started/invite-member.png) Pending invitations appear on the same **Team members** page until they're accepted. Their email badge shows **Email queued**, **Email sent**, or **Email needs attention**. The badge normally reads **Email sent** as soon as the page refreshes, because the invitation is sent the moment you click **Send invitation**. **Email queued** means it hasn't gone out yet and is retried automatically; if it needs attention, the invitation still exists, so check the address and resend or contact support instead of creating duplicate invitations. If the email doesn't arrive, click **Copy link** on the invitation and send the link yourself — by text or chat, for example. It is the same link as in the email. An invitation lasts 48 hours. An expired one shows **Expired** and has no **Copy link**, because its link no longer works: click **Resend** to renew the same invitation for another 48 hours (the email goes out again), then copy the link. Send the link only to the person you invited. Whoever opens it can create the account for the invited email address and join your practice. If the invitee is already signed in with a different email, the page tells them which address the invitation was sent to and offers **Sign out and continue**. ### Give each member a location Once the practice has at least one location, every row on **Team members** carries a **Locations** control (the pin icon). Open it, search if the list is long, and tick every site the person works at — a receptionist who covers two practices holds both. The control then reads the site names, or a count once there are several. Owners and managers can change it; everyone else sees the assignment. It is what a ring group set to **A location's staff** rings, so when someone moves between sites, change it here rather than editing every ring group. See [Call routing](/guides/settings/call-routing#ring-groups). ### Choose where each member lands Once the practice's clinical workspace is available, rows for roles that open both workspaces also carry a **Workspace** column — **CRM** or **Clinical**. It sets the page the member lands on after sign-in (**Today** or the **Day list**). Anyone can change their own; changing someone else's needs an owner or manager. See [Workspaces](/guides/getting-started/workspaces). ### Link a clinician to their profile A team member who also treats patients can be tied to their [practitioner](/guides/settings/practitioners) profile: owners and managers pick it from the clinical-profile select (the stethoscope icon) on the member's row, which offers **No clinical profile** and every profile nobody else is linked to. Pick another profile to move the link, or **No clinical profile** to clear it. One account links to one practitioner. ### Suspend a member's access Owners and managers can lock a member out of the practice without removing them: click the **Suspend access** icon on the row and confirm. Only an owner can suspend another owner, and nobody can suspend themselves. While suspended, the person cannot open this practice on the web, in the mobile app, through an API key or a connected integration; their softphone registration is revoked, their open dialling session ends, and no notification, report, digest, team-chat alert or number-porting email is sent to them for this practice. Everything else stays: their seat, role, sites, clinical profile, assigned work and history. The row shows a **Suspended** badge, and **Restore access** on the same row undoes it. This is a practice-level lock. It does not affect the person's other practices, and it is not the account-wide lock that only Smileline support can apply. ## Roles in plain words * **Front desk** — works patients, journeys, tasks, the inbox and the clinical day list, without administrative or deletion authority. The default role for reception and treatment coordinators. * **Telesales** — everything the front desk does on the phone and in the inbox: the call list, bookings, deposit requests and the dialler. Marketing (reputation, SEO, lead ads) and practice reporting are not included, so the dashboard and reports are hidden. Their own call and booking figures still show on **Today**. * **Manager** — manages the CRM, settings, integrations and team membership, but not owner-only billing decisions. * **Analyst** — read-only access for reporting and oversight, without inbox or configuration access. * **Owner** — full operational and billing control, including owner-role changes. Practice deletion remains unavailable while durable offboarding is being rebuilt. * **Dentist**, **Hygienist** and **Nurse** — the clinical roles. They work in the clinical workspace only: patient records, the day list and (dentists and hygienists) the inbox. They never see the CRM, marketing or settings. **Compare roles** on **Settings → Team members** shows the exact grid. Advertising has a third level on top of view and manage — **Set campaigns live & change ad spend** — held by owners and managers only, so front desk and analysts can view ads and results but can never start or raise spend. See the [Ads workspace](/guides/marketing/ads#who-can-do-what). Only owners can invite other owners — managers won't see the **Owner** option in the invite dialog. ## Next step --- # Demo data Source: https://docs-stage.smileline.io/guides/getting-started/demo-data Seed your practice with realistic sample records, then remove an unchanged set or archive a modified one safely. By the end of this page your practice will be full of realistic sample patients, journeys, appointments and conversations, so you can explore without touching real data. You'll also know when SmileLine deletes that sample set and when it must archive it to preserve activity history. ## Seed demo data Go to **Settings**, then **Demo data**. Click **Seed demo data**, then confirm in the dialog. Seeding takes a few seconds. When it finishes, the page shows **Demo data present** with a count of everything that was created — and every page in the app now has sample volume to explore. ![The demo data settings page showing seeded record counts](/screenshots/getting-started/demo-data-seeded.png) Only owners and managers can seed or remove demo data. Everyone else can view the status but can't change it. ## What's included The seeder builds a believable UK practice: * **400 sample patients** across every status — fresh enquiries, leads mid-journey, active patients, and inactive or archived records — with British names, fictional UK mobile numbers and values in the practice's accounting currency. * **Journeys in every stage** of your board, with realistic treatment values. * **Appointments** past and future, plus **tasks** and full patient **timelines**, so Today, Calendar and Reports all have something to show. * **Inbox conversations** across SMS, WhatsApp and email — including threads from unknown senders so you can try linking a conversation to a patient. * **Four fake staff members** the sample work is attributed to. They can't log in; they exist so assignee lists and leaderboards look real. * Any missing vocabularies — tags, practitioners, rooms, appointment types — are created too. Every record is marked as demo data. An unchanged sample set can be removed together. If staff change its activity history, SmileLine preserves that history instead of relabelling or deleting it. ## Clinical demo data On the stage cell, a platform admin can add a clinical layer on top of a seeded practice from the same page: click **Add clinical demo data**. It fills the sample patients with what a real practice record holds: * **Three months of diaries** for every demo dentist and hygienist — past visits fulfilled, cancelled or missed, future visits booked and confirmed — around a lunch break, two approved absences and the Christmas closure when it falls in the window. * **Charts**: findings, existing restorations and completed treatment on every active patient, with children given a primary dentition. * **Treatment plans** presented from planned procedures, with their visits booked into the diary. * **Clinical notes** signed by the treating clinician, with addenda. * **Ledger**: every completed procedure charged at the practice's Private fees, payments in full, in part or outstanding, deposits on implant cases and invoices — including an overdue debtor. * **Recalls** due and overdue, some already booked. * **Perio exams**: BPE screens, a full probing chart for periodontal patients and BEWE scores for tooth wear. * **Medical histories**, alerts, lab cases, a referral, prescriptions, waitlist requests, recall letters and radiographs. The top-up runs one step at a time — the page shows **Step n of 8** and moves on by itself — and every step is recorded, so a page you close or a request that fails resumes where it stopped instead of writing anything twice. Within a step the data lands patient by patient, so the rest of the practice keeps working while it runs. Without clinical document storage on the cell, plans stop at **presented** (acceptance needs a stored signature) and medical-history forms, letters and radiographs are skipped. The page lists what was skipped. Removing demo data from a practice that ran the clinical top-up always archives rather than deletes: plans are cancelled, recalls paused, waitlist requests withdrawn, lab cases and referrals cancelled, prescriptions voided and planned treatment removed from the chart, while notes, ledger entries, invoices, perio exams and documents stay as evidence. That practice cannot seed the sample set again, which is why the clinical top-up is limited to the stage cell. ## Remove demo data Go to **Settings**, then **Demo data**. Click **Remove demo data**, then confirm in the dialog. If the sample activity history is unchanged, the status returns to **No demo data**. Your real records are untouched. If anyone changed the sample activity history, SmileLine archives the whole linked sample set instead of deleting it. The sample patients, journeys and Inbox threads disappear from active work; demo staff, messaging, PMS connections, resources and automations are disabled. Linked sample referrals and rewards also disappear from active lists and reports, while their recorded history remains intact. The retained records stay explicitly marked as sample data, and that practice cannot seed or remove the sample set again. The page reports **Modified sample data archived**. ## Next step --- # Quick search Source: https://docs-stage.smileline.io/guides/getting-started/quick-search Jump to any patient, page or setting from anywhere in SmileLine with one shortcut. Quick search is the fastest way to move around SmileLine. Open it from any page, type a few characters, and jump straight to a patient record, a page, a setting, a journey board or a saved view — or start creating something new without hunting for the button. ## Open quick search * Press **⌘K** (Mac) or **Ctrl K** (Windows), or * Click **Search** at the top of the sidebar. ![The quick search palette open over the app with mixed results](/screenshots/getting-started/quick-search.png) ## What it searches | Group | What you get | | -------------- | ----------------------------------------------------------------------------------------------------------------------------------------------------------------------------------------------------------------------- | | Quick actions | **New patient** and **New journey** on every page, plus the page's own action when it has one: **New message** on the Inbox and **New campaign** on Campaigns. Selecting one opens the create dialog on the right page. | | Pages | Every page in the app, including each report. | | Settings | Every settings page, e.g. "Treatments" or "Team members". | | Journey boards | Your boards — selecting one opens it on the Journeys page. | | Saved views | Your saved patient views, applied on the Patients page. | | Patients | Live results from your patient list. | Results respect your role: pages, settings and actions you don't have access to never appear. Page-specific actions stay searchable from anywhere: type "campaign" on Today and **New campaign** still appears, marked with the page it belongs to. ## Finding patients Patient results match on far more than the name. Type any part of a patient's: * first, last or preferred name, * email address, * mobile or other phone number (digits only is fine — `7700 900` works), * fiscal code, * street address, city or postcode. The top matches appear as you type, best match first. Select one to open the patient's record. ## Typos are fine Search is typo-tolerant end to end: `pateints` still finds the Patients page, and `Jhonson` still finds Mrs Johnson. You don't need to spell it right — a close attempt is enough. Very short searches (one or two characters) only match exact fragments — typo tolerance kicks in from three characters, so a stray letter can't flood the list with noise. --- # Sign in Source: https://docs-stage.smileline.io/guides/getting-started/sign-in Sign in to SmileLine with your email and password or with Google or Apple, and reset your password when you forget it. By the end of this page you'll be signed in and looking at your landing page — the [Today queue](/guides/today/overview) for most roles, the **Day list** for clinical roles. [Workspaces](/guides/getting-started/workspaces) explains which is which. ## Sign in Go to the SmileLine sign-in page, enter your **Email**, and click **Continue**. On the regional login card, enter your **Password** and click **Login**. If your email has accounts in both service regions, choose the account you want first. You land in your default workspace: **Today**, the daily work queue, in the CRM — or the **Day list** if your role works in the clinical workspace. ![The regional SmileLine login card with email and password fields](/screenshots/getting-started/sign-in.png) Don't have an account yet? Click **Sign up** on the login card and enter your **Full name**, **Email** and a **Password** (at least 8 characters). Tick **I agree to Smileline's Terms of Service and Privacy Policy** — the links open both documents, and your acceptance (version, time) is recorded to your account — then click **Create account**. After you choose your practice country you can also sign up with **Continue with Google** or **Continue with Apple** instead. If a colleague invited you, use the link in the invitation email instead: it opens the right form with your email already filled in and takes you straight into their practice. ## Sign in with Google or Apple On the login card, click **Continue with Google** or **Continue with Apple** and approve the request with that provider. If you already have a SmileLine account under the same verified email address you're signed straight into it; if you're new, an account is created and you continue into practice setup. If your account lives in the other service region, SmileLine retries there automatically — you may briefly see the provider screen a second time. When the region genuinely can't be determined, sign in with your email and password instead. Signing in with Google or Apple skips SmileLine's two-factor verification: the provider's own protections — password, passkey, and device checks — stand in for it. Apple can hide your real email address behind a private relay address. If your SmileLine account uses your real address, a first Apple sign-in with **Hide My Email** creates a separate, empty account instead of opening yours. To use Apple with an existing account, sign in with your password first and connect Apple under **Settings → Account → Sign-in methods**. If SmileLine cannot reach the sign-in service, the login card shows an error and lets you try again. Check your connection before resubmitting your password. If you reach the wrong service region, click **Try EU account region** or **Try US account region** after the failed login. You can also pin the region before you sign in: the selector in the top-right corner of the login card offers **Auto**, **EU** and **US**. **Auto** locates your account from the email address you enter; **EU** or **US** sends you straight to that region and is remembered on this browser. These choices are always available and do not confirm whether an account exists in a region. ## Complete two-factor verification If two-factor authentication is enabled on your account, **Login** opens a second verification page instead of signing you in immediately. Open your authenticator app and enter the current six-digit code. Click **Verify and continue**. SmileLine creates your signed-in session only after the code succeeds. If you cannot use the authenticator, click **Use a backup code instead** and enter one unused backup code. Each backup code works once. Store the remaining codes somewhere private; they are not shown again after setup. Five failed checks exhaust the current verification request. Return to **Sign in** and start again. Repeated failed requests can lock second-factor checks for 15 minutes; wait for the lock to end before trying again. ## Reset a forgotten password On the login card, click **Forgot password?**. Enter your **Email** and click **Send reset link**. If an account exists for that address, a reset link is on its way. Open the email and follow the link. Choose a **New password** (at least 8 characters) and click **Reset password**. You're taken back to the login card — sign in with the new password. Reset links expire. If the page says the link is invalid or has expired, click **Request a new one** and start again from your inbox. ## Manage your sign-in methods Open **Settings → Account** and find **Sign-in methods** to see what's connected to your account: **Email & password**, **Google**, and **Apple**. * **Connect** sends you to the provider to approve the link, then returns you to Settings with the method attached. This is the safe way to add Apple to an existing account, whatever email Apple shows. * **Disconnect** removes a method. Your last remaining sign-in method can never be removed. * Changing sign-in methods requires a recent sign-in. If SmileLine asks you to sign in again first, do so and retry. ## Staying signed in Once you sign in, Smileline keeps your session on that browser, in Smileline Desk, and in the mobile app — you won't be asked for your password on every visit. A session lasts 30 days, and every day you use Smileline extends it by another 30, so you are only signed out after a month without using it. Updates and new releases never sign you out. The only other things that end a session are deliberate: you sign out, you choose **Sign out other sessions** in **Settings → Account**, you delete your account, or a platform administrator revokes your access. A few sensitive actions — connecting or disconnecting a sign-in method, deleting your account — ask you to sign in again if your last sign-in was more than a day ago, but that does not end your session anywhere else. On a shared front-desk computer, sign out when you finish: click your name at the bottom of the sidebar, then **Sign out**. ## Next step --- # Workspaces Source: https://docs-stage.smileline.io/guides/getting-started/workspaces SmileLine has a CRM workspace and a clinical workspace. Learn which one your role opens, where you land after sign-in, and how to switch between them. By the end of this page you'll know which workspace each role works in, how to set where a team member lands, and what the clinical workspace offers today. ## Two workspaces SmileLine is split into two workspaces, each with its own sidebar: * **CRM** — the front-desk product most of this guide is about: [Today](/guides/today/overview), Patients, Journeys, Calendar, Inbox, Marketing, Referrals and Reports. Its pages live under `/crm/…` — for example `/crm/today`, `/crm/patients` and `/crm/journeys`. * **Clinical** — the practice management workspace, built around the day's appointments: the **Day**, **Patients**, **To do**, **Inbox**, **Till** and **Reports**, plus the patient record. Its pages live under `/pms/…` — for example `/pms/day-list`. **Settings** is shared. `/settings/…` is the same hub from either workspace, and it only lists the pages you can open. Main CRM and Clinical pages use title-only headers, with any available actions beside the title. Settings pages keep their introductory subtitles, and patient and campaign records keep their identifying details. Bookmarks and saved links to the old addresses — `/today`, `/patients`, `/pipeline`, `/calendar`, `/inbox`, `/marketing/…`, `/referrals` and `/reports/…` — now open a **not found** page. There are no redirects, so update them to the `/crm/…` addresses. When you are signed in, that page opens inside the workspace of the address you typed (your default workspace for any other address); signed out, it is a plain page. ## Which roles see which workspace | Role | Workspaces | | -------------------------- | ---------------------------------------------------------------------- | | Owner, Manager, Front desk | CRM — and Clinical once the practice's clinical workspace is available | | Telesales, Analyst | CRM only | | Dentist, Hygienist, Nurse | Clinical only | Until launch, the clinical workspace pages show a **coming soon** notice on production, with a preview of the Day diary and a card for each clinical page (Day, Patients, To do, Inbox, Till, Reports); the sidebar, the workspace switcher and your account stay reachable. The clinical workspace exists only for practices where SmileLine has switched it on. Until then owners, managers and the front desk see the CRM alone, and a member whose role opens the clinical workspace only lands on a **Nothing to open yet** page: it asks an owner or manager to change their role or to switch the clinical workspace on, and keeps **Your account** and the practice switcher reachable. Clinical roles never see the CRM — no CRM pages and no CRM settings. **Compare roles** on **Settings → Team members** describes every role in a line: * **Owner** — Full control of the practice, including billing and deletion. * **Manager** — Runs the practice: settings, integrations, team and exports. No billing changes. * **Front desk** — Works patients, journeys, tasks, the inbox and the day list. Settings are read-only. * **Telesales** — Works the call list, the inbox and bookings. No marketing or reports. * **Analyst** — Read-only reports and CRM data. No inbox, no edits, no exports. * **Dentist** — Clinical workspace: patients, the day list and the inbox. No CRM or settings. * **Hygienist** — Clinical workspace: patients, the day list and the inbox. No CRM or settings. * **Nurse** — Clinical workspace: patient records and the day list, read-only apart from appointments. ## Where you land Opening the app at its root address — or clicking the Smileline logo at the top of the sidebar — takes you to your **default workspace**: **Today** for the CRM, the **Day** for the clinical workspace. A member with one workspace always lands there; a member with both lands in whichever is set as their default. To change a default: * **Your own** — open **Settings → Account** and pick **CRM** or **Clinical** under **Workspace**. The section only appears when your role opens both. * **Someone else's** — on **Settings → Team members**, the **Workspace** column on their row offers the workspaces their role opens. Anyone can change their own row; changing another member's needs an owner or manager. ## Switching between them When your role opens both workspaces, the bottom of the sidebar carries a **CRM** / **Clinical** toggle under **Support**; the current workspace is highlighted and picking the other one opens it. [Quick search](/guides/getting-started/quick-search) lists pages from both, with a **CRM** or **Clinical** hint beside each so you can tell them apart. ## The settings hub **Settings** is a set of sections, each a card on the hub and a row in the settings sidebar that expands to its pages. **Account**, **Practice**, **Calendar** and **Data & compliance** are shared by both workspaces; **Leads & journeys**, **Website & booking**, **Messaging**, **Phone** and **Integrations** belong to the CRM; **Clinical catalogue**, **Clinical templates**, **Insurance** and **NHS** belong to the clinical workspace. A page only shows for members whose workspace, country and role can open it, and a section with nothing to show is hidden — so clinical roles never see the CRM sections or **Team members**, a UK practice sees **NHS** rather than **Insurance**, and an Italian one sees neither. Type in the **Filter settings** box at the top of the hub to narrow the cards to matching pages. ## The clinical workspace The clinical sidebar has six pages. A practice day happens in three places — the day, the patient and the list of things to do — and the rest serve them. * **Day** (`/pms/day-list`) — the [diary](/guides/calendar/diary): a column per practitioner or room on an hour rail shaded by the rota, a 3-day view and the list. Book from an empty slot, drag a card to move or resize it, click it for its chairside status, edit or cancel. The page's address carries the date, so a day can be bookmarked or shared. * **Patients** (`/pms/patients`) — the same patient list as the CRM, with its filters, saved views and export; a row opens the clinical patient record. * **To do** (`/pms/worklists`) — the [worklists](/guides/patients/worklists) derived from the record (recalls due, unbooked treatment, unsigned notes, unpaid balances, lab returns, referral outcomes) and **My tasks**, the tasks assigned to you, where you add a task, hand it to a colleague and mark it done. * **Inbox** (`/pms/inbox`) — the same inbox as the CRM's ([conversations](/guides/inbox/conversations)): the thread list, filters, composer and live updates, for dentists, hygienists, owners, managers and the front desk. It lists only conversations with the practice's patients (active or inactive), never enquiries or leads, and a patient's name opens the clinical record. * **Till** (`/pms/till`) — the day's cash session: open it, record cash in and out, count and close it against the day's settlement. * **Reports** (`/pms/reports`) — the money reports (day sheet, aged debt, production, collections, associate pay, chair utilisation), the appointment reports and retention, from the same catalogue as the CRM's [reports](/guides/reports/overview). Booking is an action, not a page in the sidebar: **Book** (`/pms/book`) opens from the patient record's **Book an appointment** button, or from a link that already names the patient. Find the **Patient** (search by name, phone or email), pick the **Location** when the practice has more than one, an optional **Appointment type** (which fills in the **Minutes**) and **Practitioner** (**Any** unless you choose one), then the **Date**, **Time** and **Minutes**, add a **Note** if you like, and click **Book**. The confirmation offers **Open the day list** and **Open the patient**. The **patient record** (`/pms/patients/…`) carries the clinical modules — chart, notes, perio, medical history, plans, prescriptions, lab, referrals, letters, recalls, forms, insurance or NHS, and the ledger — each described under [Patients](/guides/patients/patient-detail). ## On the desk and on your phone * [Smileline Desk](/guides/desktop-app) tags its rail by workspace. When you have both, a **CRM** / **Clinical** control at the top of the rail switches between them; the clinical rail holds the **Day** and the **Inbox**. * The [mobile app](/guides/mobile-app) derives its tabs from your role and workspaces: **Day** for the clinical workspace; **Today**, **Calls** and **Dashboard** for the CRM; **Inbox** for anyone whose role can read conversations. **Account** switches practice. --- # AI assist Source: https://docs-stage.smileline.io/guides/inbox/ai-assist Draft replies and summarise long conversations with AI, without anything sending on its own. AI assist gives you two tools inside the composer: a suggested reply and a conversation summary. Both read the recent thread — and the linked patient's name, language and active journeys — so the output fits the conversation. Nothing is ever sent automatically: a suggestion is only ever a draft you review. ## Get a suggested reply Open the conversation, click the sparkles icon under the composer (titled **AI assist**), and choose **Suggest a reply**. The draft fills the composer. An "AI draft" marker appears above it with three links: **undo** restores whatever you had typed, **regenerate** asks for a fresh draft, and **report** sends a note about the draft to the Smileline team (see below). Edit the draft like any other message, then press `Enter` or click **Send**. ![An AI-suggested draft in the composer with the undo and regenerate links](/screenshots/inbox/ai-suggest.png) The suggestion matches the channel the reply will ride — short and informal for WhatsApp and SMS, fuller for email — and answers the patient's latest messages. ## Summarise a conversation Long thread, new shift? Choose **Summarize conversation** from the same **AI assist** menu. A summary appears as a notification with a **Save as note** action — click it to keep the summary in the thread as an internal note the patient never sees. ## Report AI content Anything the AI wrote can be reported. Messages the AI sent in a thread — the website widget's assistant replies and the AI voice agent's confirmations — show **Report** next to their timestamp, and an AI draft in the composer has its own **report** link. Say what was wrong and click **Send report**. A report reaches the Smileline team as a support message. It carries your words, the message or conversation reference, and your name and practice — never the AI text itself. Reports share the platform support limit of 30 messages per minute. ## Limits * **Rate limit.** AI assist is rate-limited per organisation, shared by everyone at the practice: bursts of up to about 30 requests, roughly 180 per hour in sustained use. Past the limit you'll see "AI assist rate limit reached — try again shortly". * **Empty threads.** Both actions need at least one message in the thread to work from. * **Availability.** If AI assist isn't configured for your workspace, the actions return "AI assist is not configured" — contact your administrator. AI output is a starting point, not a decision. Always review a draft before sending, especially anything touching clinical or pricing questions. --- # Channels Source: https://docs-stage.smileline.io/guides/inbox/channels How WhatsApp, SMS, email, Telegram, Messenger, Instagram, TikTok, comments and live-chat messages reach the Inbox, and the rules for each channel. SmileLine connects your messaging channels into one shared Inbox: **WhatsApp**, **SMS** (via Twilio, or from your own Voice number), **Email**, **Telegram**, **Messenger**, **Instagram DMs**, **TikTok direct messages**, **Facebook and Instagram comments**, and **Live chat** (the website [chat widget](/guides/chat-widget/setup)). This page explains how messages flow into the Inbox and what each channel allows, so you know what to expect when replying. ## How conversations flow in Once a channel is connected, inbound messages arrive in the Inbox automatically: * A message from a number or address SmileLine already knows lands in that patient's existing thread. * A message from a sender who is not linked to a patient opens a new conversation. The conversation and **Contact details** panel show the sender's name when available, otherwise their number, address or channel ID. [Link it to a patient](/guides/inbox/conversations#link-a-conversation-to-a-patient) so it lands on their timeline. * A patient reply reopens a closed or snoozed conversation, so it always resurfaces in the **Open** tab. * A message that arrives while its connection is paused or in error (a failed **Test**, an expired token) is kept and delivered into the Inbox once the connection is active again — it is never lost. Each patient has a single thread that can span channels. Their WhatsApp messages, texts and emails all appear in one conversation, and every message carries the icon of the channel it travelled on. Replying **STOP** by WhatsApp or SMS immediately blocks that channel for the linked contact, even if the connection has just been paused or disconnected. Provider retries do not append another opt-out record. One shared contact can represent up to 25 patients. If a legacy contact exceeds that limit, SmileLine keeps the whole contact blocked while the patient links are reviewed. **START** can restore consent only through an active connection and cannot clear a block that still needs review. Incoming attachments on WhatsApp, Telegram, Messenger, Instagram, comments and MMS can briefly show **Loading…** while SmileLine copies them from the provider into durable storage. That copy is retried automatically if the provider or storage is temporarily unavailable. If the provider no longer makes the file available after all retries, the thread shows **Attachment unavailable** rather than loading forever. Photos and stickers show inline, and videos and voice notes play in the thread. PDFs, documents, active content and unknown file types download instead of opening as a page on the API origin. Every file chip shows its size. **Live chat** threads come from the website widget. Replies you type are pushed to the visitor's browser in real time (with your first name, so they know a human joined), and the contact panel shows which page they're chatting from. Templates aren't available on live chat, but attachments are — in both directions: visitors can paste, drag or pick a file in the widget, and you can reply with one from the composer. The widget's own visitors show read ticks on your latest message once they've seen it. ## Choosing a channel for a reply When a thread spans channels, the composer's channel picker decides which one your reply rides. It defaults to the channel the patient last wrote on. A channel is unavailable when its connection is disconnected or the patient has opted out — the picker greys it out and shows the reason. ## Channel rules WhatsApp allows free-text replies only within 24 hours of the patient's last message (the "24-hour window"). While the window is open, the composer shows a countdown when it's about to close. Once it closes, the composer switches to approved templates only — pick one to restart the conversation, reply on another channel, or leave an internal note instead. Starting a brand-new WhatsApp conversation also requires an approved template. See [Message templates](/guides/inbox/templates). One attachment per message while the window is open, following WhatsApp's own media rules: JPEG or PNG photos up to 5 MB and MP4 video or audio up to 16 MB go out as media; a small WebP goes out as a sticker; anything else — a PDF, a Word document, a GIF, a larger photo — is delivered as a file the patient can open, exactly as WhatsApp itself does. Text sent with a photo, video or file becomes its caption; WhatsApp has no caption on a voice note or sticker, so the composer asks you to send that text separately. If you connected your WhatsApp Business app, new messages your team sends there also appear in Smileline. They are shown as outbound messages without an unread notification or a new reply window. Earlier chats are not imported. No subject lines. Sent through your connected Twilio number, or from your own SmileLine Voice number once texting is enabled on it (see [Settings → Channels](/guides/settings/channels)). A text of **HELP** or **INFO** is answered automatically with the practice's name, contact details and opt-out instructions — once per request, even after STOP. **MMS** — picture messages — exists only between US and Canadian numbers, so the paperclip appears when both your sending number and the patient's are +1 and stays hidden otherwise. From a Voice number a message carries up to 10 files and 1 MB of media in total (JPEG, PNG, GIF, MP4, 3GP or a vCard); on Twilio, up to 10 files and 5 MB. Incoming MMS photos and videos land in the thread like any other attachment. Supports subject lines, formatted content and attachments. When replying, leave the subject blank to continue the thread's latest subject. Long emails are collapsed in the thread — click **Show full email** to expand. An outbound email can include up to 20 attachments, each no larger than 16 MiB and no larger than 25 MiB combined. An incoming email is limited to 25 MiB for the complete raw message and up to 20 attachments, each no larger than 10 MiB and no larger than 20 MiB combined. A connected Outlook mailbox uploads files over 3 MB in parts, as Microsoft requires; a connected Gmail mailbox refuses the executable file types Google blocks (.exe, .bat, .js, .msi and similar), and the composer says so before sending. For abuse and cost protection, each connected email address accepts a fair-use quota of up to 10,000 incoming messages or 10 GiB of raw email per UTC day, whichever is reached first. Mail above a limit is refused with an error naming the reason, so the sending server returns it to the sender rather than the message silently disappearing — nothing is ever partially imported. When a page contains several exceptionally large formatted emails, SmileLine may show the safe plain-text version for later messages instead of loading more stored HTML. The message and its attachments remain in the conversation. A connected Gmail or Outlook mailbox behaves the same in the composer, with replies sent from your own address and filed in the mailbox's Sent folder. Incoming mail written by a person creates or continues a conversation; newsletters, no-reply notifications, auto-responders and delivery reports stay in the mailbox and are skipped, as does anything Gmail has labelled spam or trash and any message over the 25 MiB limit. Each skip is recorded: the connection's card under **Settings → Channels** shows *12 emails skipped* under its status line once the count is above zero, and if the rules change later that mail can be brought in without re-syncing the mailbox. A mailbox whose sync paused after repeated failures says so on its card under **Settings → Channels**; a successful **Test** there resumes it. Mail your team sends directly from Gmail or Outlook appears in the thread labelled as sent outside SmileLine. Telegram conversations start with the patient: they message your practice's bot, and the thread appears in the Inbox. Replies go out as the bot, with no time window — you can reply whenever consent allows. New conversations cannot be started from SmileLine on Telegram. Messages are plain text up to 4,096 characters. A reply can carry one attachment, and text sent with an attachment is its caption, limited to 1,024 characters — the composer refuses anything longer before it sends. Photos, GIFs, MP4 videos, MP3/M4A audio and OGG voice notes go out in Telegram's own form for each; anything else goes as a document. Incoming photos, GIFs, documents, voice notes, stickers and videos up to 16 MiB are copied into the conversation like WhatsApp media. Messenger and Instagram direct messages allow replies only within 24 hours of the person's last message, with no template escape — once the window closes the endpoint shows **Reply window closed** and you reply on another channel instead. The composer shows a countdown as the window nears its end. Meta's messages carry only an account id. Smileline looks up the person's Meta profile, then checks the participants in that specific conversation if the profile gives no name. Messenger uses the person's name; Instagram uses their profile name or @username. Meta must grant access to the requested information. If neither lookup provides a name, the thread keeps the id and tries again when another message arrives. A full profile name automatically links an unassigned conversation when it exactly matches one eligible patient's first name and surname in your practice, ignoring capitalisation and extra spaces. A username or a name shared by several patients needs a manual link. Existing names and patient links are preserved. See [patient matching and linking](/guides/inbox/conversations#link-a-conversation-to-a-patient). Messages that arrive while another tool (a separate inbox product connected to the same Page) owns the conversation still land in the thread, but Meta refuses replies from Smileline until that tool releases the conversation. Replies staff type in Meta's own apps appear in the thread too, labelled **sent outside SmileLine**, so the conversation always reads complete. When someone unsends a message, the bubble becomes **Message unsent** — the history stays, the content goes. A reply can carry one attachment while the window is open, sent without text (Meta has no caption): on Messenger any image, video, audio or file; on Instagram a JPEG or PNG image, an MP4/MOV/WebM video, AAC/M4A/WAV audio, or a PDF — the composer refuses other formats before sending. Incoming stickers, reels and shared posts arrive in the thread too. TikTok conversations start with the patient: they message your practice's TikTok Business Account, and the thread appears in the Inbox named after their TikTok profile. New conversations cannot be started from SmileLine on TikTok. Replies are allowed only within 48 hours of the patient's last message, with no template escape — once the window closes the endpoint shows **Reply window closed** and you reply on another channel instead. TikTok also limits a business to 10 consecutive messages before the patient answers again; a reply over that limit fails with TikTok's reason on the message. Replies are text-only. Incoming photos are copied into the conversation; a shared TikTok post arrives as its link; stickers, videos and voice notes arrive as **Unsupported TikTok message. Open TikTok to view it.** so nothing goes missing. Replies your team types in the TikTok app appear in the thread too, labelled **sent outside SmileLine**. TikTok does not deliver direct messages through its API for Business Accounts registered in the United Kingdom, the European Economic Area, Switzerland or the United States; see [Settings → Channels](/guides/settings/channels#connect-tiktok). Comments on your Facebook Page posts and Instagram posts arrive as conversations, one thread per person — all of someone's comments across posts share a thread, and each message notes which post it was on. The composer offers two modes: **Public reply** posts under the comment; **Private reply** sends a one-time DM (Meta allows one private reply per comment, within 7 days). A public reply on a Facebook comment can carry one image (JPEG, PNG or GIF); private replies and Instagram comment replies are text-only. If the person answers your private reply, the conversation continues as an ordinary Messenger or Instagram DM thread. A comment the author deletes becomes **Message unsent** in the thread. Attachment limits depend on the channel, and the composer shows the rule for the channel you are replying on (hover the paperclip). Every upload is limited to 16 MiB per file. Outbound email supports up to 20 files and 25 MiB combined; incoming email allows up to 20 files, 10 MiB per file and 20 MiB combined. ## Connecting and managing channels Channels are set up in **Settings → Channels** by an owner or admin: choose **Add channel** to connect a WhatsApp number, an SMS number, an email address or a Telegram bot, then use **Test** to verify the connection. The full setup walkthrough, including the webhook and inbound-address details your provider needs, lives in [Settings → Channels](/guides/settings/channels). ![The channel filter and channel icons in the conversation list](/screenshots/inbox/channel-icons.png) If no channel is connected yet, the **New** conversation dialog will tell you — connect one in **Settings → Channels** first. --- # Working with conversations Source: https://docs-stage.smileline.io/guides/inbox/conversations Read, answer and triage patient messages from every channel in one place. The Inbox gathers every WhatsApp, SMS and email exchange into one screen. This page shows you how to read a conversation, reply, leave internal notes, attach files, and keep the queue tidy with assign, snooze and close. On web and mobile, conversation titles show the linked patient's name, or the sender's profile name when the conversation is unlinked. Messenger and Instagram recipient labels also use the available profile name in the thread header and reply-channel picker. Phone numbers and email addresses stay visible in the picker so you can choose the right destination. A channel ID is the fallback when no profile name is available. Open the Inbox from the sidebar. The page has three panes: the conversation list on the left, the open thread in the middle, and the contact panel on the right. ![The Inbox with the conversation list, an open thread and the contact panel](/screenshots/inbox/inbox-overview.png) ## Find the conversation you need * Switch between the **Open**, **Snoozed** and **Closed** tabs above the list. **Open** is everything that still needs attention. * Narrow the list with the channel filter (**All channels**, WhatsApp, SMS, Email), the assignee filter (**Mine**, **Unassigned**, **Anyone**, or a colleague), and the **Unread** toggle. * Type in **Search conversations** to match a contact's name, phone number, email address or the last message. Unread conversations show a badge with the unread count, and the header shows how many conversations are unread in total. New inbound messages appear in the list the moment they arrive. The list works from the keyboard: press `j`/`k` (or the arrow keys) to move, `Enter` to open, and `Esc` to close the thread. Opening a conversation marks it as read. ## Read the thread Messages from the patient sit on the left; yours sit on the right with delivery ticks — a clock while sending, one tick for **Sent**, two for **Delivered**, and two coloured ticks for **Read**. Scroll up to load older messages. Emails show their subject line; click **Show full email** to expand a long one. A web address in a message is clickable and opens in a new tab. A conversation can span more than one channel — the same contact's WhatsApp, SMS and email messages live in a single thread, each message marked with its channel icon. A parent, guardian or guarantor may represent more than one patient through that contact. In that case, each message records which patient it concerns before consent, timeline and automation effects are applied. When a practice retention period removes patient-bearing message content, the thread keeps the message's direction, channel, time and delivery state but replaces its body with **Content removed by your data retention policy**. ## Reply Open the conversation and click into the composer at the bottom. Make sure the **Reply** tab is active. If the thread spans several channels, check the channel picker next to the attach button. It defaults to the channel the patient last wrote on; click it to reply on a different one. If the contact represents more than one patient, use **Message about** to choose the patient this reply concerns. SmileLine uses that choice for consent checks, the patient timeline and automation. Type your message. For email replies you can set a subject — leave it blank to reply on the thread's latest subject. Press `Enter` or click **Send**. `Shift+Enter` adds a new line instead. Email replies use the same visual editor as email templates, so a reply can be formatted rather than plain text: type `/` for layout blocks, select text for formatting, and paste or drag in an image to add one inline. Because `Enter` makes a new paragraph there, an email reply sends with `Cmd`/`Ctrl` + `Enter` or the **Send** button. Every other channel — and internal notes — stays a plain text box where `Enter` sends. For a longer email, click the expand button in the composer's toolbar to write it in a full window. Everything works the same there — subject, templates, AI assist, attachments and the channel picker — and closing the window puts the draft, formatting included, back in the thread. You can't send on a channel that is disconnected or that the patient has opted out of — the composer tells you why and lets you pick another channel. WhatsApp replies are also subject to the 24-hour window; see [Channels](/guides/inbox/channels). When a shared family contact replies and the message cannot honestly be tied to one patient, SmileLine stops reply-sensitive nurture for every patient that contact represents. It does not put the reply on one patient's timeline or count it as that patient's campaign response. ## Attach a file Click the paperclip icon in the composer and pick one or more files, drag them onto the composer, or paste a copied image or file straight into the message box. Each file is limited to 16 MiB; email takes up to 20 files and 25 MiB combined, and the other channels follow their provider's own rules — hover the paperclip to see the rule for the channel you are replying on, and see [Channels](/guides/inbox/channels) for the full list. The paperclip is hidden where the channel cannot carry files (SMS outside the US and Canada, Instagram comment replies). A file that the channel cannot deliver is refused before it uploads, with the reason. SmileLine keeps an uploaded file private until you send the message. The upload expires after one hour if you abandon the draft, and each upload can be sent only once. If it expires, upload the file again. Images show as thumbnails before and after sending, videos and voice notes play in the thread, and documents and unknown file types download instead of opening as a page. ## Leave an internal note Switch the composer to the **Note** tab, write your note, and click **Add note**. Notes appear in the thread on an amber card marked "not visible to the patient" — they are never sent. Use them for handovers and context. ## Triage a conversation The thread header carries the triage actions: * Click **Close** when the conversation is dealt with (or **Reopen** to bring it back). * Open the actions menu (the `⋮` button) for the rest: * **Assign to** — hand the conversation to a colleague, or set it back to **Unassigned**. * **Snooze** — hide it until **Later today (+3h)**, **Tomorrow 9:00** or **Next Monday 9:00**. * **Mark unread** — put it back in the unread queue for a second look. * **Link to patient** — see below. ![The conversation actions menu with assign and snooze options](/screenshots/inbox/triage-menu.png) Snoozed conversations reopen on their own when the timer runs out — and immediately if the patient replies. An inbound message also reopens a closed conversation, so nothing slips past the **Open** tab. ## Link a conversation to a patient Incoming messages match existing patients in your practice by email first, then mobile number. If neither matches, the sender's full name can link the conversation when it matches exactly one eligible patient's first name and surname. Capitalisation and extra spaces are ignored; partial names, nicknames and usernames do not match. Archived, deceased and merged-away patient records are excluded. Messenger and Instagram also check after their profile name becomes available, including cached names when another message arrives. If the patient already has a thread, the conversations join and their message history is preserved. Existing patient links and shared-contact relationships are kept. If several patients share the same full name, or no match is available, link the conversation yourself. The **Contact details** panel still shows the sender's name when available, otherwise their number, address or channel ID; **Unknown contact** appears only when none is available. Names and contact details written inside message text are not extracted for matching. Click **Link patient** in the thread header (or **Link to patient** in the contact panel). The search starts with the sender's name when available, otherwise their number, email address or channel ID. Search by name, phone or email and pick the right patient — or click **Create a new patient**. **Create a new patient** prefills the available name, email, mobile and channel location. It also checks earlier inbound messages for contact-form answers and unambiguous email addresses or phone numbers. Review and edit these suggestions before saving. Messenger and Instagram account IDs are never used as mobile numbers. Lead source, tags and referral details stay empty when they are not known. The conversation and all its past messages are added to the patient's timeline. A reachable contact has one conversation thread. If the contact you link already has one, the two threads merge into it automatically. For a shared family contact, choose the represented patient for each new outbound message; SmileLine never guesses from the shared phone number or email address. Once linked, the contact panel on the right shows the patient's details and journeys. You can edit contact fields directly there, or click **Open full patient record**. ## Retry a failed message Most ordinary messages that cannot be delivered show **Not delivered** with the failure reason and a **Retry** button. Fix the cause if there is one (for example, a wrong number) and click **Retry** to send that message again. If an SMS or WhatsApp provider may have accepted a message but did not return a conclusive response, the bubble instead shows **Delivery status unknown**. SmileLine does not offer **Retry** for that message because sending it again could give the patient a duplicate. A later signed delivery callback can still recover the message to **Sent**, **Delivered**, **Read** or a confirmed failure. An appointment reminder suppressed while a historical PMS import resolves a source correction is also non-retryable. Its frozen message may describe an old appointment time. SmileLine leaves the reminder lifecycle available for a later live appointment change, which creates a new message with current content. SmileLine also removes **Retry** after retention has removed the message content. The API reports `MESSAGE_CONTENT_REDACTED` rather than risking an empty message being delivered to the patient. SmileLine also withholds **Retry** when the original reason for a scheduled message no longer exists: for example, its automation was cancelled or its deposit request was already paid, cancelled or expired. Campaign messages are retried through their campaign workflow, not from the Inbox. Write a fresh manual message if the patient still needs a different follow-up. **Retry** is also withheld once a message has stopped being worth sending rather than merely failing. A reminder whose appointment has already started shows **Not sent — the appointment time had already passed**. Ordinary failed messages, by contrast, are never refused for their age or for how many times they have been retried: every **Retry** starts a fresh delivery attempt. Email waits in the delivery queue when the shared email provider is busy. Provider rate limits are retried automatically without using up the email’s ordinary failure attempts. Queued email does not expire merely because it has waited for capacity. Genuine delivery problems remain visible and recoverable. If a new message cannot be handed to the delivery queue, Smileline retries that handoff on a finite backoff for up to 48 hours. A handoff recorded as accepted is not published again merely because processing is delayed. If the worker cannot tell whether an older handoff succeeded, recovery can create another queue copy after 30 minutes; a persisted provider-attempt claim allows only one copy to submit the patient message, and the generation is not failed while a sibling could still be delivered. For other channels, if a delivery attempt is still queued when its own 48-hour horizon elapses, it is marked as no longer timely instead of being delivered late — and **Retry** starts a fresh attempt with a fresh horizon. A **send attempt 2** label appears on later attempts. Each attempt has its own finite queue-publication budget, so a retry can never restart earlier attempts' work — only add one more. ## Start a new conversation Click **New** in the Inbox header, choose a channel, enter the recipient's phone number or email address, and write the first message. If a thread already exists for that contact and channel, your message lands there instead of creating a duplicate. Business-initiated WhatsApp messages must use an approved template — see [Message templates](/guides/inbox/templates). --- # Message templates Source: https://docs-stage.smileline.io/guides/inbox/templates Insert reusable message snippets in the composer, and manage the practice's template library. Templates save you retyping the same answers — opening hours, directions, deposit reminders. This page shows you how to insert one while replying and how to manage the practice's template library. ## Insert a template while replying Open the conversation and click the template icon (the leftmost button under the composer, titled **Insert template**). Pick a template from the popover. It only lists templates that fit the reply's channel, plus channel-agnostic ones. The template body is inserted into the composer with its merge tags already filled in — the patient's name, your practice details and so on. What you see is exactly what will send. Edit the text if you like, then send. On an email reply that is `Cmd`/`Ctrl` + `Enter` or the **Send** button; on every other channel `Enter` sends. ![The template picker open above the composer](/screenshots/inbox/template-picker.png) For email replies, a template with a subject also fills the subject field if it's still empty. ## Merge tags Template bodies can contain merge tags that resolve when the template is inserted: | Tag | Resolves to | | --------------------------- | --------------------------------------------------------- | | `{{patient.firstName}}` | The patient's first name (their preferred name when set) | | `{{patient.lastName}}` | The patient's last name | | `{{practice.name}}` | Your practice name | | `{{practice.website}}` | Your practice website | | `{{practice.signature}}` | The email signature from **Settings → Practice** | | `{{practice.logo}}` | The email logo from **Settings → Practice**, as a picture | | `{{location.name}}` | The location's name | | `{{location.phone}}` | The location's phone number | | `{{location.email}}` | The location's email address | | `{{location.address}}` | The location's full address | | `{{location.openingHours}}` | The location's opening hours, formatted | Location tags resolve against the site set as the automation location in **Settings → Practice**, falling back to your first location. A tag that can't be resolved — for example a patient tag in an unlinked conversation — is inserted as blank text, never as raw braces. ## WhatsApp templates and Meta approval WhatsApp only allows free-text messages within 24 hours of the patient's last message. Outside that window — and when starting a new WhatsApp conversation — you must send a template that Meta has approved for your account. Smileline handles the approval for you. Every WhatsApp-channel template is submitted to Meta automatically: * The standard reminder set (booking confirmation, appointment moved, 48-hour and 24-hour reminders, after your visit, missed appointment, cancellation) comes with every practice as WhatsApp templates. They are submitted the moment your WhatsApp connection is active. * A WhatsApp template you write yourself is submitted within a few minutes of saving it. * Templates you already created in WhatsApp Manager are imported into the list, with their Meta status. Each WhatsApp template shows its status in **Settings → Templates**: | Status | Meaning | | --------------------------------- | -------------------------------------------------------------------------------------------------------------------------------------------------------------------------------- | | **Not submitted** | Waiting for a WhatsApp connection. Connect WhatsApp under **Settings → Channels** and it goes out by itself. | | **Submitting shortly** | Saved; Smileline sends it to Meta within a few minutes. | | **In review at WhatsApp** | Meta is reviewing it. Most decisions arrive within an hour; Meta allows itself up to 24 hours. | | **Approved by WhatsApp** | Ready. The composer offers it as a one-click send when the 24-hour window is closed. | | **Rejected by WhatsApp** | Open the template: Meta's reason is shown. Fix the text, save, and it is submitted again as a new version. | | **Paused / Disabled by WhatsApp** | Meta stopped it after negative feedback. It is withdrawn from the composer until Meta reinstates it. | | **Needs attention** | Something outside the text: the connection lacks the template permission, the account's template quota is full, or several submissions failed in a row. The template says which. | The merge tags in your text become Meta's placeholders in the order they appear, so what you see in Smileline is what Meta approves and what sends. Each merge tag can appear only once in a WhatsApp template, because Meta rejects a template that reuses a placeholder; the editor tells you if you repeat one. Choose a **Category** when you write the template: **Utility** for appointment confirmations, reminders and account updates, **Marketing** for offers and promotions. Meta reviews the category too and may re-file it — the template then shows the category Meta chose. Marketing templates cost more per message, are subject to WhatsApp's marketing opt-out, and are not delivered to US numbers. **Language** defaults to your practice's country; pick another when the text is written in a different language. ### Editing an approved template Saving a change to an approved template sends the new text to Meta as a new version. The approved text keeps sending until the new version is approved, at which point the template switches over — nothing is interrupted, and reminders already scheduled with the old text keep working. Smileline asks you to confirm before it submits. A change that only swaps one merge tag for another — `{{patient.firstName}}` for `{{patient.preferredName}}`, say — does not go back to Meta at all, because Meta's copy is unchanged. ### Imported templates A template created in WhatsApp Manager arrives with Meta's numbered placeholders (`{{1}}`, `{{2}}`, …). Replace each one with a merge tag and save; the template is then ready to send without going back to Meta. A template that uses features Smileline cannot fill yet — named parameters, a picture or document header, buttons with variables, or an authentication template — is shown read-only with the reason. Templates are managed in the WhatsApp account of your first active WhatsApp connection. A practice with numbers in several WhatsApp Business Accounts manages templates in that one account; the template dialog says which number's account it is. ## Manage the template library Templates live in **Settings → Templates**. Owners and managers can create and edit them; everyone else can use them in the composer. Go to **Settings → Templates** and click **New template**. Give it a **Name** and choose a **Channel** — **Any channel** makes it available everywhere, or pick WhatsApp, SMS or Email to scope it. Write the message. Email templates get the visual editor and a **Subject**; SMS, WhatsApp and **Any channel** templates get a plain text box. WhatsApp templates also take a **Category** and a **Language**, and are submitted to Meta for approval when you save. Add merge tags where you want them. In an email, type `{` and pick a field from the list that appears. On any channel, the merge-tag buttons under the editor insert one at the cursor. Click **Save**. The template appears in every composer straight away. It is the same editor everywhere a template is edited, including the **Edit template** button inside an automation step — so an email keeps its design no matter where you change it. To retire a template, click **Archive** on its row — it disappears from the composer but stays in the list, and **Restore** brings it back. ## The email visual editor Email templates are written in a visual editor rather than a plain text box. * Plain paragraphs read like a personal email — that is the default, and usually the right one for a follow-up. * Type `/` for layout blocks: headings, lists, quotes, buttons, dividers, sections and columns. * Type `{` to search the merge tags and insert one. Keep typing to filter the list, then press `Enter`, or click the one you want. * Select text to get formatting options. * Click **Image** to add a picture, or paste and drag one straight into the body. * Press `Escape` once to close an open menu, and again to close the dialog. ### Images Click **Image** below the editor to upload a picture or reuse one you have already uploaded. Anything you upload joins your practice's image library and stays available in every template, campaign and reply, so a logo only needs uploading once. Use JPEG, PNG or GIF, up to 2 MB each. Images are hosted for you and load from a link in the email, so keep them small enough to appear quickly on a phone. Deleting an image from the library breaks it in emails you have already sent, because those emails load it from that same link. Leave it in place unless you want it gone everywhere. WebP images are rejected. Outlook cannot display them, and a picture that silently fails to load in a patient's inbox is worse than one you could not upload. Many people read email with images switched off, so never put words that matter, such as an appointment time or a cancellation link, inside a picture. The editor writes the email at 600px wide, which is the standard for email clients. On a narrow screen it shrinks to fit — what recipients see on a phone. ## Writing the HTML yourself Some emails are easier to paste than to rebuild — a design an agency sent you, a layout with its own styling, a newsletter you already use elsewhere. Above the body, switch from **Visual** to **HTML** and write the markup directly. Click **HTML** above the editor. If you have not written any HTML yet, SmileLine starts you off with the current design's markup, so you can adjust it rather than begin from nothing. Type or paste your HTML in the **Code** tab. It is a real code editor — highlighting, closing tags and indentation all behave as you would expect. Merge tags work exactly as they do in the visual editor. Type them yourself, or click a tag button below the editor to drop one in at the cursor. **Image** adds a picture from your library as an `img` tag. Open the **Preview** tab to see the result. Merge tags appear as themselves here — they only resolve when a message actually sends. Click **Save**. The template sends your HTML exactly as written. Your HTML is sent untouched, `style` blocks and all, so responsive layouts keep working. SmileLine builds the plain-text version of the email from your markup automatically, for the small number of people whose mail app cannot show HTML — which is why a design made only of images is refused unless it has a subject to fall back on. The two modes hold separate drafts, and **Save** commits whichever one you have open. Saving in HTML replaces the visual design; saving in Visual replaces your HTML. Switching back and forth before saving changes nothing, so it is safe to look. An HTML template cannot be re-opened in the visual editor with its markup intact — the visual editor only understands its own blocks. Keep a template in one mode or the other. --- # Welcome to SmileLine Source: https://docs-stage.smileline.io/guides The CRM built for dental practices — capture leads, run your day, and keep every patient conversation in one place. SmileLine helps your front desk turn enquiries into booked appointments. This guide walks through every part of the app, from your first sign-in to reports. ## Start here ## Work smarter ## Building an integration? The [API Reference](/reference) documents every endpoint, with an interactive playground to try requests against your own data. --- # Boards and stages Source: https://docs-stage.smileline.io/guides/journeys/boards-and-stages Track every treatment enquiry through your pipeline on the Journeys board. Open **Journeys** in the sidebar to see your board: a kanban view where every card is one patient's journey towards one treatment, and every column is a stage of your pipeline — from first enquiry to treatment started. ![The Journeys board with stage columns and journey cards](/screenshots/journeys/board.png) ## Boards A board is one pipeline of stages. Most practices run a single board; if yours has several (for example, one per treatment type), switch between them with the board picker in the header. Each board remembers its own stages, and new journeys land on the board configured for their treatment. ## Manage boards and stages Owners and managers click **Manage boards** in the header — or open **Settings → Journey boards** — to edit the funnel itself. On a phone (screens narrower than 768px) the header button is hidden; use the Settings route. The page is a two-part editor: pick a board in the list at the top, and that board's stages load underneath it. Click anywhere on a board's row. The selected row is tinted, marked with a bar down its left edge, and its arrow turns to point at the stage list below, which now reads **Stages on** that board. Edit the stages: drag the grip handle to reorder them, click a stage name to rename it in place, or click the stage's pencil to set its name, category, colour, win probability and **Rotten after (days)** together. Click **Add stage** to append a blank row to the bottom of the list, type a name, and press Enter. The row stays open so you can add several stages in a row — press Escape, click the **✕**, or click away to close it. Each board row carries its own actions on the right: the pencil renames the board, the pin makes it the default that new journeys land on, and the archive icon hides it from the Journeys page. The default board can't be archived — make another board the default first. A stage's category is either **Open** or **Won**, and it's what keeps reporting comparable however you rename the stage. Archived boards and stages stay reachable through the **Archived** toggle above each list, where a restore icon brings them back. ## Stages and column totals Each column header shows the stage's name, the number of cards in it, and the total value of those cards. Open stages sum the potential value of active journeys — your pipeline. A won stage sums what those journeys are actually worth — your booked revenue. ## Cards A card shows the patient's name, the treatment, the journey's value, and how long it has sat in its current stage. Won and lost journeys carry a badge. An active journey also carries a **Stale** badge after it has spent the stage's configured **Rotten after (days)** period there. Snoozing a journey hides its **Stale** badge until the snooze ends. The original time in stage still applies when it wakes. Won, lost, and archived journeys are never marked stale. Archiving a patient takes their cards off every board, even while the journey itself is still active. The journey is kept and stays visible on the patient's own record; find archived patients through the **Archived** preset view on the Patients page. Owners and managers set **Rotten after (days)** when editing a stage under **Manage boards**. Leave it empty when that stage should never mark journeys stale. * Click the card to open the journey detail dialog — values, owner, practitioner, location, first-contact dates, and the patient's full activity feed, where you can also add notes. * Click the patient's name (or **View patient** in the card menu) to open their [patient record](/guides/patients/patient-detail). * The **⋯** menu on each card offers **Mark won**, **Mark lost…**, and **Reopen** — see [Move, close, and reopen](/guides/journeys/move-close-reopen). ![The journey detail dialog with facts on the left and the activity feed on the right](/screenshots/journeys/journey-detail.png) ## Filter the board Use **Search patients…** to find cards by patient, and **+ Filter** to narrow the board by: * **Owner** — one or more team members, or **No owner** for unassigned journeys. * **Treatment**, **Practitioner**, **Location** — one or more entries. * **Channel** — where the enquiry came from. * **Created** and **Entered stage** — date ranges with the same relative presets as the [patients list](/guides/patients/list-and-filters). Filters appear as chips; click a chip to edit it, its **✕** to remove it, or **Clear** to reset. The board URL carries your board, search, and filters, so you can bookmark or share the exact view. ## Lost journeys and board size Lost journeys stay in the stage where they stalled but are hidden by default — toggle **Show lost** in the header to reveal them. The board displays up to 500 journeys at a time. If you see "Showing the first 500 journeys", add filters to narrow the board. ## Start a new journey Click **New journey** in the header. Search for the patient and pick them from the results. Choose the **Treatment**. Optionally set the **Location** and an estimated value — left empty, the value defaults from the treatment's price. Click **Create journey**. The card lands in the board's first stage, and a first-contact task appears on the Today page. You can also start a journey from the **Journeys** panel on a [patient record](/guides/patients/patient-detail), where the patient is already filled in. --- # Move, close, and reopen Source: https://docs-stage.smileline.io/guides/journeys/move-close-reopen Move journeys between stages, mark them won or lost, and reopen closed ones. A journey's place on the board should always reflect reality: move the card as the patient progresses, close it won when they start treatment, close it lost when they don't — with a reason — and reopen it if they come back. ## Move a card between stages Drag a card to another column and drop it. On a touch screen, press and hold the card for a moment, then drag. You can also change the stage from the **Stage** dropdown in the **Journeys** panel of the [patient record](/guides/patients/patient-detail). Moving a card forward tells SmileLine you've acted on the lead: the first forward move records the first contact attempt, and any open first-contact task for that journey on the Today page is completed automatically. Most of the time you shouldn't have to. Stages move on their own from the work you record — the [Today outcome wizard](/guides/today/outcomes-and-undo), an appointment marked **Fulfilled** or **No-show** in the [Calendar](/guides/calendar/overview), and a connected [practice-management system](/guides/settings/integrations). That's why the stage beside a lead's name on Today is a read-out rather than a dropdown: the board and the patient record are where a manual correction belongs. Only active journeys can be dragged. To move a won or lost journey, **Reopen** it first. ## Mark a journey won Either drag the card into your board's won stage, or pick **Mark won** from the card's **⋯** menu (also available in the journey detail dialog and on the patient record). Both do the same thing: the journey moves to the won stage, its status becomes **Won**, and the close date is recorded. ## Mark a journey lost Open the card's **⋯** menu and choose **Mark lost…**. Pick a **Reason** — this is required, and it feeds your missed-revenue reports. Lost reasons are managed in Settings by admins and owners. Optionally add a **Note** with context, then click **Mark lost**. ![The Mark as lost dialog with the reason dropdown and optional note](/screenshots/journeys/mark-lost.png) Losing is not a stage move: the journey keeps the stage where it stalled, along with all its history. The card fades and disappears from the board unless **Show lost** is on (the toggle is hidden on phones narrower than 768px). Any open first-contact task for the journey is cancelled. ## Reopen a journey People change their minds. To bring a won or lost journey back, choose **Reopen** from the card's **⋯** menu, the journey detail dialog, or the patient record. A lost journey becomes active again in the stage where it stopped. A won journey returns to its last open stage before the win (or the board's entry stage if that stage is no longer available). Its close date, lost reason and lost note are cleared. --- # Attribution Source: https://docs-stage.smileline.io/guides/lead-capture/attribution How SmileLine records where every lead came from, and where to see it. By the end of this page you'll know what SmileLine records about a lead's origin, how the channel is worked out, and where that information surfaces in the app. ## Touches: the capture record Every time a lead arrives through a [website form](/guides/lead-capture/website-forms), a [tracked call](/guides/lead-capture/call-tracking) or a capture endpoint, SmileLine records a **touch**: a snapshot of where that contact came from at that moment. A tracked call carries the caller's web session — the UTMs and click IDs their browser held when the number was assigned — so a phone enquiry attributes like a form one. A touch stores: * **When** it was captured and **how** it arrived (form, webhook, Zapier, lead ad, WhatsApp, SMS, call, chat, manual, import) * The derived **channel** (see below) and the **source** name * The **UTM set**: source, medium, campaign, term, content * The **landing URL** and **referrer domain** * Which **capture form** (hook) received it, and the **affiliate** label if the hook carries one A patient can accumulate several touches — an enquiry from a Google ad in March and another from Instagram in June are both kept. The **first touch** is treated as the origin; the newest one shows as **Last touch** when it differs. Technical match data recorded alongside a touch (IP address, device details, approximate geolocation, cookie snapshots, consent flags) stays server-side. It is never shown in the app or returned by list APIs. When a server posts on the visitor's behalf and forwards their address as `client_ip`, that is the IP recorded rather than the posting server's own; see [Direct posting](/guides/lead-capture/direct-posting#attribution-is-automatic). ## Channels on journeys Each journey also carries a single **channel** — the origin bucket used to group boards, reports and the dashboard lead flow. Captured leads get it derived from their touch; manually created leads inherit the channel of their **Lead source** (each entry in **Settings → Lead sources** belongs to a channel — see [Vocabularies](/guides/settings/vocabularies)). The channel buckets are: paid search, paid social, paid AI, organic search, social, referral (website / friend / practice), existing patient, email, chat, direct, phone, walk-in, print, AI, other and unknown. ## How the channel is derived For captured leads the channel is worked out automatically, in order of confidence: 1. **Ad click ids** — a `gclid` means paid search, an `fbclid` means paid social, an `oppref` (OpenAI's [ChatGPT Ads](/guides/marketing/chatgpt-ads) click id) means paid AI, and so on for the other platforms' click ids. 2. **`utm_medium`** — explicit mediums like `cpc`, `paid-social`, `paid_ai` or `email` win over guesses. 3. **Referrer** — a social network referrer becomes social, a search engine becomes organic search, an AI assistant becomes AI. A visit from chatgpt.com with no click id stays AI, not paid AI. 4. Otherwise the lead counts as **direct** — a visit with no campaign parameters and no external referrer. You don't configure any of this. With the [tracking script](/guides/lead-capture/website-tracking) installed, the visitor's marketing parameters travel with every captured submission automatically. If you post to a capture endpoint from your own code instead, make sure your form forwards the page's query parameters (see [Post leads from your own code](/guides/lead-capture/direct-posting)). ## How the lead source is chosen A new patient created from a website form or a tracked call also gets a **Lead source** from **Settings → Lead sources**, chosen from the same signals — you no longer pick one per tracking pool. In order: 1. **Name match** — the `utm_source` (or the ad platform behind a click id such as `gclid` or `fbclid`) is matched by name against your Lead sources list, within the channel the medium or click id implies: `utm_source=google` with `utm_medium=cpc` picks **Google Ads**, a paid `tiktok` picks **TikTok Ads**, a paid `facebook`, `instagram` or `meta` picks **Facebook / Instagram Ads**, and an `oppref` click picks **ChatGPT Ads** (seeded for new practices; an existing practice gets it on its first ChatGPT lead). A bare `utm_source` with no medium matches across every channel. 2. **Create** — a paid-search, paid-social or paid-AI source that matches nothing is added to the list under its own name (a `bing` click becomes **Bing**); a bare `utm_source` that matches nothing (say `utm_source=leaflet`) becomes a new source on the **Other** channel. Creation stops at 50 active lead sources; referring websites never create sources. 3. **Channel anchor** — organic search, social, email, AI assistants, referring websites and phone calls use your first lead source on that channel (**Organic search**, **Social media**, **Email**, **AI assistants**, **Phone call**, …). Paid channels never anchor, so an unmatched Bing click is not booked as Google Ads. 4. **Fallback** — anything else (a direct visit with no tags, a submission with no attribution) uses the form's **Lead source if the submission has no attribution**. A plain direct visit with no form fallback gets **Website**; a submission with no attribution and no fallback gets none. A call to a rotating pool number follows the same rules as a form when the caller had a web session, and gets **Phone call** when they didn't. A call to a [static tracking number](/guides/lead-capture/call-tracking#track-printed-and-offline-ads) skips the list above entirely: it is attributed to the one lead source pinned to that number. Sources SmileLine creates appear in **Settings → Lead sources** like any other; they are not logged in the activity log as a user action. ## Where you see attribution ### On the lead Open a lead from the Today page: the **Source** group on the lead panel shows **Channel**, **Source**, **Campaign**, **Capture form** and **Captured**, plus a **Last touch** row when a newer touch exists. Leads created by hand show **Manual / untracked** with their lead source. ![Source group on the lead panel showing channel, campaign and capture form](/screenshots/lead-capture/lead-source-panel.png) ### On the patient record Open the full patient record: the **Source** group on the profile card lists the whole first touch — channel, source, capture form, captured time, affiliate, landing URL, referrer, every UTM parameter, the ad campaign / ad group / ad / placement / network / keyword / match type / device, every click ID under its own parameter name (`gclid`, `fbclid`, `msclkid`, `ttclid`, `li_fat_id`, …, plus pixel IDs such as `fbp` and `fbc`), and the GA client and session IDs. When a newer touch exists it appears as its own **Last touch** group. Nothing here is editable; the lead source in the Marketing group above it is. ### On a form's deliveries **Settings → Website**, open a form and pick a delivery under **Deliveries**, then switch to **Field mapping**: the **Attribution** block above the payload names every marketing parameter that arrived with that submission, its value, and the channel and lead source it produced. When nothing arrived it says so, and points at the fix — attribution is never a mapping problem, it is a question of what the sender forwards. ### In reports Attribution feeds several reports (see [Reports](/guides/reports/overview)): * **Lead sources** — channel mix, top sources and how each converts * **Attribution (UTM)** — touches by UTM source and campaign, with the journeys, wins and revenue credited to each first touch * **Lead volume** and the **Conversion funnel** — split and stacked by channel * The dashboard's **Conversion by channel** card and **lead flow** graph both start from the channel ### Conversion by channel The dashboard's **Conversion by channel** card answers the question channels exist to answer: of the leads that arrived in the selected window, how many came from each channel and how many of those booked. The bar chart puts leads next to bookings per channel; the table beside it adds the share of the whole period, the booking rate, journeys won, revenue won, ad spend and the return that spend produced, and every channel opens into the campaigns and sources behind it. A lead counts in the window it was **created** in, and its bookings and wins count whenever they happened since — so 50 leads with 10 bookings is 20% however long those bookings took to land. Each channel row carries a small trend line of its leads over the window, and the bar behind its share draws the same proportion the number states. #### Expanding a channel The arrow beside a channel opens the rows underneath it, each with the same columns as the channel itself. What a row is depends on what the leads carried: * **Paid search, paid social, paid AI and email** break down by **campaign** — the `utm_campaign` on the click, or the campaign name from your connected ad account when the click carried its campaign id. * **Organic search, social and AI assistants** break down by **source** — the `utm_source` or the site the visitor arrived from. * **Phone, print, walk-ins, referrals and existing patients** have no web touch to read, so they break down by the **lead source** recorded against the patient. Rows are attributed on the journey's **first** touch, the same touch its channel came from, so a row and its channel always describe the same visit. A journey with nothing recorded shows under **Unattributed**. Where a channel has more rows than the card lists, the remainder is gathered into **Other campaigns** — the rows always add up to the channel above them. A campaign row only shows ad spend when its clicks carried the campaign id, or when its `utm_campaign` matched the name of a campaign in a connected ad account. Spend that could not be matched to a campaign's leads still appears — as its own row, with leads at zero — rather than being dropped. ### Return on ad spend **Return** is revenue won divided by ad spend, shown as a multiple: `4.2×` means every £1 spent came back as £4.20 of won treatment. **Ad return** in the KPI strip does the same sum across every channel that took spend, so spend that produced nothing still counts against it. Spend comes from your connected [ad accounts](/guides/marketing/ads) — Google Ads lands on paid search, Meta and TikTok on paid social, ChatGPT Ads on paid AI — which is the same rule that puts an ad click's lead in that channel. Channels SmileLine has no cost for — organic search, referrals, phone, walk-ins, print — show a dash rather than a return. Nothing in the app records what those cost you, and a return computed without a cost would be wrong rather than optimistic. A channel that took spend and produced nothing shows `0×`, which is a real answer. Ad spend is read in the ad account's own currency and shown in the practice's, so a practice whose ad accounts bill in a different currency should read the return as indicative. ### The lead flow graph The dashboard's **Lead flow** card reads left to right, one column per dimension. **Columns** offers ready-made sets — channel to contacted by to outcome, lead source to outcome, campaign to lead source to outcome, owner to current stage to outcome, treatment to contacted by to outcome — and you can still build your own from two to four columns underneath. Hover any card and the rest of the graph answers for that card alone: every other column switches to the leads it shares with the one you are pointing at, and the percentage becomes its share of that card rather than of the whole period. Hovering **Organic search** turns the outcome column into organic search's own outcomes. Click a card to pin it, click the background to release it. ![Attribution report with UTM campaign breakdown table](/screenshots/lead-capture/attribution-report.png) Every report accepts a **Channel** filter, so any number in the app can be narrowed to, say, paid social only. ## Keep attribution clean * Set each form's **Lead source if the submission has no attribution** — it's used only when a submission arrives with no marketing parameters, since tagged submissions pick their source from the campaign data. * Keep the **Lead sources** vocabulary tidy and each source on the right channel, since manual leads depend on it entirely. * Use consistent `utm_campaign` names in your ads — the Attribution report groups by the exact string. --- # Call tracking Source: https://docs-stage.smileline.io/guides/lead-capture/call-tracking Phone numbers that attribute every call — rotating numbers for your website, and static numbers for the adverts you print. Most patients still pick up the phone. Call tracking closes the gap web forms leave: a visitor who arrived from an ad sees a dedicated tracking number on your site, and when they call it, SmileLine knows exactly which campaign, keyword and click brought them — the same attribution a form submission gets. Call tracking is part of the core plan. There is no add-on to enable: you pay only for the numbers you hold and the minutes you use, listed on the [billing page](/guides/settings/billing). ## How it works 1. You create a **tracking pool** and buy a few numbers into it. 2. The [website tracking script](/guides/lead-capture/website-tracking) you already installed swaps your published phone number for one from the pool, per visitor. Each visitor keeps their number for a few hours after their last visit, so a same-day callback still matches. 3. When the number is called, SmileLine answers, records, and forwards the call to your practice. The caller's web session — UTM parameters, click IDs, landing page — is attached to the call. 4. The call becomes a lead: a known caller is matched by phone number; an unknown caller becomes a patient with a journey and a Today task, exactly like a form submission. Missed calls become leads too — a missed call is someone to ring back. Every tracked call is logged and recorded, and transcribed when the transcription switch is on. That is the rotating pool your website uses. Anything printed — a leaflet, a newspaper advert, a radio slot, your Google Business Profile — has no website visit to read, so it gets a **static tracking number** instead: one number, one lead source, no rotation. See [Track printed and offline ads](#track-printed-and-offline-ads). ## Set up a pool Go to **Settings → Call tracking** (you need a role that manages phone settings) and click **New pool**. **Name it after the audience** — for example “Website — Google Ads”. One pool per website is a fine start; add more when different pages should forward to different places. Up to ten pools can be live at once — archive one to make room. Archiving stops the pool's numbers being swapped into the page; calls to the numbers it still holds keep forwarding, and those numbers keep billing until you release them. **Choose where calls forward.** The default is the location's own phone number — a live pool needs a location with a phone number in the practice's country, and saving refuses otherwise rather than leaving callers with a busy tone. If you forward to one of your SmileLine Voice numbers, calls ring your devices directly instead of dialling out. Forwarding to a number outside the practice's country isn't supported yet. This destination is also the pool's safety net: if SmileLine itself is ever unavailable, calls to the pool's numbers are forwarded straight there, and each one is written to the review queue within the hour so you can ring the caller back. It updates by itself within about five minutes of a change here or to the location's phone. **Pick what new enquiries become.** The treatment is required while the pool is live — it is what guarantees an unknown caller turns into a journey on the board and a task in Today. **Choose where the number appears.** Under **Where the tracking number appears on your website** pick any mix of three ways — all optional: * **Replace every phone number on the site** (off by default) — the script finds every phone-shaped number on the page, in text and `tel:` links, and swaps them all for this pool's number. Only one live pool per practice can have this on; saving a second fails with *“Another live pool already replaces every number on the site”*. * **Specific numbers to replace** — list the numbers currently shown on your site in international form (`+44…`); only those are swapped. * **Tag the elements yourself** — mark any phone link or text element on the site and the script fills it, no number list needed. See [Mark the elements on your site](#mark-the-elements-on-your-site). **Buy numbers into the pool.** Two or three numbers cover a typical site; busy campaigns need more. A visitor keeps their number for four hours after they were last seen (30 minutes if they never came back, so crawlers and one-page visits don't hold numbers all day), and a freed number waits ten minutes before it is handed to someone else. Sized against real traffic: at four new visitors an hour a pool of **three** numbers shows a tracking number to more than **85 %** of them, and two numbers cover a quieter site with two an hour. When every number is held, new visitors simply see your real number, the pool shows **All numbers held**, and the card counts the page loads it could not serve — **N unserved requests today / this week** — so you can see whether it happens once a week or every afternoon. Pool size is the dial to turn if it does. Anyone who knows your public site key could hold numbers the same way; the page always keeps working, and the badge and the counter are how you'd notice. Every number the practice holds — pool members, static numbers and phone-system lines — is listed together on **Settings → Phone numbers**, with the role each one plays. Release a number, or move one between roles, from there; this page keeps the pools themselves. UK numbers need approved business verification first (an Ofcom requirement). One verification covers Voice numbers and tracking numbers alike — start it from the banner on the Call tracking page, and click **View review** there to see the reviewer's verdict on each detail, their messages, and to fix anything declined. See [Complete UK verification](/guides/settings/voice-numbers#complete-uk-verification). Use **Replace every phone number on the site** only when the site shows a single practice number. Every number it swaps forwards to this pool, and it also rewrites other phone-shaped numbers on the page — a partner practice's number, an NHS helpline — so those callers reach you instead. ### Mark the elements on your site Add `class="sl-phone"` (or the attribute `data-sl-phone`) to any phone link or text element. The script fills its text and its `tel:` link — the element itself when it is the link, otherwise the link around or inside it — with the visitor's tracking number: ```html 020 7946 0958 ``` With several pools, `data-sl-phone=""` picks which pool the element shows — the id is displayed in the pool dialog. The script processes roughly the first 2,000 text nodes that contain a digit on a page (indentation and prose cost nothing) and watches content added during the first 10 seconds after load, so keep phone numbers in the page's own markup rather than in late-loading widgets. It only ever rewrites a run that is exactly one of the numbers a pool lists — a number glued to other digits, like an opening-hours line, is left alone rather than damaged. A visitor who already holds a tracking number keeps the swap rules that came with it for up to 10 minutes, so a change to these settings reaches returning visitors after that. ## Qualify callers with a menu If regulars keep calling the tracked number, add the optional caller menu on the pool: for example *“Press 1 if you're an existing patient, or 2 for new enquiries.”* Every caller is still forwarded, recorded and logged, but only the keys you mark as new-enquiry create a lead. Existing patients who match by phone number get the call attached to their timeline instead of a fresh lead in Today. You choose what silence means: treat a caller who presses nothing as a new enquiry (the default — nothing genuine is dropped) or just log the call. ## Track printed and offline ads A pool answers the question *which campaign sent this visitor to my website*. A leaflet, a press advert, a radio slot or your Google Business Profile listing has no visit to read, so a pool cannot attribute it — a caller with no web session is simply recorded as **Phone call**. Give each of those its own **static tracking number** instead: one number, printed in one place, pinned to one lead source. Every call to it is attributed to that source, however the caller found it. | | Website pool | Static tracking number | | ------------------------------- | ------------------------------------------------------- | ---------------------------------------------------------------------------------------- | | Who sees the number | one website visitor at a time, swapped in by the script | whoever reads the advert | | Attribution | the visitor's campaign, keyword and click | the one lead source pinned to the number | | Forwarding, treatment, location | taken from the pool | set on the number itself | | Caller menu | optional | not available | | Good for | Google Ads, Meta, organic search, any web campaign | leaflets, press, radio, vehicle livery, directory listings, your Google Business Profile | ### Set one up Get the number. Click **Buy number** on any pool on this page to order one, or use a number you already hold. Go to **Settings → Phone numbers**, click **Change role** on that number and choose **Static tracking number**. See [Change a number's role](/guides/settings/voice-numbers#change-a-numbers-role). Pick the **lead source** every call to it is attributed to. Make one per advert — “Autumn leaflet”, “Metro half-page” — so the reports separate them. Add them under **Settings → Lead sources** first if they don't exist yet. Pick the **treatment** a new enquiry becomes and the **location** the call belongs to, and optionally the number calls forward to. Leave forwarding empty and calls go to that location's own phone. Print the number on the advert. Static numbers behave like pool numbers everywhere else: calls are answered, recorded, forwarded and — with the transcription switch on — transcribed, and they reach Today, the timeline and the review queue in the same way. They are not in a pool, so they don't use up your ten-pool allowance and the website script never shows them. Because there is no caller menu on a static number, every caller who isn't already a patient becomes a new enquiry from that source. While a static number is live it holds on to what it points at: you can't archive that lead source, treatment or location, and you can't clear the location's phone number while the number follows it. Change the number's settings first, or release it. Read a static number's figures as **new patients this advert brought**, not everyone who rang it. A patient's **Lead source** is set once, when SmileLine first creates their record, so a first-time caller is acquired under the advert's source and counts there in acquisition reports. Someone who already enquired months ago keeps the source they arrived with — their call still lands on their timeline, and the touch still records the advert, but the report doesn't move them. ## What shows up in the CRM * **Today** — a new-lead task for every lead-eligible call, missed calls included. A caller Smileline could not tie to a web session shows as an **Incoming call** at the top of **New · Call now**; a caller it could tie to one keeps that web source and sorts by time with the other new leads. * **The patient timeline** — the call with its duration, outcome, recording and transcript. * **Attribution** — the visitor's UTMs and click IDs on the lead touch, so [conversion feedback](/guides/lead-capture/attribution) reports the call to Google or Meta like any other lead. A new caller's **Lead source** is worked out from that campaign data — see [How the lead source is chosen](/guides/lead-capture/attribution#how-the-lead-source-is-chosen); a caller with no web session (someone who typed the number from a leaflet) gets the practice's **Phone call** source. A call to a [static tracking number](#track-printed-and-offline-ads) skips all of that and is attributed to the source pinned on the number. * **The review queue** — the rare call that could not become a lead by itself, such as a withheld number; listen to the recording and follow up by hand. * **The Calls report** — answer rate, ring time, calls by hour, the UTM source / campaign / keyword behind each call and the missed calls nobody rang back. See [Calls](/guides/reports/calls). * **A caller-ID label in the call log** — where the carrier reports the call's STIR/SHAKEN attestation, the Desk call log shows **Caller ID verified**, **Caller ID attested**, **Caller ID via gateway** or **Caller ID unverified** on the row. It is a hint for the person answering, nothing more: an unverified caller with a real number is still logged, recorded, captured as a lead and followed up like everyone else. Only a withheld or unusable number keeps a call out of the pipeline, and that call is parked in the review queue where you can see it. ## Send tracked calls to GA4 Google Analytics only sees what happens in the browser, so a visitor who reads your number and picks up the phone is a conversion GA4 never records. Connecting your GA4 property sends each attributed tracked call to it as a `phone_call` event, stitched to the same visitor and session the tracking script saw — so the call lands in the same reports, funnels and audiences as your web form submissions. In GA4 open **Admin → Data streams**, pick your web stream, and copy its **Measurement ID** (`G-…`). Under **Measurement Protocol API secrets**, create a secret and copy the value. On **Settings → Call tracking**, under **Google Analytics 4**, paste both and click **Connect**. The secret is stored encrypted and never shown again; to rotate it, paste the new one and **Save**. What is sent: the visitor's GA client and session ids (the same ones the tracking script reads from your GA cookies), the time of the call, whether it was answered, the talk and ring durations, and a stable event id per call so a retry can never count twice. Nothing about the caller — no phone number, no name — leaves SmileLine. Personalised advertising is switched off on every event. Only calls with a web session are sent: a caller with no session, or a visitor whose consent setting or browser kept the GA cookie from being stored, has nothing to stitch to and produces no event. Events are delivered within about five minutes and retried for up to three days, which is as far back as GA4 accepts them; a call that could not be delivered in that window is skipped and counted on the settings card, and saving the GA4 settings re-sends anything that is still deliverable. ## Pricing Call tracking bills three things, all usage-based and shown on the billing page: a monthly charge per held number, a per-minute rate for answered tracked calls (both call legs and the recording included), and a per-minute rate for transcription. Both pool members and static numbers cost the same per number. Releasing one from **Settings → Phone numbers** stops its monthly charge immediately; released numbers cannot be recovered. ## When nobody answers a tracked call A tracked call is forwarded to the practice like any other. If nobody picks up and the practice has Smileline Voice, the caller hears the practice's voicemail greeting and can leave a message — it lands in the voicemail inbox exactly like a call to the practice's own number, and the enquiry is still captured with its campaign attribution. Without Voice, the caller hears a short notice and the call is logged as missed; either way the missed-call follow-ups (text-back, call-back) apply to tracked numbers too. --- # Custom integrations Source: https://docs-stage.smileline.io/guides/lead-capture/custom-integrations Give your own form, backend or third-party tool a SmileLine capture endpoint, with optional signed server-to-server delivery. By the end of this page you'll have a **Custom endpoint** form — an intake URL your own code posts to — and you'll know how to rotate its credentials, switch its delivery mode, or retire it. Most websites don't need this. Install the [tracking script](/guides/lead-capture/website-tracking) and SmileLine detects and captures your existing forms without any wiring. Reach for a custom integration when a backend, middleware tool or third-party product needs to deliver leads itself. ## What a custom integration is A custom integration is a [website form](/guides/lead-capture/website-forms) of type **Custom endpoint**. It gets its own URL containing an unguessable routing token: ```text https://api-eu.smileline.io/capture/YOUR_TOKEN ``` That is an EU example. US practices receive `api-us.smileline.io`. Always copy the complete URL from SmileLine; its hostname is part of the routing boundary. When a submission arrives, SmileLine matches or creates the patient, opens a journey for the form's default treatment, and records an attribution touch (see [Attribution](/guides/lead-capture/attribution)). Choose one delivery mode per form: * **Public browser form** — a website can post directly without an API key or login. Use this with [Post leads from your own code](/guides/lead-capture/direct-posting). * **Signed JSON webhook** — a backend signs the exact JSON body with a separate secret. Use this for server-to-server integrations where the sender can protect a credential. Only owners and managers can view or manage **Settings → Website**. ## Create one A custom endpoint is set up in three steps, shown as a **Basics · Send a test submission · Confirm the mapping** strip at the top of the page until the mapping is confirmed. The endpoint goes live after the first step, but nothing becomes a patient until you confirm the mapping in the third: submissions that arrive in between park safely and replay once you confirm. **Step 1, Basics.** Go to **Settings → Website**, click **New form** and choose **Custom integration**. (**Settings → Integrations → Inbound webhooks → New inbound webhook** opens the same page with that choice made.) Give it a **Name** that identifies the sender, e.g. "Implants quiz — website". Leave **Default treatment** as **None** for general enquiries, or choose a fallback treatment. A matching submitted treatment takes precedence; with neither a match nor a default, a new contact arrives as an enquiry in **Today**. Optionally choose a **Lead source if the submission has no attribution** and a **Location**. Under **What arrives here**, keep **Form submissions** unless a phone system will post its calls to this endpoint — then choose **Incoming calls** (see [Incoming calls from your phone system](#incoming-calls-from-your-phone-system)). Then choose **Public browser form** or **Signed JSON webhook** under **Delivery authentication**. Click **Continue**. If you chose signed delivery, copy the signing secret from **Save the signing secret** before closing it; Smileline never shows it again. **Step 2, Send a test submission.** The form's page shows the **Endpoint** URL, its status reads **Waiting for the first submission…**, and the card lists what to do. **Copy for AI** puts a ready-made brief on your clipboard for whoever builds your website — paste it into ChatGPT, Claude, Cursor or an email to your developer; it contains the endpoint, the delivery mode, the accepted formats, the field names Smileline recognises and a reminder to forward marketing parameters untouched. A public endpoint also shows a **Test request**: copy the `curl` line into a terminal to send a sample submission yourself. Signed endpoints show the header recipe instead (see [Send signed JSON](#send-signed-json)). The page checks every few seconds; **Check now** asks straight away. If you can't send one yet, **Skip and use conventional names** activates the endpoint with the default field names (`first_name`, `last_name`, `email`, `phone`, `telephone`, `date_of_birth`, `gender`, `address`, `address_line_2`, `city`, `county`, `postcode`, `country`, `preferred_contact_method`, `preferred_contact_time`, `treatment`, `location`, `message`, `additional_information`, `marketing_consent`). **Step 3, Confirm the mapping.** As soon as the submission arrives, SmileLine proposes a field mapping from its fields and lists the payload beside the boxes. A box that names a field turns green with a tick, and the field it names carries a green chip in the **First submission** panel, so what is still unmapped stands out. Click a field to drop its path into the focused box, adjust anything the proposal got wrong, check the defaults, and click **Looks right — activate**. The parked submission replays into the CRM and every later submission is captured live. Marketing parameters need no box: the **Attribution · captured automatically** group under the mapping lists what Smileline reads on its own (campaign tags, ad click ids, landing page and referrer), and the submission panel groups any it received under **Captured automatically**, marked **Automatic** — they cannot be clicked into a box. See [Attribution](/guides/lead-capture/attribution). The form's page badges it **Public form** or **Signed JSON** so you can check its mode at a glance. Its **Deliveries** tab records everything it receives — see [Delivery history](/guides/lead-capture/website-forms#delivery-history). ## Incoming calls from your phone system A custom integration set to **Incoming calls** turns each post into a call the reception team sees straight away. Point your phone system, PBX or call-tracking tool at the endpoint and have it post **one event per incoming call**, as soon as the phone rings or as soon as the call ends: ```json { "phone": "+447700900123", "first_name": "Sample", "last_name": "Caller" } ``` The caller's number (`phone`) is the only required field; send the caller's name if the phone system knows it. Without one, the lead is created as **Unknown caller** — the same name a tracked or missed call gets — and staff fill in the real name from the card. Do not post outbound calls. The field names are mapped from the first event exactly as for a form, so a system that sends `caller` or `from` instead of `phone` works once you confirm the mapping. What happens on each event: * Smileline matches the number to an existing patient or creates a new lead, and opens a journey on the form's **Default treatment** (with none, the caller arrives as an enquiry to triage). * The lead appears on [Today](/guides/today/overview) as an **Incoming call** card, with a phone icon, **at the top of New · Call now** — above the newest form leads. A repeat caller who already has a card moves back to the top as one fresh card, never a second one. * A new caller's **Lead source** is your practice's phone-call source ("Phone call" by default), unless the event carries campaign parameters — which is why the fallback lead-source picker is not offered for incoming calls. If your phone system knows how the caller found you (a tracking number tied to a campaign), forward the `utm_*`, click-id, `landing_url` and `referrer` values exactly as they arrive and they are read as for any other lead. * Whether the call was answered or missed is not part of the event. Staff record what happened on the card, exactly as for any other lead — see [Record an outcome](/guides/today/outcomes-and-undo). **Copy for AI** on the endpoint's page hands your developer or phone-system vendor a brief written for calls, and the **Test request** posts a sample call. You can switch an existing endpoint between **Form submissions** and **Incoming calls** on its **Advanced** tab. ## Send signed JSON A signed endpoint accepts `application/json` at the same `/capture/{token}` URL. It rejects query parameters and requires these headers: | Header | Value | | ------------------------- | -------------------------------------------------------------------------------------- | | `X-SmileLine-Delivery-Id` | A unique delivery ID, up to 200 characters. Reuse it only to retry the identical body. | | `X-SmileLine-Timestamp` | Unix time in seconds, within five minutes of SmileLine's current time. | | `X-SmileLine-Signature` | `v1=` followed by the lowercase or uppercase hexadecimal HMAC-SHA256 digest. | Build the signed bytes as the timestamp, a full stop, the delivery ID, another full stop, and the **exact raw request body**: ```text timestamp.deliveryId.rawBody ``` This command signs and submits one JSON body. Keep the secret in your backend's secret store; the example environment variable is only a placeholder. ```bash SMILELINE_CAPTURE_URL="https://api-eu.smileline.io/capture/YOUR_TOKEN" body='{"first_name":"Amelia","email":"amelia@example.co.uk"}' timestamp="$(date +%s)" delivery_id="lead-$(uuidgen)" signature="$(printf '%s' "${timestamp}.${delivery_id}.${body}" | openssl dgst -sha256 -hmac "$SMILELINE_CAPTURE_SECRET" -hex | sed 's/^.* //')" curl -X POST "$SMILELINE_CAPTURE_URL" \ -H "Content-Type: application/json" \ -H "X-SmileLine-Delivery-Id: ${delivery_id}" \ -H "X-SmileLine-Timestamp: ${timestamp}" \ -H "X-SmileLine-Signature: v1=${signature}" \ --data-raw "$body" ``` A successful delivery answers `201` with `{"ok":true}`. The body must be a JSON object and is limited to 256 KiB. If the body contains `_sl.event_id`, it must equal `X-SmileLine-Delivery-Id`. Sign the exact bytes you send. Reformatting JSON, changing whitespace, or adding a newline after calculating the HMAC makes the signature invalid. ## The Advanced tab A custom integration's **Advanced** tab holds its credentials and endpoint lifecycle: * **Endpoint URL** — the complete regional URL, with a copy button. * **What arrives here** — switch the endpoint between **Form submissions** and **Incoming calls** (see [Incoming calls from your phone system](#incoming-calls-from-your-phone-system)). Events already received keep the lead they created. * **Enable signed delivery** switches a public endpoint to signed JSON. Copy the one-time secret immediately; unsigned browser posts stop working as soon as the mode changes. **Disable signing** revokes both signing secrets and returns to public mode. Changing the mode keeps the endpoint URL, field mapping and delivery history. * **Rotate signing secret** — save the new one-time secret and update the sender. The previous secret remains valid for 24 hours (the page shows when it expires), and SmileLine accepts either secret so you can deploy without an intake gap. **Revoke previous secret** ends the overlap early — use it once every sender is on the new secret, or when the old one may be compromised. * **Regenerate token** — mints a fresh routing token if the URL leaks. Public form URLs are normally visible in website HTML, so treat them as semi-public; a signed endpoint still uses its separate secret for authentication. After regenerating, the previous endpoint URL stops working immediately. Update every sender that posts to this form first, or submissions will be lost. ## Pause, archive and restore The same lifecycle as every website form — pausing or archiving makes the endpoint answer `404`, and restoring keeps a previously paused form paused. See [Pause, archive and restore](/guides/lead-capture/website-forms#pause-archive-and-restore). ## Good to know * Unknown, paused and archived tokens all answer the same `404`, so outsiders can't probe which tokens exist. Those requests are never recorded, so they don't reach the delivery history either. * Each endpoint is rate limited independently, so a burst on one integration can't drown out the others. * A delivery ID is unique within its form, not across the whole practice. Retrying the same ID with identical content returns the stored result and records nothing new. Reusing the same ID with different content is rejected, and that rejection *is* listed. * Custom endpoints are exempt from [domain pinning](/guides/lead-capture/website-tracking#domain-pinning) — they authenticate by token (and signature), not by origin. * If a configured default location, treatment or lead source was archived before a submission arrived, SmileLine still preserves the lead and opens an [intake-review item](/guides/lead-capture/intake-review) for staff. It never applies the archived definition or silently loses the form. * The endpoint itself is documented in the API reference under the **Capture** group at [/reference](/reference). --- # Post leads from your own code Source: https://docs-stage.smileline.io/guides/lead-capture/direct-posting Point a website form or script at a capture endpoint URL so submissions become leads automatically. By the end of this page your form will post straight into SmileLine — no backend code on your side. If the [tracking script](/guides/lead-capture/website-tracking) is installed, your existing forms are detected and captured automatically — you only need the techniques on this page for a form SmileLine cannot see, such as one rendered inside a third-party product. ## Before you start You need a **Custom endpoint** form in **Public browser form** mode and its endpoint URL. Create one under **Settings → Website** and copy the complete regional URL from the form's page — for example, `https://api-eu.smileline.io/capture/YOUR_TOKEN`. US practices receive an `api-us.smileline.io` URL. See [Custom integrations](/guides/lead-capture/custom-integrations). A public-form endpoint accepts `application/json`, `application/x-www-form-urlencoded` and `multipart/form-data`. URL query parameters are merged underneath the body, so pixel-style integrations can ride the query string alone. Files posted on a multipart form are kept: they are stored securely and recorded on the lead's capture record, so an X-ray or referral document sent with the enquiry arrives with it. This browser guide doesn't apply to forms labelled **Signed JSON**. Those accept JSON only, reject query parameters, and require a backend to calculate HMAC headers. See [Send signed JSON](/guides/lead-capture/custom-integrations#send-signed-json). ## Point your form at the endpoint A classic form post. The browser navigates to the endpoint's raw JSON response, so prefer the fetch variant to keep visitors on your page: ```html
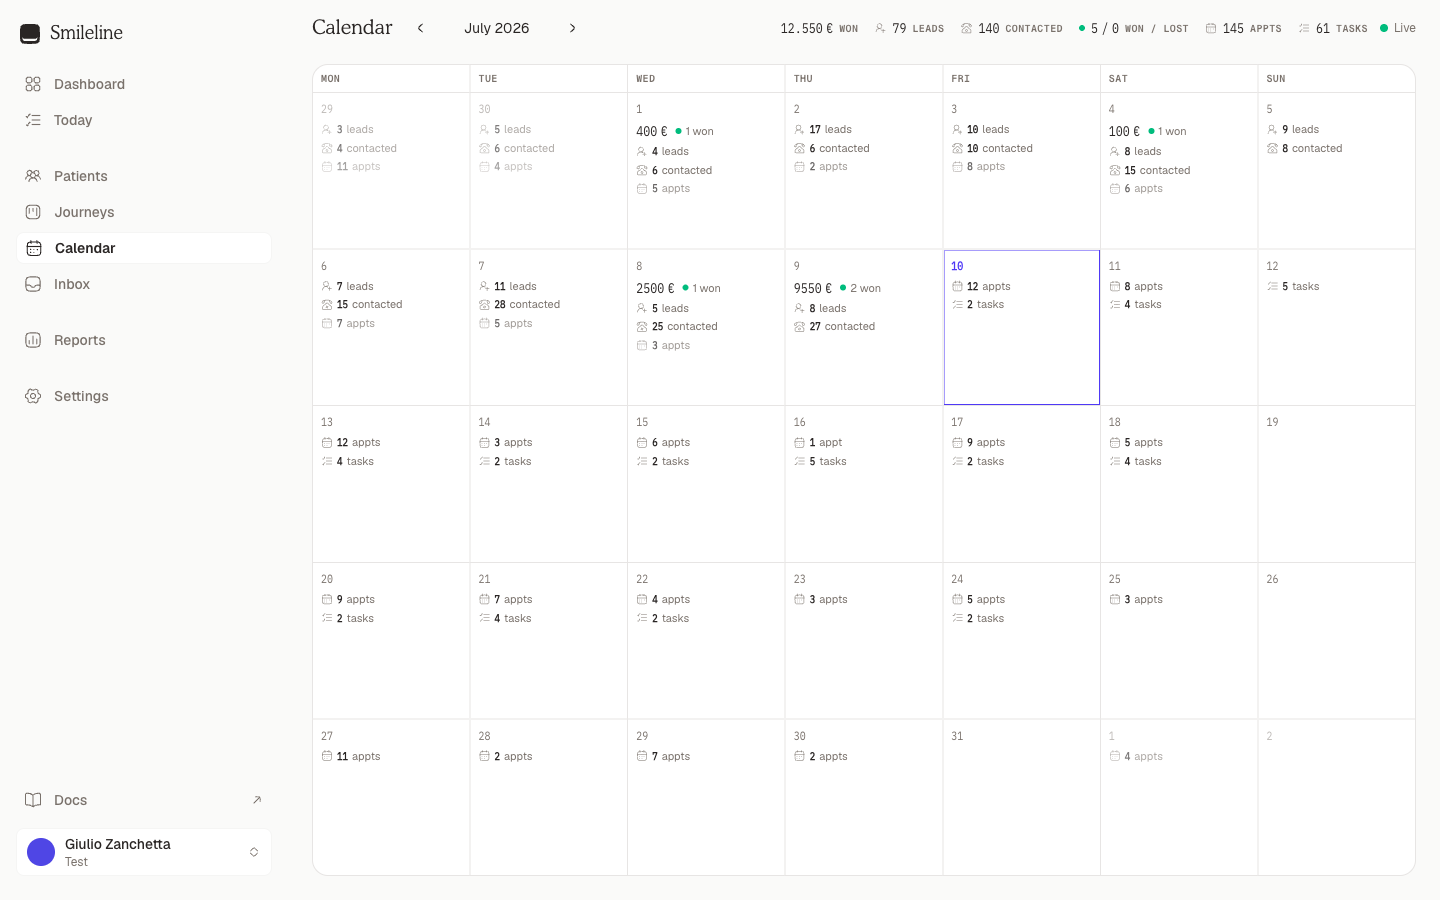
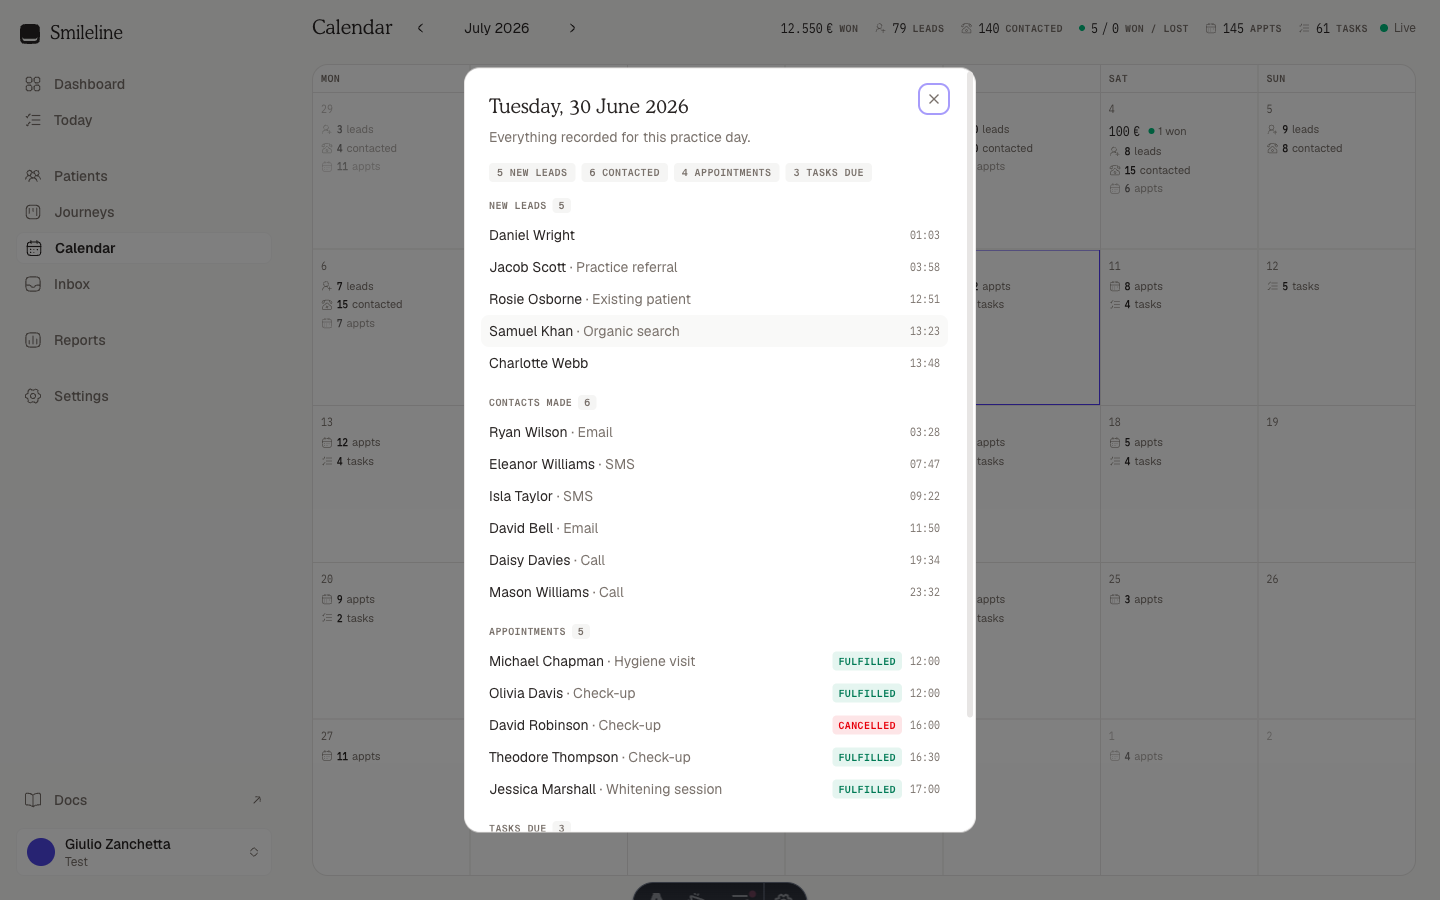
```
Submit in the background and show your own thank-you message. The endpoint allows cross-origin requests, so this works from any website: ```js const form = document.querySelector("#enquiry-form"); form.addEventListener("submit", async (event) => { event.preventDefault(); const response = await fetch( "https://api-eu.smileline.io/capture/YOUR_TOKEN", { method: "POST", headers: { "Content-Type": "application/json" }, body: JSON.stringify({ first_name: form.first_name.value, last_name: form.last_name.value, email: form.email.value, phone: form.phone.value, treatment: "invisalign", message: form.message.value, }), }, ); if (response.ok) showThankYou(); }); ```
Test from the command line before wiring up the website: ```bash curl -X POST "https://api-eu.smileline.io/capture/YOUR_TOKEN" \ -H "Content-Type: application/json" \ -d '{"first_name":"Amelia","email":"amelia@example.co.uk","phone":"+447700900123"}' ``` A successful capture answers `201` with `{"ok":true}` — and the lead appears on the Today page in real time. ## Which fields are understood Field names are set per form in its **Field mapping** — the left column below shows the defaults a new custom integration starts with. Rename them in the mapping to match whatever your form already sends. | Default field name | Fills | | ------------------ | --------------------------------------------------------------------------------------------------------------------------------------------------------- | | `first_name` | Patient first name | | `last_name` | Patient last name | | `email` | Patient email | | `phone` | Patient mobile number | | `treatment` | Matched against a treatment's slug (see **Settings → Treatments**); unknown values fall back to the form's **Default treatment** | | `location` | Matched against a location id, then a case-insensitive location name; unknown values fall back to the form's **Location** — one form can serve every site | | `message` | Saved as a note on the patient timeline | Rules worth knowing: * **Nested payloads are mappable.** A box also accepts a dot path such as `data.contact.email` or `answers.0.value`, so a webhook that nests its fields needs no middleman to flatten them. Build the mapping from a real submission — see [Field mapping](/guides/lead-capture/website-forms#field-mapping). * **An email or phone is required.** A submission with neither (after mapping) is rejected with `400` — and the rejected body is kept under the form's **Deliveries** so you can see exactly what arrived. * **Bounded extra fields are retained.** Fields that aren't mapped are kept verbatim on the lead's capture record and listed as **submitted answers** on the lead; the ones you name under [Additional fields](/guides/lead-capture/website-forms#additional-fields) land on the enquiry as **label: value**. JSON and form posts are limited to 256 KiB; a multipart submission can be up to 10 MiB and carry up to 10 files, no single file larger than 10 MiB. The merged body and query snapshot allows up to 1,000 keys, 512-byte key names, 32 KiB string values, 200 items per array and ten levels of nesting. * **Bad values degrade, they don't fail.** A phone is read in the usual shapes — `+44 (0)7700 900123`, `+44 07700 900123`, `44 7700 900123`, a `tel:` prefix, an extension or note after the number (`ext 4`, `x4`, `(mobile)`, a trailing comma). A phone that still cannot be read, or a mistyped email, never blocks the lead and is never dropped: the lead is created with the value stored on the patient exactly as typed (and on the capture record), and an unreadable phone opens a **Contact could not be read** item in [Intake review](/guides/lead-capture/intake-review) with a **Fix phone** action. * **Duplicates attach, they don't multiply.** If the email or phone matches an existing patient, the enquiry is attached to them instead of creating a duplicate. ## Attribution is automatic Do not map marketing parameters — they're extracted automatically into the lead's attribution record: `utm_*` parameters, ad-platform click ids (`gclid`, `fbclid`, `msclkid`, `ttclid` and many more), `landing_url`, `referrer` and `user_agent`. A server that posts on the visitor's behalf should forward their IP address too, as `client_ip` (also read: `visitor_ip`, `user_ip`, `remote_ip`, `ip_address`, `ip`): it replaces the posting server's own address as the lead's match key for ad-platform conversion uploads, and a value that is not an IP address is ignored. Just make sure your form forwards the page's query parameters (or posts them alongside the fields). A field of one of those names is read **wherever it sits in the body** — `{"attribution": {"utm_source": "google"}}` and `{"data": {"tracking": {"gclid": "…"}}}` both attribute like a flat post, so a webhook that nests its tracking block needs no middleman. If the same name appears twice, the shallowest wins. See [Attribution](/guides/lead-capture/attribution). Rich integrations (e.g. Zapier or a custom tracking script) can also post a structured `_sl` envelope with visitor context and an `event_id` idempotency key. Re-posting the same `event_id` with the same content never creates a duplicate — the original result is returned again. Reusing an `event_id` with **different** content is rejected with `409`, so a copy-paste mistake can't silently overwrite an earlier enquiry. If a submission was interrupted mid-processing, its `event_id` becomes usable for a retry after about 15 minutes. Mint the `event_id` once, when the visitor submits, and send the same one on every retry — the tracking script does exactly this from the visitor's browser — so a resend after a `503` or a dropped connection is a no-op rather than a second enquiry. The full envelope shape is documented in the API reference under the **Capture** group at [/reference](/reference). ## Submissions survive outages Once a submission passes the endpoint's basic checks, it cannot be lost to a problem on SmileLine's side. If an internal component is briefly unavailable when your form posts, the submission is still accepted with a `201` and stored safely, then processed automatically within a few minutes of service recovering — a multipart post is replayed exactly as sent, files included. A `201` always means the lead is safe; your website never needs to retry. The one exception is file storage itself being unavailable: a multipart post then answers `503` with `Retry-After`, its form fields are kept in the [review queue](/guides/lead-capture/review-queue#which-items-offer-retry) as `capture-file`, and **Retry** there recreates the lead without the files. Your sender still has the files, so resending the same post (same `event_id`) is the other way to complete it. ## Responses | Status | Meaning | | ------ | ------------------------------------------------------------------------------------------------------------------------------------------------------------------------------------------------------------------------------------------------ | | `201` | Captured — body is `{"ok":true}` | | `400` | Invalid body, or no valid email/phone after mapping | | `404` | Unknown, paused or archived token | | `409` | The `_sl` `event_id` was reused with different content, or the same submission is still being processed | | `413` | Request body exceeds the intake limit — 256 KiB, or 10 MiB for multipart uploads | | `429` | Rate limited — retry after the number of seconds in the `Retry-After` header | | `503` | SmileLine could not store the submission at all (a double outage), or could not store a multipart post's files — those fields are kept for review. Retry after the number of seconds in the `Retry-After` header, with the same `_sl` `event_id` | A `404` from a URL that used to work usually means the form was paused, archived, or its token was regenerated. Check **Settings → Website**. ## Post leads from a connected integration A capture endpoint URL is the whole credential, which is right for a browser and wrong for a server that has already proved who it is. An integration holding an [OAuth connection](/reference/authentication#oauth-connections) — the [Zapier app](/guides/settings/zapier), or your own — should post to `POST /leads` instead. It is the same pipeline: same patient matching, same attribution, same automation enrolment, same **Deliveries** record. ```bash curl -X POST "$SMILELINE_API_URL/leads" \ -H "Authorization: Bearer sl_oat_EXAMPLE_TOKEN" \ -H "Content-Type: application/json" \ -d '{ "firstName": "Amelia", "lastName": "Hart", "email": "amelia@example.co.uk", "phoneMobile": "+447700900123", "postalCode": "W6 0NB", "preferredContactTime": "after 6pm", "treatmentSlug": "invisalign", "message": "Looking for a consultation", "eventId": "crm-4711", "landingUrl": "https://example.co.uk/invisalign", "attribution": { "utm_source": "google", "gclid": "EXAMPLE" } }' ``` Differences from the browser endpoint: * **The token names the practice**, so send no `X-Organization-ID` and no capture token. * **`treatmentSlug` is required** and is a slug, not an id — the value from **Settings → Treatments**. There is no hook default to fall back on here, and a lead without a treatment would create a patient but no enquiry. * **`location`** accepts a location id or a case-insensitive location name. * **Field names are fixed**, in the camelCase spelling above. No field mapping applies. Beyond the ones shown you may also send `phoneOther`, `dateOfBirth`, `gender`, `addressLine1`, `addressLine2`, `city`, `province` (county or state), `postalCode`, `country`, `preferredContactMethod`, `preferredContactTime` and `note` — the same set the [Field mapping](/guides/lead-capture/website-forms#what-you-can-map) tab offers, interpreted the same way. A date, gender or contact method that cannot be read is left empty rather than rejected (a phone or email is kept as typed), and a submission matching an existing patient fills that record's blanks without overwriting it. * **Attribution rides in one flat `attribution` map** — `utm_*`, `gclid`, `fbclid` and friends, at most 40 keys — while `landingUrl`, `captureUrl` and `referrer` are top-level fields. Attribution keys may not reuse a lead field name; a map containing `marketingConsent`, `email` or any other mapped field is refused, because those carry a declared meaning that a free-form marketing parameter must not be able to set. * **An email address or a mobile number is required**, as on every capture path. * **Bodies are capped at 128 KiB.** Nothing this contract allows comes close. * **Creating a lead needs `write` scope** plus `patient:create` and `journey:create` on the acting user's role. Leads posted this way arrive through a capture form named **Zapier** that SmileLine provisions on first use, so they are inspectable under **Settings → Website** like any other source. Don't archive it — and if you switch it off there, this endpoint stops accepting leads too, with `409` and `code: "LEAD_INTAKE_DISABLED"`. Off means off for integrations as well as for website forms. Every request body is kept, whatever the outcome. A lead that succeeds, one refused for an unknown treatment, one that arrived while the database was unreachable — all of them retain the exact bytes you sent. Nothing you post is ever discarded because we could not process it. ### Idempotency `eventId` is your idempotency key: * Re-sending the same `eventId` with the same body returns the original result rather than opening a second enquiry. * Reusing an `eventId` with a **different** body is refused with `409` and `code: "IDEMPOTENCY_KEY_REUSED"`. * Omit `eventId` and SmileLine keys the request on a digest of the body itself, so a blind retry after a lost response still de-duplicates. The key it used comes back in the response as `eventId`. ### Responses | Status | Meaning | | ------ | ------------------------------------------------------------------------------------------------------------------------------------------------------------------------------------------------------------------------------ | | `201` | Created. The body carries `patientId`, `journeyId` (never null), `taskId`, `patientWasCreated`, `organizationId` and `eventId`. | | `202` | Stored durably but not processed yet; SmileLine replays it automatically. Treat it as a success and do not re-send. A treatment archived in the moment between validation and processing lands here rather than being refused. | | `400` | Invalid body, or an unknown or archived `treatmentSlug`. | | `401` | The access token is expired or no longer valid. Refresh it and retry. | | `403` | The connection lacks `write` scope, or the acting user's role cannot create patients or enquiries. Unlike `401`, retrying will not help. | | `409` | `IDEMPOTENCY_KEY_REUSED`, `LEAD_INTAKE_DISABLED`, or the same lead is still being processed. | | `413` | The body exceeded 128 KiB. | --- # Intake review Source: https://docs-stage.smileline.io/guides/lead-capture/intake-review Correct and acknowledge capture warnings without losing a lead or silently changing CRM data. Intake review keeps a lead when a capture hook refers to a location, treatment, lead source, or other optional reference that SmileLine can no longer apply safely — or when a phone number the visitor typed could not be read. You can correct the underlying record, then acknowledge the warning with an audited note. Open issues appear in two places: * **Today** shows the five newest issues to roles that can update patients. The panel refreshes every minute and hides when nothing needs review. * **Settings → Review queue** shows the ten newest issues and totals by reason to owners and managers, on the **Intake issues** tab. (Submissions that never became a lead at all live on the neighbouring [Unprocessed payloads](/guides/lead-capture/review-queue) tab.) ## Understand the reason | Reason | What happened | | ------------------------------ | ------------------------------------------------------------------------------------------------------------------------------------------------------------------------------------------------------------------------------------------------------------------------------------------------------------------------------------------------------------------------------------------------------------------------------------------------------------------------------------------------------------------------------------------------ | | **Archived location** | The submission referred to a location that had already been archived. | | **Archived treatment** | The requested or default treatment had already been archived. | | **Archived lead source** | The hook's configured lead source had already been archived. | | **Invalid optional reference** | Another optional capture reference could not be applied safely. | | **Contact could not be read** | The lead was created and the phone number is kept on the patient exactly as typed, but no rule could read it as a dialable number, so calls and messages cannot reach it yet. The row shows the value **as typed**. Click **Fix phone**, correct the number and save: the patient's mobile is updated and the warning closes in one step. A number that still cannot be read stays on the record as typed, the dialog says so, and nothing is acknowledged. The form link opens the form's **Deliveries** tab, which holds the whole submission. | SmileLine still preserves the lead and its raw capture record. It does not revive or apply an archived definition. ## Resolve an issue Open the issue's reason link to inspect the relevant setting. The row also links to its form (on the **Deliveries** tab) and patient when those records are available. Correct the patient, capture hook, or setting as needed. For example, choose an active default treatment on the hook. For **Contact could not be read**, **Fix phone** on the row does the correction and the acknowledgement together. Return to **Intake review** and click **Acknowledge**. Optionally add a resolution note, then confirm the acknowledgement. Acknowledgement never changes the patient, journey, capture hook, or vocabulary item. Make the correction first; acknowledgement only records that a staff member reviewed the warning. Acknowledging an issue twice is safe: the first acknowledgement remains the resolution. Resolution notes are limited to 1,000 characters and the actor and time are retained for audit. The queue API is documented under **Intake review issues** in the [/reference](/reference). --- # Native lead ads Source: https://docs-stage.smileline.io/guides/lead-capture/native-lead-ads Connect Meta, Google Ads, and TikTok lead forms directly to Smileline, map their fields, and review capture exceptions. Smileline can receive submissions from provider-hosted forms on **Meta and Instagram**, **Google Ads**, and **TikTok**. Native lead capture is included in Smileline Core. It creates the same patient, enquiry or treatment journey used by other capture sources; it does not create or change advertising campaigns. Open **Ads** to see provider health and recent lead activity. Use **Meta Ads**, **Google Ads**, or **TikTok Ads** to connect accounts and choose their forms — once a platform is connected its page opens on a [dashboard](/guides/marketing/ads#platform-dashboards), and the connection, accounts and forms sit behind **Settings** at the top right. Use **Lead capture** to review mappings and submissions that need attention. ## Who can use it Owners and managers can connect providers, select accounts, configure forms, import recent leads and disconnect an integration. Front desk and analysts can view connection health, mappings and submission outcomes; telesales have no lead-ads access. Resolving a lead that may attach to an existing patient also requires permission to update patients. ## Connect a provider A platform that is not connected yet opens straight on setup. Once it is connected, the page opens on the platform dashboard and everything below — the connection, its accounts and their defaults, form mappings, **Import recent leads** and the Google webhook key — is under **Settings** at the top right of the page. Granting access on the platform returns you to **Settings**, and a reconnect prompt from a notification takes you there directly. Select **Sync now** under **Settings** to refresh accounts and forms. With the **SEO & Ads add-on**, the same action also imports campaigns and reporting for your enabled ad accounts; see [Platform dashboards](/guides/marketing/ads#platform-dashboards). Newly discovered accounts remain disabled until you enable them and save their defaults. ### Meta and Instagram 1. Open **Ads → Meta Ads** and select **Connect Meta**. 2. Complete Meta's authorization and choose the Facebook Pages used by the practice. 3. Select the Pages to enable. Instagram Instant Forms are delivered through their associated Facebook Page, so they appear in the same connection. 4. Review each discovered form's mapping, then enable it. 5. Send a test lead from Meta's Lead Ads Testing Tool and confirm that the form reports **Test received**. Meta may require the practice to grant Smileline access in Lead Access Manager as well as during authorization. The connection, under **Settings**, shows an action warning if Smileline can see a Page but cannot retrieve its leads. If the connection reports **Meta authorization is missing permissions**, select **Reconnect** and approve every requested permission. The error names the missing permissions. If Meta does not offer them, contact Smileline support so the app's Login for Business configuration can be corrected. Every Page and ad account the grant can see is listed, however many there are: each sync reads a bounded number of listing pages and resumes from where it stopped, so a grant with hundreds of Pages is complete after a few syncs, and a Page or ad account is only marked as no longer discovered once a complete listing has failed to include it. Instant Forms fill in over successive syncs in the same way as Google and TikTok forms: each sync reads a bounded number of form pages across the practice's Pages and resumes from where it stopped, so a Page with many forms is complete after a few syncs (its card says so while forms are still arriving) and a form is only marked as no longer discovered once a complete walk of its Page has failed to list it. Meta issues 60-day access tokens (a short-lived token from Meta's login is traded for the 60-day one before anything is stored). Smileline renews yours automatically before it lapses, so you normally never reconnect. Meta's 90-day data-access window is different: the automatic renewal cannot extend it, so its warning — 14 days and again 3 days before access ends — asks you to re-authorise in Meta, which reconnecting does. Connecting also grants Meta's `pages_read_engagement` and `pages_manage_ads` permissions, which Meta requires for lead retrieval. The ad, ad set and campaign names on a lead are read only when the grant carries Meta's `ads_management` permission; without it leads still arrive with their form answers and attribution stays empty. ### Google Ads 1. Open **Ads → Google Ads** and select **Connect Google Ads**. 2. Enter the practice’s **Customer Google Ads ID** (10 digits, with or without hyphens). If you access it through an agency manager account, also enter the **Manager account ID (optional)**. 3. Select **Continue with Google** and sign in with an account that can access that customer. Smileline checks access before connecting. 4. Enable the chosen account and select **Save account defaults**. Review its discovered forms and their mappings. 5. For the fastest delivery, copy the generated webhook URL and key (shown beside each form under **Settings**) into each Google lead form, then use Google's **Send test data** action. Google allows one webhook integration per form. Google connection requests two permissions: Google Ads access (`adwords`) for accounts, lead forms, reporting and supported campaign and conversion-action management; and Data Manager access (`datamanager`) for [conversion feedback](/guides/marketing/conversion-feedback). The connection does not request Chrome Web Store publishing or add permissions from other Google integrations. Campaign management still requires the SEO & Ads add-on, and conversion feedback must be enabled separately. Smileline also reconciles connected Google Ads accounts through Google's API. The API path recovers missed deliveries and forms that do not use the optional webhook. A form configured with another CRM webhook can therefore remain connected to that service. Recovery and imports respect the requested time window, including when the Google Ads account uses a different time zone or the clocks change. Only the chosen customer is connected to this practice. The manager’s other customers are not imported or displayed. Older connections that did not record a customer choice ask you to reconnect; their account inventory stays hidden until you complete setup. Conversion feedback uses the chosen customer. A practice with conversion history cannot be switched to a different customer: connect that customer in its own practice. Lead forms fill in over successive syncs. Each sync reads a bounded number of form pages for the chosen customer and resumes where the last one stopped. Its card indicates when forms are still arriving. A form is only marked as no longer discovered after a complete walk of that customer’s forms. ### TikTok 1. Open **Ads → TikTok Ads** and select **Connect TikTok**. 2. Authorize the advertiser account and choose the account used by the practice. 3. Review the discovered Instant Forms and their mappings. 4. Enable account-wide capture so newly created forms are discovered automatically. 5. Create a TikTok test lead and confirm that the form reports **Test received**. Each advertiser also shows a **Direct messages** form for leads that arrive through TikTok direct-message ads. Map it like any other form. Direct-message leads arrive live only: TikTok offers no export for them, so **Import recent leads** does not cover that form. TikTok currently offers direct-message lead ads to advertisers registered in APAC and LATAM; elsewhere the feature needs a TikTok allowlist, and the form stays visible but empty until it applies. TikTok lead storage is regional. Smileline uses the European lead region for UK, EEA and Swiss advertiser accounts, and whenever a catch-up import comes back empty it checks the other regions as well, so ads targeted at another region are still reconciled. An advertiser with several hundred Instant Forms fills in over successive syncs: each sync reads a bounded number of form pages and picks up where the last one stopped, so the full inventory appears after a few daily syncs (or a few presses of **Sync**), and an advertiser whose forms are still arriving says so on its card. The first complete inventory walk marks any previously stored form it did not list as no longer discovered; after that a form is only marked once two consecutive complete walks have failed to list it. If you have moved an advertiser's leads into a Business Center form library, Smileline records the library from TikTok's form listing and from the first lead it delivers, and exports that form's leads through the library rather than the advertiser account. ## Map a form Forms and their mappings live under **Settings** on the platform page. A form cannot be enabled until at least one valid contact route—email or mobile phone—is mapped. For each form, review: * first name, last name or full name; * email and mobile phone; * the practice location and lead source; * an optional default owner; * treatment routing: a fixed treatment, an answer-to-treatment map, or **Enquiry triage**; * which submitted answers staff should see in the capture record; * any explicit marketing-consent checkbox and the channels it covers. Use **Enquiry triage** when the form does not establish a treatment. The submission creates a *Review new enquiry* task in **Today** — for a first-time contact as much as for a known patient — where staff confirm the treatment or dismiss it. Smileline keeps a submitted answer snapshot with the capture record. Provider payloads and credentials are not exposed as general patient fields. ## Marketing consent Submitting a native lead form does not by itself grant promotional consent. Smileline records an opt-in only when you deliberately map a form checkbox or disclaimer response and specify the covered channels—email, SMS or WhatsApp. The provider, form, field, submitted value, notice text and submission time are retained as evidence. An absent, blank or unmapped checkbox leaves the patient's existing preference unchanged. It never opts a patient in automatically. ## Test leads and exceptions Provider test leads validate authorization, delivery and field mapping, but they never create a patient, journey, task or automation enrollment. Neither Meta nor TikTok flags a test lead, so Smileline recognises the placeholder text their testing tools fill in ("test lead: dummy data for …"); a test lead you complete with real-looking details is treated as a real enquiry. Real submissions can wait in **Lead capture → Needs review** when: * the form is new, disabled or missing a valid mapping; * neither a valid email nor phone was supplied; * the email and phone match different existing patients; * a referenced location, lead source or treatment is no longer available; * the provider connection needs authorization again. After correcting the mapping, select **Replay**. For an identity conflict, choose the correct patient or create a new enquiry. Smileline records the resolution and processes the submission once. Two more cases are kept rather than lost. A submission that was received but could not be queued for processing — an outage at that moment — counts under **Needs replay** at the top of **Lead capture**; select **Replay** on the row. A submission for an ad account or Page the practice had not connected yet waits in the [review queue](/guides/lead-capture/review-queue#which-items-offer-retry) as `lead-ads-unknown-asset`: connect the account, then **Retry** it there and the lead lands in the practice that owns the account. ## Import recent leads New connections capture live submissions by default. Owners and managers can optionally import the last 7 days, 30 days or the provider maximum from **Import recent leads** under **Settings** on the platform page: * Meta and TikTok: up to 90 days; * Google Ads: up to 60 days. Historical imports do not create due-now follow-up tasks or start automations. A historical submission without a treatment remains in review instead of appearing as a new enquiry in **Today**. Imports and routine reconciliation are idempotent. Receiving the same provider lead through a webhook and a recovery scan does not create it twice. Raw provider and normalized lead payloads are removed 30 days after processing. A submission that remains unresolved has a hard 90-day limit; at that point its raw details are redacted and the submission closes as ignored, while its non-sensitive receipt and status history remain. ## What native lead capture does not do Native lead capture only brings submissions in — it never creates campaigns, spends budget, or captures Instagram/Facebook direct messages. The rest of the Ads workspace covers the other direction and the money: * [Conversion feedback](/guides/marketing/conversion-feedback) reports Lead, Booked and Won back to the platforms (Smileline Core). * [Ad campaigns](/guides/marketing/ads-campaigns) and the [Creative studio](/guides/marketing/creative-studio) create and manage campaigns (SEO & Ads add-on). * **Spend & results** in the Ads workspace compares platform-reported spend with CRM truth per campaign (SEO & Ads add-on); the **Ads weekly digest** report is its email counterpart. --- # Review queue Source: https://docs-stage.smileline.io/guides/lead-capture/review-queue Recover, resolve, or discard inbound submissions that could not be processed — nothing sent to SmileLine is ever silently lost. SmileLine stores every inbound payload — a website form post, a Meta lead, a chat message, a practice-management event — before it tries to process it. When something cannot be processed (a malformed body, an unrecognised event type, an internal failure), the raw payload is kept and appears in the review queue instead of disappearing. The queue lives at **Settings → Review queue**, visible to owners and managers. It has two tabs: * **Intake issues** — leads that *did* arrive but reference something that needs fixing. See [Intake review](/guides/lead-capture/intake-review). * **Unprocessed payloads** — submissions and events that never became a CRM record at all. This page covers that tab. When anything is waiting, **Today** shows an amber strip — *3 items need review* — and owners and managers get an **Incoming data needs review** notification — in the bell and, by default, by email, at most one email per item per day however often it is retried. Both open the **Unprocessed payloads** tab directly, and each tab's label shows how many items are open. See [Notifications](/guides/settings/notifications#email). ## What lands here | Label | What it means | | --------------------------- | ------------------------------------------------------------------------------------------------------------------------------------------------------------------------------------------------------------------------------------------------------------------------------------------------------------------------------------------------------------------------------------------------------------------------------------------------------------------------------------------------------------------------------------------------------------------------------------------------------------------------------------------------------------------------------------------------------------------------------------------------------------------------------------------------------ | | **Parked payload** | A submission or webhook that failed to process — a form post that wasn't valid JSON, a signed provider event SmileLine couldn't parse, or a message caught by an outage. | | **Stripe event** | A signed Stripe event of a type SmileLine doesn't handle, or one for an unmapped account. The event itself stays at Stripe. | | **PMS sync row** | A record from your practice-management system that failed to sync. | | **Phone event** | A phone-system job that exhausted its retries — including a call or AI-call event SmileLine received but could not deliver to the call after several attempts. **Inspect** shows the event as SmileLine understood it; **Retry** gives it one fresh set of attempts; **Discard** keeps the record but stops further retries. | | **Detected form** | The [tracking script](/guides/lead-capture/website-tracking) found a form on your website and somebody has submitted it while it still waits for its field mapping. The row appears only once the first submission arrives — a form nobody has used is not listed — and shows how many submissions are waiting; they are held behind this one row rather than listed separately. **Inspect** shows the page, selector, fields, when the form was first and last seen, and the count. There is no **Retry**, **Resolve** or **Discard**: click **Map fields** to open the form in **Settings → Website**, where confirming the mapping turns every waiting submission into a lead and archiving the form deletes them. See [Website forms](/guides/lead-capture/website-forms#confirm-a-detected-form). | | **Family account proposal** | An import or your PMS named a guarantor for a patient, but SmileLine could not open a shared family account on its own: the patient is an adult without a recorded sharing consent, the guarantor already belongs to another family account, or the two guarantee each other. The guarantor relationship itself is recorded; the account waits for your decision. | Items marked **retrying automatically** are still being retried in the background; you don't need to act unless they stay stuck. Items marked **held** arrived while the practice was past its [free plan's](/guides/settings/billing#free-plan-for-partner-created-practices) patient limit: they are stored intact and become leads automatically within a few minutes of the practice subscribing, so there is nothing to retry. The failure line on a row tells you how it got here: one that reads *kept for review* was never retried, because it needs a person's decision on sight; one that reads *moved to manual review* used up its automatic retries. Either way the payload is intact and the actions below apply. ## Which items offer Retry **Retry** appears only where SmileLine can honestly run the payload through processing again. These kinds of parked data gained it recently: | Source | What it is | What Retry does | | -------------------------- | ----------------------------------------------------------------------------------------------------------------------------------------------------------------------------------------------------------------------------------------------------------------------------------------------------------------------------------------------------------------------------- | ---------------------------------------------------------------------------------------------------------------- | | `capture-file` | A website form post whose file uploads could not be stored. The form fields were kept; the files were not. | Recreates the lead without the files. | | `outbound-email` | An outgoing email retained after delivery could not complete. Provider throttling normally recovers automatically. | Rechecks the delivery and retries it if it is still eligible. Completed deliveries are skipped. | | `email-raw` | An inbound email that could not be delivered into the inbox — an outage, or a mailbox connection that was paused at the time. | Delivers the email into the inbox. | | `referral-suspect` | A friend's referral submission that filled the hidden anti-bot field. Browser autofill does this on genuine referrals, so it is parked rather than dropped. | Accepts it as genuine: the referral is submitted. | | `pms-webhook-unrecognized` | A practice-management webhook carrying an event type SmileLine did not recognise. | Runs it again — useful once support for that event type has arrived. | | `lead-ads-unknown-asset` | A lead-ad submission for an ad account or Page the practice had not connected yet. | Connect the account under **Ads** first, then Retry: the lead lands in the practice that owns the account. | | `ai-voice-capture` | A caller's details the AI receptionist took but could not save during a fault. | Saves the patient and the lead. | | `whatsapp-batch` | A signed WhatsApp delivery for one of your numbers that SmileLine could not fully place: it carried a message with no sender, or failed mid-processing. Every message in the batch is kept. (A delivery naming a number no connection here owns — disconnected, or belonging to the other region — is held for Smileline support instead, and does not appear in your queue.) | Runs the batch through the inbox again. Messages already delivered are filed as duplicates and announce nothing. | | `meta-batch` | The same for a Messenger, Instagram or comments delivery on one of your Pages: an unsend that arrived before its message, or a failure mid-processing. A delivery for a Page not connected here is held for Smileline support. | Runs the batch through the inbox again. | A lead that Retry — or the background replay — creates reaches your team exactly like a live submission: it appears on **Today** and the bell rings once. A payload that had already landed earlier (a browser retry, a provider redelivery) is filed as a duplicate and announces nothing. A **Detected form** row offers none of the three: it stands for the submissions waiting behind it, and they are settled together from **Settings → Website**. Some other rows are deliberately **not** offered Retry — only **Inspect**, **Resolve** and **Discard** — because running them again would fail the same way, or the retry lives elsewhere. The row's note says which: `public-form-invalid` (the body failed validation; enter the lead by hand), `telegram-unsupported` (an update kind SmileLine doesn't handle yet), `email-loop-suspect` (mail from the connection's own address), `pms-poll-unmappable` (a practice-management record SmileLine could not map), `lead-ads-overflow` (an evidence copy — its **Replay** is in the Ads workspace), and an integration lead SmileLine deliberately refused (the sender was told to fix and resend, so a retry here would duplicate their corrected submission). ## Phone-system items Items from the phone system name their source on the row, and what the queue can honestly offer depends on it — some are replayed from here, some recover on their own, and some can only be inspected: | Source | What it is | What to do | | ------------------------------------------ | ----------------------------------------------------------------------------------------------------------------------------------------------------------------------------------------------------------------------------------------------------------------------------------------------------------------------------------------------------------------------------------------------------------------------------------------------------------------------------------- | ------------------------------------------------------------------------------------------------------------------------------------------------------------------------------------------------------------------------------------------------------------------------------------------------------------------------------------------------------------------------------------------------------------------------------------------------------------------------------------------ | | `dialer-connections-voicestack` | A VoiceStack completed-call webhook whose receipt could not be stored. | **Retry** replays it. A body SmileLine could not read is not offered a retry — VoiceStack never resends it — so **Inspect** it, then **Resolve** or **Discard**. | | `dialer-telnyx-cdr` | A [desk-phone](/guides/desk-phones) call record that failed to import. | Nothing — the daily desk-phone usage pull reads these records again. **Resolve** once it has. The same source also carries a desk-phone move back to SmileLine that used up its attempts (`raw_line_teardown_parked`): click **Move back to SmileLine** on the number again to retry it. | | `dialer-telnyx-porting` | A port-in or port-out event SmileLine could not apply. | Nothing — the porting and port-out pollers re-read the order from the carrier. **Resolve** once the port shows the right state. | | `dialer-telnyx` | A signed call or recording event SmileLine could not parse. | **Inspect**, then **Resolve** or **Discard**. There is no retry: the provider never resends it. | | `voice-failover-rescue` | A call that arrived while SmileLine could not take it — one row per call, written within the hour, titled caller → dialled number → backup so you can ring the caller back. Voice lines forward to their [backup number](/guides/settings/call-routing#backup-number); tracking numbers forward to wherever they normally forward. A Voice line with no backup configured leaves a *backup not configured* row instead: nobody could be forwarded, but the caller's number is kept. | Ring the caller back if needed, then **Resolve**. | | `dialer-operation` (a **Phone event**) | A verification submission, document upload, number release, port step or desk-phone move that was parked before the provider confirmed it. | **Retry** re-arms the same operation in place — a fresh set of attempts, the same request, so a provider object that did land is picked up rather than duplicated. Submitting the same thing again from where you started it — **Settings → Phone numbers** for verification, documents and releases (see [If an operation is parked for review](/guides/settings/voice-numbers#if-an-operation-is-parked-for-review)), **Settings → Call routing** for a desk-phone move — does the same. | | `recording-unreported` (a **Phone event**) | A voicemail the caller left whose recording the provider never reported back, after an hour of automatic checks. SmileLine keeps asking the provider hourly for up to 30 days; the practice already has a **Missed call** notification for it. | **Retry** restarts the fast five-minute checks. **Resolve** once the voicemail turns up or the caller has been reached another way. | ## Clinical storage items | Source | What it is | What to do | | -------------------- | ---------------------------------------------------------------------------------------------------------------------------------------------------------------------------------------------------------------------------------------- | -------------------------------------------------------------------------------------------------------------------------- | | `clinical-retention` | A [clinical document deletion](/guides/settings/clinical-storage#deletions) the daily scan proposed and the database refused — the summary carries the reason (a legal hold or a copy that changed under the scan). Nothing was deleted. | Nothing — tomorrow's scan re-evaluates the document on its own. **Inspect** if the reason is unexpected, then **Resolve**. | ## Act on an item Click **Inspect** to see the raw stored payload and why it failed. This is exactly what was received, so you can tell a real enquiry from junk. Click **Retry** to run it through processing again — for example after fixing a form's field mapping or reconnecting a provider. Retries are safe to repeat: an already-processed payload is recognised and skipped. Click **Resolve** when the item is handled some other way (say, the patient called and was entered manually). The payload is kept; the item leaves the queue with your note. Click **Discard** only for junk. Discarding permanently deletes the stored payload and asks why — the decision, who made it, and the note are kept forever. Inbound data is deleted in exactly two places: **Discard** here, and **Archive** on a website form that still holds submissions waiting for its mapping. Nothing in this queue expires on a timer, and no automatic process removes it. ## Handled history Switch to **Handled** to see previously resolved and discarded items, including who settled each one and the note they left. --- # Website forms Source: https://docs-stage.smileline.io/guides/lead-capture/website-forms Build forms in SmileLine, confirm the forms detected on your website, and manage every enquiry endpoint from one list. **Settings → Website** is one list of every route an enquiry takes from your website into SmileLine. By the end of this page you'll know how to build a form, confirm a detected one, and manage mapping, deliveries and lifecycle for all of them. ## Three kinds of form | Type | How it starts | What it is | | ---------------------- | --------------------------------------------------------------------- | --------------------------------------------------------------------------------------------------------------------------------------------------------------------------------------------------------------------- | | **Built in SmileLine** | You build it with the form builder | Gets a hosted page and an embed snippet; every field maps automatically. | | **Detected on site** | The [tracking script](/guides/lead-capture/website-tracking) finds it | A form that already exists on your website. Confirm its field mapping once and SmileLine captures every submission — no website changes. | | **Custom endpoint** | You create it for your own code | A raw capture endpoint your form, backend or third-party tool posts to. Set up in three steps: basics, one test submission, confirm the mapping. See [Custom integrations](/guides/lead-capture/custom-integrations). | The list shows each form's type, status and when its last lead arrived. Statuses: * **Needs mapping** — a detected form awaiting your confirmation, or a custom endpoint listening for its first submission. Submissions park safely in the meantime; nothing is lost. * **Active** — capturing submissions and opening journeys. * **Paused** — intake stopped without deleting anything. * **Archived** — retired; shown under the **Archived** view with a restore icon. ## Build a form in SmileLine Click **New form** and choose **Form builder** — "Build the form here. You get a hosted page and an embed, and every field maps automatically." Add fields — **Text**, **Email**, **Phone**, **Long text** or **Checkbox**, up to 30. Each has a label, a field key (derived from the label until you edit it), and a **Required** toggle. Field keys double as the submitted payload keys, and the capture mapping is re-derived automatically when you edit them. Leave **Default treatment** set to **None** for a general enquiry form, or choose a fallback treatment. If the submission matches a treatment, Smileline opens its journey; otherwise it uses the default. With neither, a new contact appears as an enquiry in **Today** for your team to triage. You can also choose a location and a **Lead source if the submission has no attribution**. A submission that arrives with campaign parameters picks its own source — matching your list by name or adding a new one — as described in [How the lead source is chosen](/guides/lead-capture/attribution#how-the-lead-source-is-chosen); the one you pick here is used only when it carries none. Set the submit button text and the success message, then create the form. ### Put it on your website Open the form's **Hosted page** tab: * **Share the hosted page** — a standalone page on SmileLine's domain showing your practice name, brand colour and the form: `https://widget-eu.smileline.io/form/?key=YOUR_FORM_KEY` (US practices receive a `widget-us` address). Link to it from anywhere — ads, emails, QR codes. * **Embed it** — copy the `